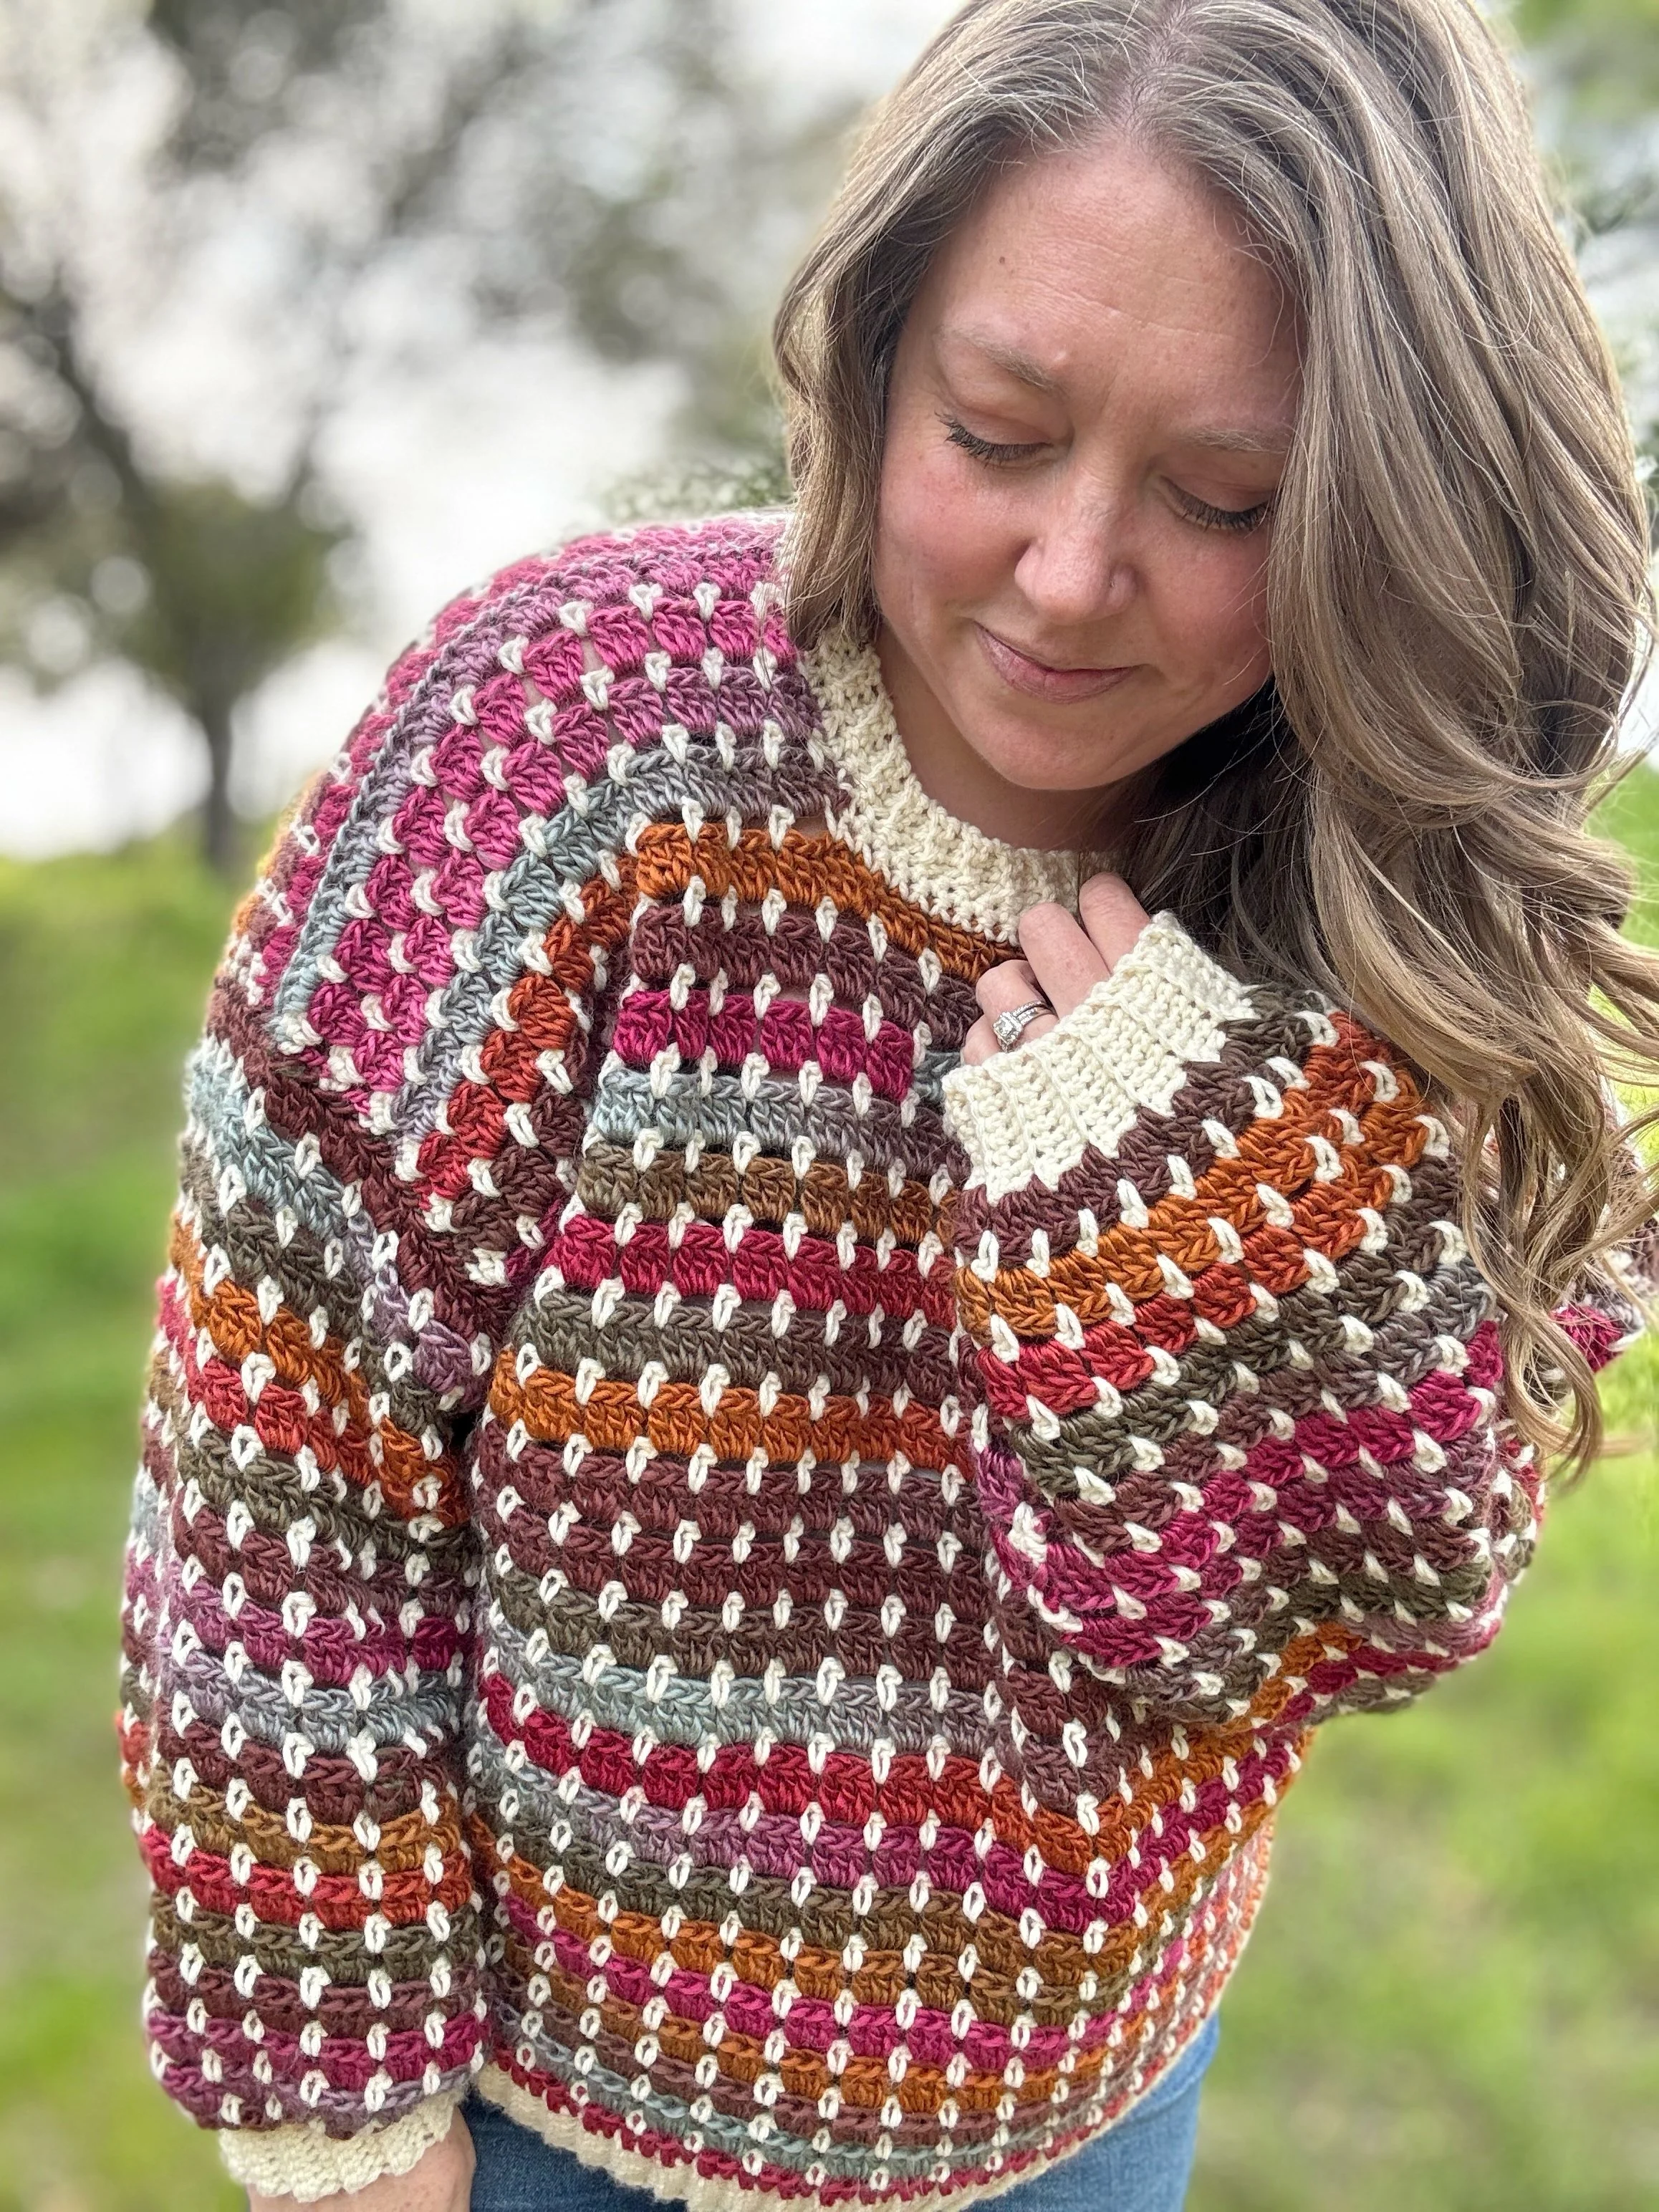
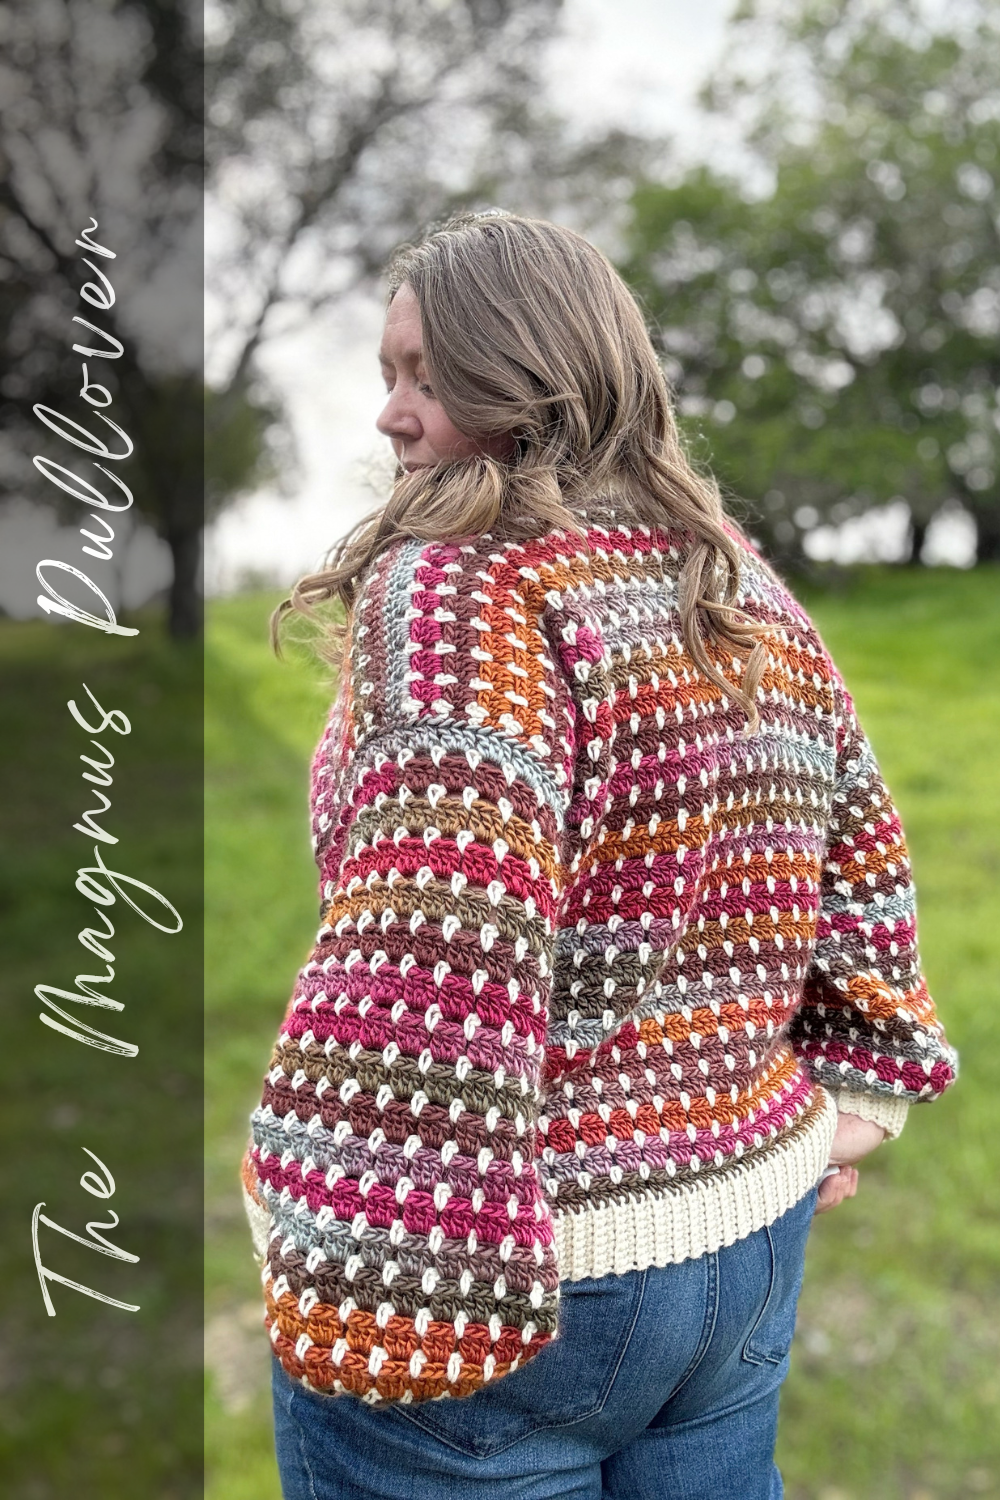
The Magnus Pullover- Free Crochet Pattern
he Magnus Pullover is a stylish and cozy crochet sweater pattern designed for comfort and versatility. With its oversized fit, simple stitches, and unique construction, this pullover is perfect for layering during chilly seasons. Whether you're a seasoned crocheter or looking for your next challenge, the Magnus Pullover will quickly become a wardrobe favorite! Scroll down for the free version, grab the PDF in my shop or treat yourself to the complete kit from Lion Brand Yarn.

After getting several requests for a pullover version of The Magnus Cardigan, I knew it was time to make it happen!
The Magnus Collection has become one of my absolute favorites, and adding a pullover just felt like the perfect way to complete it. When I started designing, I had two main goals in mind:
Minimize the ends to weave in (because let’s be real, no one loves that part).
Give the yarn a refresh with something bold and vibrant.
While Scarfie Lite has been a go-to, it might not be around forever, so I wanted to experiment with something that had a little more punch in the color department. Enter Landscapes Yarn—still a gorgeous, multicolored yarn with that soft, lofty halo like Scarfie Lite, but with even richer, more eye-catching hues. The result? A Magnus Pullover that truly makes a statement.
Of course, I couldn’t leave out the tried-and-true Wool-Ease, and the combination turned out even better than I imagined. Not gonna lie—I had a bit of a panic moment when swatching, wondering if I’d gone too bold with the colors. But I decided to trust the process, and I’m so glad I did!

Constructing Your Magnus Pullover
When designing the Magnus Pullover, I wanted to keep the construction as seamless as possible—both to match the cardigan version and to minimize those dreaded ends!
We’ll start with the bottom ribbing, working in single crochet through the back loop only. Once the ribbing is complete, we’ll join the ends to form a giant loop, then build the main body in turned rounds using the beautiful block stitch. The best part? By simply carrying the yarn up the inside join, we eliminate a ton of extra ends!
Once the body reaches your desired length (easily adjustable by adding or subtracting rows), we’ll split the pullover in half and work the front and back separately in turned rows. This is where a few more ends come in, but still far fewer than in the cardigan version. A bit of shaping at the neckline creates that perfect crew neck fit.
After seaming the shoulders and weaving in the ends, we’ll move on to the sleeves, following the same method as the cardigan—starting with the ribbing, joining the ends, and working an increase round before continuing straight up in block stitch. The sleeve length is also easily adjustable, just be sure to finish on a Row 3 repeat for a seamless transition.
The final step? Attaching the sleeves to the armholes and adding the collar directly to the neckline for a clean, polished finish.
And don’t worry—I’ve put together a full video tutorial to walk you through every step of the process so you can confidently create your Magnus Pullover!
The Magnus Pullover Crochet Pattern
Materials:
589-1173 yards (4-8 skeins) of Lion Brand Landscapes in Color A (Desert Springs)
350-588 Yards (2-3 skeins) of Lion Brand Wool-Ease in Color B (Fisherman)
Crochet hooks sizes I(5.5mm) & K(6.5mm)
Tapestry needle, scissors, tape measure
Notes:
1.The Pullover is made in 3 pieces; main body and two sleeves. The collar is worked directly onto the neckline at the end. The main body and sleeves are made starting with a ribbing and then worked in turned rounds. The top sections of the main body are split in half and worked in turned rows from the armhole to the shoulders.
2.Ch(s) at beginning of rows/rounds do(es) not count as a stitch.
Gauge:
14 sts X 10 rows = 4.5” X 4.5” in block stitch
Abbreviations:
Ch(s)- chain(s)
St(s)- stitch(es)
sk- skip
sl st- slip stitch
sc- single crochet
dc- double crochet
dc2tog- double crochet two together
sm- stitch marker
BLO- back loop only
sp- space
RS- right side
WS- wrong side
Sizing:
XS: fits bust 28-30” Color A (approx. 589 yards/ 4 skeins) Color B (approx. 350 yards/ 2 skeins)
S: fits bust 32-34” Color A (approx. 680 yards/ 5 skeins) Color B (approx. 386 yards/ 2 skeins)
M: fits bust 36-38” Color A (approx. 732 yards/ 5 skeins) Color B (approx. 415 yards/ 3 skeins)
L: fits bust 40-42” Color A (approx. 829 yards/ 6 skeins) Color B (approx. 448 yards/ 3 skeins)
XL: fits bust 44-46” Color A (approx. 872 yards/ 6 skeins) Color B (approx. 472 yards/ 3 skeins)
2X: fits bust 48-50” Color A (approx. 975 yards/ 7 skeins) Color B (approx. 508 yards/ 3 skeins)
3X: fits bust 52-54” Color A (approx. 1019 yards/ 7 skeins) Color B (approx. 532 yards/ 3 skeins)
4X: fits bust 56-58” Color A (approx. 1128 yards/ 8 skeins) Color B (approx. 566 yards/ 3 skeins)
5X: fits bust 60-62” Color A (approx. 1173 yards/ 8 skeins) Color B (approx. 588 yards/ 3 skeins)

Video Tutorial:
Pattern:
Ribbing:
With Color B and 5.5mm hook ch 9.
Row 1: sc in 2nd back bump from hook and in each back bump across, ch 1, turn. (8)
Row 2: sc in BLO of each st across, ch 1, turn. (8)
Repeat Row 2 for a total of 114(126, 134, 150, 162, 174, 186, 198, 210) rows.
Bring ends together and slip stitch through the back loops only of the beginning chs and ending row. Turn ribbing RS out. Change to Color A and ch 2.
The main body of the pullover is worked directly into the edges of the ribbing and is made in turned rounds until the armholes split. Yarn can be carried up along the seam. No need to fasten off after every round.
Main Body:
Switch to 6.5mm hook.
Round 1: working directly into the edges of the ribbing, 1dc into each row edge around, sl st to 1st st to join. (114(126, 134, 150, 162, 174, 186, 198, 210)
Change to Color B, ch 1 and turn.
Round 2: sc into sp between first and last st of previous round, *ch 2, sk 3, sc into sp right after the 3rd skipped st, repeat from * around, sl st to 1st st to join. (114(126, 134, 150, 162, 174, 186, 198, 210)
Change to Color A, ch 2 and turn.
Round 3: *3dc into ch-2 sp, repeat from * around, sl st to1st st to join. (114(126, 134, 150, 162, 174, 186, 198, 210)
Change to Color B, ch 1 and turn.
Repeat Rows 2-3 for a total of 27 rows. The pullover should measure approx. 15” from the bottom of the ribbing.
Adjust the number of rows here to shorten or lengthen your pullover. End after a Row 3 repeat.
Before changing to Color B, sl st over one more stitch after the join, then change to Color B, ch 1 and turn.
We will now be separating the front and back panels and working them in turned rows. You will need to fasten off at the end of each row.
Upper Back
Row 1: sc into join st, sc into sp between first and last st of previous round, [ch 2, sk 3, sc into sp right after the 3rd skipped st]18(20, 22, 24, 26, 28, 30, 32, 34) times, sc in next dc. (56(62, 68, 74, 80, 86, 92, 98, 104)
Change to Color A, ch 2 and turn.
Row 2: dc into 1st st, *3dc into ch-2 sp, repeat from * across until 1 st remains, dc into last st. (56(62, 68, 74, 80, 86, 92, 98, 104)
Change to ColorB,ch1 and turn.
Row 3: sc into 1st st, sc into sp between first and second st, *ch 2, sk 3, sc into sp right after the 3rd skipped st, repeat from * until 1 st remains, sc into last st.
Repeat Rows 2-3 for a total of 14(16, 16, 18, 18, 20, 20, 22, 22) rows, ending after completing a Row 2 repeat.
Upper Back Neckline Shaping:
We will now be working the last 2 rows of the upper back to create a bit of neckline shaping.
Place a stitch marker in the space after the 16th(19th, 22nd, 25th, 28th, 31st, 34th, 37th, 40th) stitch from each side to mark the neckline.
Row 1: sc into 1st st, sc into sp between first and second st, *ch 2, sk 3, sc into sp right after the 3rd skipped st, repeat from * until 1st sm, sc 24 placing a sm in the 1st and 24th st, sc in next sp, *ch 2, sk 3, sc into sp right after the 3rd skipped st, repeat from * until 1 st remains, sc in last st.
Change to Color A, ch 2 and turn.
Row 2(right shoulder): dc into 1st st, *3dc into ch-2 sp, repeat from * across until sm, dc into same st as sm.
Fasten off and reattach Color A into same st as next sm, ch 2.
Row 2(left shoulder): dc into same st as sm, *3dc into ch-2 sp, repeat from * across until 1 st remains, sc into last st.
Fasten off leaving a long tail for seaming.
Upper Front
We will now be working up the Upper Front section of our pullover. With WS facing, join Color B into the last dc of the 3dc cluster on the right hand side (see arrow below) and ch 1.

Row 1: sc in same st as join, sc in sp between first and second st, *ch 2, sk 3, sc into sp right after the 3rd skipped st, repeat from * until 1 st remains, sc into last st.
Change to Color A, ch 2 and turn.
Row 2: dc into 1st st, *3dc into ch-2 sp, repeat from * across until 1 st remains, dc into last st. (56(62, 68, 74, 80, 86, 92, 98, 104)
Change to Color B, ch 1 and turn.
Row 3: sc into 1st st, sc into sp between first and second st, *ch 2, sk 3, sc into sp right after the 3rd skipped st, repeat from * until 1 st remains, sc into last st.
Repeat Rows 2-3 for a total of 8(10, 10, 12, 12, 14, 14, 16, 16) rows, ending after completing a Row 2 repeat.


Upper Front Neckline Shaping:
Place a stitch marker in the space after the (19th(22nd, 25th, 28th, 31st, 34th, 37th, 40th, 43rd) stitch from each side to mark the neckline.
Row 1: sc into 1st st, sc into sp between first and second st, *ch 2, sk 3, sc into sp right after the 3rd skipped st, repeat from * until 3 sts before sm, ch 2, sk 3, sc 18 placing a sm in the 1st and 18th st, *ch 2, sk 3, sc into sp right after the 3rd skipped st, repeat from * until 1 st remains, sc in last st.
Fasten off and change to Color A, ch 2 and turn.
We will now be working each upper shoulder section separately. Fasten off after the end of each row.
Left Shoulder:
Row 2: dc into 1st st, *3dc into ch-2 sp, repeat from * across until sm, dc into same st as sm.
Fasten off and change to Color B, ch 1 and turn.
Row 3: sc in 1st st, sc in sp between first and second st, *ch 2, sk 3, sc into sp right after the 3rd skipped st, repeat from * until 1 st remains, sc into last st.
Fasten off and change to Color A, ch 2 and turn.
Row 4: dc into 1st st, *3dc into ch-2 sp, repeat from * across until last ch-2 sp, 2dc into ch-2 sp, dc2tog working into the ch-2 spand last st.
Fasten off and change to Color B, ch 1 and turn.
Row 5: sc in 1st st, ch 2, sk 2, sc into the sp right after 2nd skipped st, *ch 2, sk 3, sc into sp right after the 3rd skipped st, repeat from * until 1 st remains, sc into last st.
Fasten off and change to Color A, ch 2 and turn.
Row 6: dc into 1st st, *3dc into ch-2 sp, repeat from * across until last ch-2 sp, 1dc into ch-2 sp, dc2tog working into the ch-2 spand last st.
Fasten off and change to Color B, ch 1 and turn.
Row 7: sc in 1st st, ch 1, sk 1, sc into the sp right after the skipped st, *ch 2, sk 3, sc into sp right after the 3rd skipped st, repeat from * until 1 st remains, sc into last st.
Fasten off and change to Color A, ch 2 and turn.
Row 8: dc into 1st st, *3dc into ch-2 sp, repeat from * across until ch-1 sp, sk ch-1, dc into last st.
Fasten off leaving a tail for seaming.
With RS of pullover facing you, attach Color A in the same stitch as the next sm and ch 2.
Right Shoulder:
Row 2: dc into same st as join, *3dc into ch-2 sp, repeat from * across until 1 st remains, dc into last st.
Fasten off and change to Color B, ch 1 and turn.
Row 3: sc in 1st st, sc in sp between first and second st, *ch 2, sk 3, sc into sp right after the 3rd skipped st, repeat from * until 1 st remains, sc into last st.
Fasten off and change to Color A, ch 2 and turn.
Row 4: dc2tog working into 1st st and the ch-2 sp, 2dc into ch-2 sp, *3dc into ch-2 sp, repeat from * across until 1 st remains, dc into last st.
Fasten off and change to Color B, ch 1 and turn.
Row 5: sc in 1st st, sc in sp between first and second st, *ch 2, sk 3, sc into sp right after the 3rd skipped st, repeat from * until 3 sts remain, ch 2, sk 2, sc into last st.
Fasten off and change to Color A, ch 2 and turn.
Row 6: dc2tog working into 1st st and the ch-2 sp, 1dc into ch-2 sp, *3dc into ch-2 sp, repeat from * across until 1 st remains, dc into last st.
Fasten off and change to Color B, ch 1 and turn.
Row 7: sc in 1st st, sc into the sp between first and second st, *ch 2, sk 3, sc into sp right after the 3rd skipped st, repeat from * until 2 sts remain, ch 1, sk 1, sc into last st.
Fasten off and change to Color A, ch 2 and turn.
Row 8: dc into 1st st, sk ch-1 sp, *3dc into ch-2 sp, repeat from * across until 1 st remains, dc into last st.
Fasten off leaving a long tail for seaming.
Seaming Shoulders:
Lay the pullover down so the shoulder stitches on the front and back are in line together. Seam the shoulders together with Color A yarn using your preferred seaming method.
Weave in all ends along neckline and armholes.

Sleeves: Make two
Ribbing:
With Color B and 5.5mm hook ch 9.
Row 1: sc in 2nd ch from hook and in each ch across, ch 1, turn. (8)
Row 2: sc in BLO of each st across, ch 1, turn. (8)
Repeat Row 2 for a total of 23(25, 25, 25, 25, 28, 28, 28, 28) rows.
Bring ends together and slip stitch through both loops of the beginning row and current row to join. Turn cuff RS out. Change to Color A and ch 2.
The main body of the sleeve is worked directly into the edges of the ribbing and is made in turned rounds. Yarn can be carried up along the seam. No need to fasten off after every round.
Main Body:
Switch to 6.5mm hook.
XS-ONLY
Round 1(initial increase): working directly into the row edges of the ribbing, 1dc into 1st row edge, 2dc into each row edge around, sl st to 1st st to join. (45)
S(M)-ONLY
Round 1(initial increase): working directly into the row edges of the ribbing, 2dc into each row edge around, 3dc into last row edge, sl st to 1st st to join. (51)
L(XL)-ONLY
Round 1(initial increase): working directly into the row edges of the ribbing, 3dc into 1st row edge, *2dc into next 3 row edges, 3dc in next, repeat from * around, sl st to1st st to join. (57)
2X(3X)-ONLY
Round 1(initial increase): working directly into the row edges of the ribbing, 2dc into 1st row edge and next 2 row edges, *3dc in next, 2dc into each of the next 3 row edges, repeat from * around until 1 row edge remains, 3dc in last row edge, sl st to1st st to join. (63)
4X(5X)-ONLY
Round 1(initial increase): working directly into the row edges of the ribbing, 2dc into 1st row edge, *3dc in next, 2dc in next, repeat from * around, 2dc in last row edge, sl st to1st st to join. (69)
Change to Color B, ch 1 and turn.
All Sizes:
Row 2: sc into sp between first and last st of previous round, *ch 2, sk 3, sc into sp right after the 3rd skipped st, repeat from * around, sl st to1st st to join. (45(51, 51, 57, 57, 63, 63, 69, 69)
Change to Color A, ch 2 and turn.
Row 3: *3dc into ch-2 sp, repeat from * around, sl st to1st st to join. (45(51, 51, 57, 57, 63, 63, 69, 69)
Change to Color B, ch 1 and turn.
Repeat Rows 2-3 for a total of 35(35, 35, 35, 33, 33, 31, 31, 29) rows. *adjust number of rows to lengthen or shorten sleeves.
Fasten off leaving a long tail for seaming.
Attaching Sleeves:
Turn sweater WS out. Place sleeve into armhole so right sides are facing each other. Make sure the seam of the sleeve in lined up with the bottom of the armhole. Pin or clip in place then using Color A and a tapestry needle use your preferred method of seaming to join the sleeve to the armhole.
Repeat with second sleeve.
Collar:
With 5.5mm hook and Color B, attach yarn to the left shoulder seam with WS facing you and ch 1.
Setup Round: sc in same st as join and evenly around entire neckline working 2sc into each dc row and 1sc into each sc row and st, sl st to 1st st to join.
Row 1: ch 4, sc into 2nd ch from hook and each ch across, sl st into next 2 sc of neckline, turn. (3 sc, 2 sl sts)
Row 2: sk 2 sl sts, sc BLO across, ch 1, turn. (3 sc)
Row 3: sc BLO across, sl st into next 2 sc of neckline, turn. (3 sc, 2 sl sts)
Repeat Rows 2-3 around neckline. Fasten off and sew ends of ribbing together on the WS.
Weave in all ends.

I hope you love your new Magnus Pullover. If you make one, I’d love to see it. Make sure to tag me @meghanmakesdo and use #themagnuspullover on socials.
As always you can find a digital PDF of this pattern in my shop, Etsy and Ravelry, or get the complete kit from Lion Brand Yarn.
Happy Crocheting,
Meghan