The Emory Pullover-Free Crochet Pattern
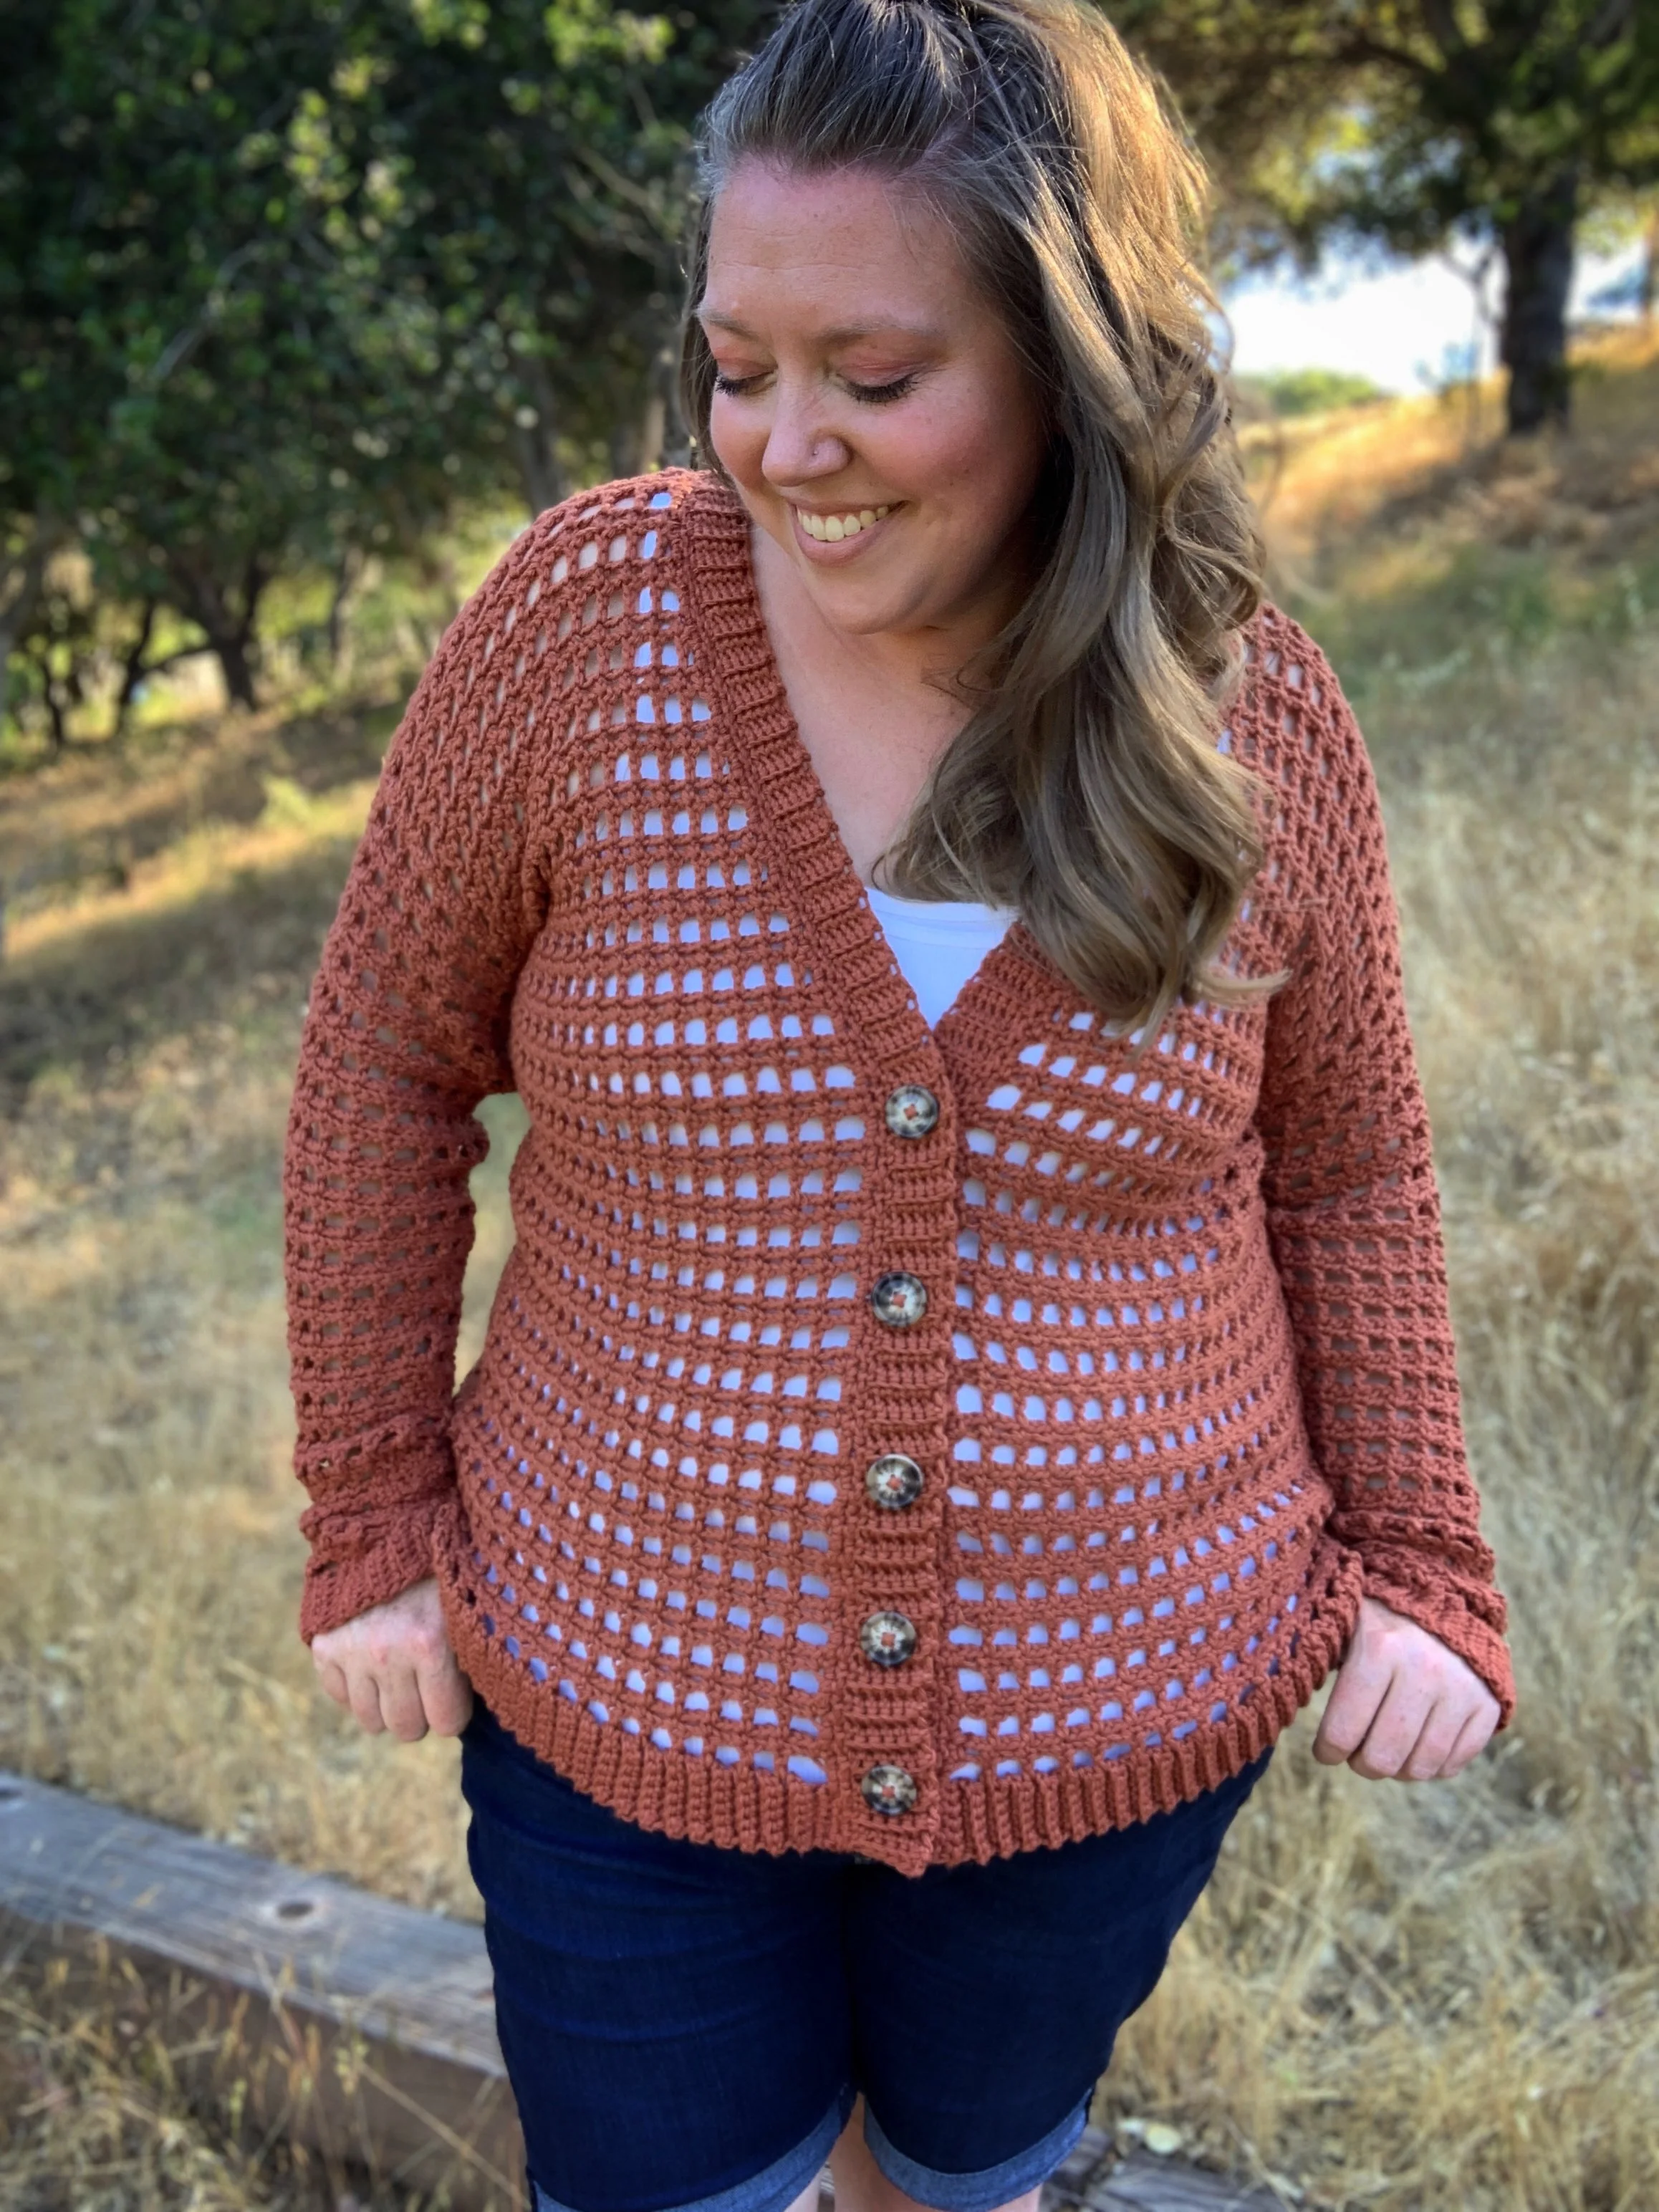
The Emory Pullover crochet pattern features a beautiful lacy stitch design with long sleeves and a rounded neckline. It's perfect for creating a romantic and stylish look that will keep you cool all Summer long. Keep scrolling for the free pattern.
The Emory Pullover is also available as a downloadable PDF in my shop or as a complete kit from Lion Brand Yarn.

The warmer weather is the perfect time for lacy openwork crochet. I’ve had this idea in my head for a while and when Lion Brand came out with a new yarn perfect for Summer wearables I knew it was the right time to bring this idea to life.
The Emory Pullover features a stunning lacy stitch called the Norman arch stitch. It’s a fun four row repeat that creates an eye-catching design. Paired with the new Botanic yarn it’s a must have this season.
I decided to work this design top down to make it easier for doing the sleeves and keep the seaming to a minimum. It made it a breeze to work up. I started with the back panel which is just one large rectangle. Then I moved on to the front panel which starts by making the right and left sides and then joining them together and working straight down. This creates a beautiful scoop neckline. After seaming the shoulders and sides together the only thing left was to add the sleeves. They were easy to work up in turned rounds which meant no seams! I ended on the arches to create a romantic look, but you could easily end on a different row to get a straight across edge if you prefer.
I love how this top came together and know I’ll be wearing it all Summer long. My niece has already asked me to make her a mini version. Let’s hope I can find the time to work it up before the Summer ends.

If you are new to lacy stitches or are more of a visual learner then you’ll definitely want to check out the video tutorial too. I’ll work through the top and show you exactly how to make the Norman arch stitch. Be sure to follow along with the written pattern as you watch.
I can’t wait to start seeing your Emory Pullovers.

The Emory Pullover Crochet Pattern
Materials:
835-1284 yards (6-9 skeins) of Lion Brand Botanic in Walnut
Tapestry needle, scissors, tape measure, stitch markers
Abbreviations:
ch(s)- chain(s)
tch- turning chain
st(s)- stitch(es)
sk- skip
sl st- slip stitch
sc- single crochet
dc- double crochet
dtr- double treble crochet
RS- right side
WS- wrong side
Notes:
1.The pullover is worked top down in two pieces. The front and back panels are then seamed at the shoulders and sides. Thesleeves are worked directly into the armholes and a collar is added at the end.
2.Pattern is written in 5 sizes; XS/S, M/L, XL/2X, 3X/4X, 5X/6X.
3.Ch 3 at beginning of rows counts as a stitch. Ch 1 at beginning of rows does not count as a stitch. Sl sts do not count as stitches.
4.The main pattern stitch is a multiple of 9+1.
5.Pattern is made with 6-12” of positive ease. Size down for a tighter fit.
6. Model is wearing a size XL/2X and is 5’9”
Gauge:
18 sts X 6 rows = 4” X 4” in main pattern stitch after blocking.
For swatch ch 20,
Then use Rows 1-6 of main body back panel to finish swatch.
Size:
XS/S: fits bust 28-34” (approx. 835 yards/ 6 skeins)
M/L: fits bust 36-42” (approx. 984 yards/ 7 skeins)
XL/2X: fits bust 44-50” (approx. 1085 yards/ 7 skeins)
3X/4X: fits bust 52-58” (approx. 1176 yards/ 8 skeins)
5X/6X: fits bust 60-66” (approx. 1284 yards/ 9 skeins)

Video Tutorial:
Pattern:
Back Panel: make one
Ch 92(110, 128, 146, 164)
Row 1(WS): sc in 2nd ch from hook, *ch 3, sk 3, sc 1, ch 7, sc 1, ch 3, sk 3, sc 1, repeat from * across, ch 1, turn. (10(12, 14, 16, 18)ch-7 arches made)
Row 2(RS): sc in 1st st, sk ch 3, *13dc in ch-7 sp, sk ch 3, sc in next sc, sk ch 3, repeat from * across ending with a sc in last st, turn. (10(12, 14, 16, 18)13dc arches made)
Row 3: ch 5 (counts as 1dtr), *dc into 6th dc of arch, ch 3, dc in 7th dc of arch, ch 3, dc in 8th dc of arch, repeat from * across all arches, dtr into last st, turn. (10(12, 14, 16, 18) dc-ch3 sets made)
Row 4: ch 3(counts as dc), sk 1st st and next dc, *dc 1 into next ch, ch 1, sk 1 ch, dc 1 into next ch, ch 3, sk 1 dc, dc 1 into next ch, ch 1, sk 1 ch, dc 1 into next ch**, sk next 2 dc, repeat from * ending at **, sk next dc, dc 1 into top of tch, turn. (10(12, 14, 16, 18)dc sets made)
Row 5: ch 6(counts as 1 dc, ch 3), *sk next ch-1 sp, work [1sc, ch 7, 1sc] into ch-3 sp, ch 3, sk next ch-1 sp**, dc 1 between next 2 dc, ch 3, repeat from * ending last repeat at **, dc 1 into top of tch, turn. (10(12, 14, 16, 18)ch-7 arches made)
Repeat Rows 2-5 for a total of 40 rows, ending on a Row 4 repeat.
Fasten off.
Front Panel: make one
The front panel is made top down starting with two separate sides (front right and front left). They are then attached during a Row 4 repeat and then worked the same as the back panel.
Front Right & Front Left Sides Ch 29(38, 47, 56, 65)
Row 1(WS): sc in 2nd ch from hook, *ch 3, sk 3, sc 1, ch 7, sc 1, ch 3, sk 3, sc 1, repeat from * across, ch 1, turn. (3(4, 5, 6, 7)ch-7 arches made)
Row 2(RS): sc in 1st st, sk ch 3, *13dc in ch-7 sp, sk ch 3, sc in next sc, sk ch 3, repeat from * across ending with a sc in last st, turn. (3(4, 5, 6,7)13dc arches made)
Row 3: ch 5 (counts as 1dtr), *dc into 6th dc of arch, ch 3, dc in 7th dc of arch, ch 3, dc in 8th dc of arch, repeat from * across all arches, dtr into last st, turn. (3(4, 5, 6, 7) dc-ch3 sets made)
Row 4: ch 3(counts as dc), sk 1st st and next dc, *dc 1 into next ch, ch 1, sk 1 ch, dc 1 into next ch, ch 3, sk 1 dc, dc 1 into next ch, ch 1, sk 1 ch, dc 1 into next ch**, sk next 2 dc, repeat from * ending at **, sk next dc, dc 1 into top of tch, turn. (3(4, 5, 6, 7)dc sets made)
Row 5: ch 6(counts as 1 dc, ch 3), *sk next ch-1 sp, work [1sc, ch 7, 1sc] into ch-3 sp, ch 3, sk next ch-1 sp**, dc 1 between next 2 dc, ch 3, repeat from * ending last repeat at **, dc 1 into top of tch, turn. (3(4, 5, 6, 7)ch-7 arches made)
Repeat Rows 2-3 once more, do not fasten off.
With a new skein of yarn repeat for the other side. You will have two identical pieces.
Joining Front Right & Front Left Sides
Once both front sides have been made lay them down RS up. Fasten off the Front Left leaving a tail for weaving in.
Then starting with the Front Right, work a Row 4 repeat across, then ch 35, then work a Row 4 repeat across the Front Left piece starting with a dc instead of a ch 3. This will join the two front pieces.
Row 5: ch 6(counts as 1 dc, ch 3), *sk next ch-1 sp, work [1sc, ch 7, 1sc] into ch-3 sp, ch 3, sk next ch-1 sp**, dc 1 between next 2 dc, ch 3, repeat from * across Front Left side ending last repeat at **, sc 1 into last dc of Front Left side, ***ch 3, sk 3, sc 1, ch7, sc 1, ch 3, sk 3, sc 1, repeat from *** across ch sts placing last sc into the first dc of Front Right side, ch 3, repeat from * to * across Front Right side ending last repeat at **, dc 1 into top of tch, turn. (10(12, 14, 16, 18)ch-7 arches made)
Repeat Rows 2-5 of the back panel instructions for a total of 40 rows(counting from the shoulder down), ending on a Row 4 repeat.
Fasten off.

Seaming:
Lay back panel and front panel on top of each other with WS facing. Seam the shoulders together using your preferred method of seaming.

Then seam each side together leaving the arm holes open. You will leave the top 11(12, 14, 16, 16) rows on the front and back panels un-seamed.
Sleeves:
With RS facing attach yarn to underarm seam of armhole, ch 1.
Sleeves are worked in turned rounds.
Round 1(RS): sc in same st as join and evenly around entire armhole making sure you have 63(72, 81, 90, 90) stitches total, sl stto 1st st to join, ch 1, turn. (63(72, 81, 90, 90)
Round 2(WS): sc in same st as join, *ch 3, sk 3, sc 1, ch 7, sc 1, ch 3, sk 3**, sc 1, repeat from * around ending at **, sl st to 1st st to join, ch 1, turn. (7(8, 9, 10, 10) ch-7 arches made)
Round 3: sc in same st as join, sk ch 3, *13dc in ch-7 sp, sk ch 3, sc in next sc, sk ch 3, repeat from * across, sl st to 1st st to join, turn. (7(8, 9, 10, 10) 13dc arches made)
Round 4: ch 5, *dc into 6th dc of arch, ch 3, dc in 7th dc of arch, ch 3, dc in 8th dc of arch, repeat from * across all arches, sl st to top of ch 5 to join, turn. (7(8, 9, 10, 10) dc-ch3 sets made)
Round 5: ch 3, sk 1 dc, *dc 1 into next ch, ch 1, sk 1 ch, dc 1 into next ch, ch 3, sk 1 dc, dc 1 into next ch, ch 1, sk 1 ch, dc 1 into next ch**, sk next 2 dc, repeat from * ending at **, sk next dc, sl st to top of ch 3 to join, turn. (7(8, 9, 10, 10) dc sets made)
Round 6: ch 6(counts as 1 dc, ch 3), *sk next ch-1 sp, work [1sc, ch 7, 1sc] into ch-3 sp, ch 3, sk next ch-1 sp**, dc 1 between next 2 dc, ch 3, repeat from * ending last repeat at **, sl st to 3rd ch st to join, turn. (7(8, 9, 10, 10) ch-7 arches made)
Repeat Rounds 3-6 for 31(31, 27, 23, 23) rounds, ending on a Round 3 repeat.
Add or subtract rounds here to get the length you prefer. You can also end on a Row 4 or 5 repeat for a straight across sleeve instead of the decorative arches.
Fasten off and weave in ends.
Repeat on second armhole.
Neckline Edge:
With RS of top facing you, attach yarn to left shoulder seam and ch 1.
Round 1: sc in same st as join and evenly around entire neck opening, sl st to 1st st to join. (approx. 112 sts)
Fasten off and weave in all remaining ends.
Block using your preferred method.

Now go enjoy wearing your new Emory Pullover! If you make one I’d love to see it. Make sure to tag me @meghanmakesdo and use #theemorypullover on social media so I can share.
As always you can find a PDF version in my shop, Etsy and Ravelry or grab the complete kit from Lion Brand Yarn.
Happy Crocheting,
Meghan