

The Jordie Cardi- Free Crochet Pattern and Crochet Along
Wrap yourself up this season in the coziest of cardigans. The Jordie features simple stitches, a hood, pockets and an oversized fit. The comfy feel of the chenille yarn will have you reaching for your Jordie every day. Find all the detail for the Jordie Crochet Along with Stitch Together Official below.

Let’s start the new year with a super cozy crochet along! I am thrilled to be bringing you my first pattern of the year…The Jordie Cardigan. So what better way to kick off a new year of patterns than with a crochet along with Stitch Together Official. We will be working up this ultra soft cardigan for the whole month of February. The simple stitches and basic construction of this design make it the perfect project for beginners to advanced crocheters.
The Crochet Along starts February 1st, so it’s the perfect time to grab the complete kit from Lion Brand Yarn. The kit comes with a full digital copy of the pattern plus all the yarn you’ll need in the color of your choice. There are so many gorgeous colors to choose from!

The Jordie Cardigan Crochet Along with Stitch Together Official
The Jordie Cardigan Crochet Along will be available right here on the blog. A new section of the pattern will be added each week. Make sure to book mark this page or follow me over on Instagram so you don’t miss a thing. I’ll also be sharing all the details and updates over in the Stitch Together Official Facebook group.
Stitch Together Official is a fantastic crochet along group over on Facebook. We have been doing crochet alongs for just over 4 years now and it’s always a good time. For the month of February we will be working on The Jordie Cardigan crochet pattern. Make sure to join the group so you can be first to know when new sections of the pattern are released, share your progress and cheer on your fellow makers.
Pssssst… would you rather knit along instead? Check out the Jessa Cardigan knitting pattern. It’s the sister design to the Jordie and is just as cozy. You can grab the kit from Lion Brand Yarn and join in on the fun!
The Schedule
Now: Get your kit from Lion Brand Yarn or pick up your supplies at your favorite retailer.
February 1st -Part 1: Make your gauge swatch (we will be using the pockets as our gauge swatch) and work up your back panel.
February 8th -Part 2: Work up both front panels.
February 15th -Part 3: Work up both sleeves.
February 22nd -Part 4: Seam it together, then add the hood, trim and pockets.
Purchase the PDF pattern for The Jordie Cardigan on Ravelry, Etsy or in my shop.
Materials:
1773-2854 yards of Lion Brand Chenille Appeal in Stucco
Crochet hook size 3.75mm
Tapestry needle
Scissors
Stitch Markers
Tape measure
Abbreviations:
ch- chain
sk- skip
st(s)- stitch(es)
sc- single crochet
yo- yarn over
RS- right side
WS- wrong side
Esc- extended single crochet
Esc2tog- extended single crochet two together (insert hook into 1st st, yo, draw up a loop and ch 1, insert hook into 2nd st, yo, draw up a loop and ch 1, yo and draw through all 3 loops on hook)
Gauge:
16.5 sts and 16 rows in esc = 5” square
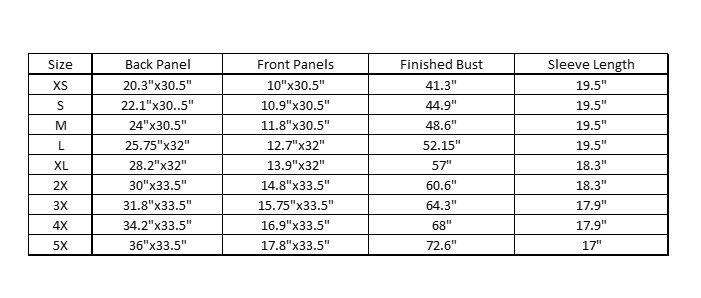
Size:
XS: fits bust 28-30” (approx. 1773 yards) 7 skeins
S: fits bust 32-34” (approx. 1917 yards) 7 skeins
M: fits bust 36-38” (approx. 2005 yards) 8 skeins
L: fits bust 40-42” (approx. 2181 yards) 8 skeins
XL: fits bust 44-46” (approx. 2247 yards) 8 skeins
2X: fits bust 48-50” (approx. 2478 yards) 9 skeins
3X: fits bust 52-54” (approx. 2544 yards) 9 skeins
4X: fits bust 56-58” (approx. 2750 yards) 10 skeins
5X: fits bust 60-62” (approx. 2854 yards) 11 skeins
Notes:
1. Pattern is worked in five pieces (back panel, two front panels and two sleeves) worked bottom up and then seamed together. The front and back panels are seamed at the shoulders and then sleeves are sewn in place. Underarms and sides are then seamed to complete the cardigan. The hood is made directly onto the neckline and the pockets are sewn on separately.
2. Pattern is made with 11-12.5” of positive ease. Size down for a tighter fit.
3. Model is wearing a size 2X and is 5’9”
4.Chains at beginning of rows do not count as a stitch.

Video Tutorials:
Check out these helpful videos before you get started.
Part 1-February 1st
Welcome to week one of The Jordie Cardi Crochet Along! It’s time to make your gauge swatch and start on the back panel.
To make your gauge swatch, follow the directions for the pockets. Then measure the amount of stitches listed under gauge and make sure yours matches. If it doesn’t, go up or down a hook size until you get the correct gauge.
Pockets: make two
Ch 22,
Row 1: esc in 2nd ch from hook and in each ch across, ch 1, turn. (21)
Rows 2-22: esc in each st across, ch 1, turn. (21)
Row 23: sl st in each st across. (21)
Fasten off leaving a long tail for sewing to the cardigan.
Back Panel: make one
Ch 68(74, 80, 86, 94, 100, 106, 114, 120)
Row 1(RS): esc in 2nd ch from hook and in each ch across, ch 1, turn. (67(73, 79, 85, 93, 99, 105, 113, 119)
Row 2: (WS): esc in each st across, ch 1, turn. (67(73, 79, 85, 93, 99, 105, 113, 119)
Repeat Row 2 for a total of 100(100, 100, 105, 105, 110, 110, 110, 110) rows.
I suggest using a row counter to help keep track as you go since the yarn makes rows and stitches hard to see.
Fasten off leaving a long tail for seaming.
Part 2-February 8th
Yay for week two of The Jordie Cardi CAL! This week we will be working up both front panels. They are made just like the back panel, only half the size. I recommend using a row counter to help keep track as you go.
Front Panels: make two
Ch 34(37, 40, 43, 47, 50, 53, 57, 60)
Row 1(RS): esc in 2nd ch from hook and in each ch across, ch 1, turn. (33(36, 39, 42, 46, 49, 52, 56, 59)
Row 2: (WS): esc in each st across, ch 1, turn. (33(36, 39, 42, 46, 49, 52, 56, 59)
Repeat Row 2 for a total of 100(100, 100, 105, 105, 110, 110, 110, 110) rows.
Fasten off leaving a long tail for seaming.
Part 3- February 15th
Can you believe we are already on week 3 of the Jordie Cardi Crochet Along?! This week we are working up our sleeves! The sleeves are worked bottom up with increases every few rows. I’ve included a sleeve chart to help keep track of rows and increases as you go. The sleeves can be easily adjusted to get the perfect length. Simply add or subtract rows at the top after all increases have been made.
Sleeves: make two
XS-ONLY
Ch 39
Row 1(RS): esc in 2nd ch from hook and in each ch across, ch 1, turn. (38)
Rows 2-6: esc in each st across, ch 1, turn. (38)
Row 7: 2esc in 1st st, esc across until 1 st remains, 2esc in last st, ch 1, turn. (40)
Rows 8-12: esc in each st across, ch 1, turn. (40)
Rows 13-60: repeat Rows 7-12 (56)
Row 61: repeat Row 7. (58)
Rows 62-64: esc in each st across, ch 1, turn. (58)
Do not ch 1 at the end of Row 64.
Add or subtract rows here to get the length you prefer.
Fasten off.
S(M, L)-ONLY
Ch 39(39, 41)
Row 1(RS): esc in 2nd ch from hook and in each ch across, ch 1, turn. (38(38, 40)
Rows 2-5: esc in each st across, ch 1, turn. (38(38, 40)
Row 6: 2esc in 1st st, esc across until 1 st remains, 2esc in last st, ch 1, turn. (40(40, 42)
Rows 7-10: esc in each st across, ch 1, turn. (40(40, 42)
Rows 11-55: repeat Rows 6-10 (58(58, 60)
Row 56: repeat Row 6. (60(60, 62)
S(M)-ONLY
Rows 57-64: esc in each st across, ch 1, turn. (60(60)
L-ONLY
Rows 57-60: esc in each st across, ch 1, turn. (62)
Row 61: repeat Row 6. (64)
Rows 62-64: esc in each st across, ch 1, turn. (62)
Do not ch 1 at the end of Row 64.
Add or subtract rows here to get the length you prefer.
Fasten off.
XL(2X, 3X)-ONLY
Ch 41(44, 44)
Row 1(RS): esc in 2nd ch from hook and in each ch across, ch 1, turn. (40(43, 43)
Rows 2-4: esc in each st across, ch 1, turn. (40(43, 43)
Row 5: 2esc in 1st st, esc across until 1 st remains, 2esc in last st, ch 1, turn. (42(45, 45)
Rows 6-8: esc in each st across, ch 1, turn. (42(45, 45)
Rows 9-48: repeat Rows 5-8 (62(65, 65)
Row 49: repeat Row 5. (64(67, 67)
XL(2X)-ONLY
Rows 50-60: esc in each st across, ch 1, turn. (64(67)
3X-ONLY
Rows 50-58: esc in each st across, ch 1, turn. (67)
Do not ch 1 at the end of Row 60(60, 58).
Add or subtract rows here to get the length you prefer.
Fasten off.
4X(5X)-ONLY
Ch 44(44)
Row 1(RS): esc in 2nd ch from hook and in each ch across, ch 1, turn. (43(43)
Rows 2-3: esc in each st across, ch 1, turn. (43(43)
Row 4: 2esc in 1st st, esc across until 1 st remains, 2esc in last st, ch 1, turn. (45(45)
Rows 5-6: esc in each st across, ch 1, turn. (45(45)
Rows 7-45: repeat Rows 4-6 (71(71)
Row 46: repeat Row 4. (73(73)
4X-ONLY
Rows 47-58: esc in each st across, ch 1, turn. (73)
5X-ONLY
Rows 47-56: esc in each st across, ch 1, turn.
Do not ch 1 at the end of Row 58(56).
Add or subtract rows here to get the length you prefer.
Fasten off.

Don’t forget to add your Jordie as a project on Ravelry for a chance to win a $10 gift card to Starbuck or Dunkin.
Part 4- February 22nd
We made it to the final week of The Jordie CAL! Woo Hoo! This week we will be seaming our cardigan together, then adding the hood directly onto the neckline and attaching our pockets. Remember to take your time with the seaming and if you start to get “clumps” of yarn on the inner thread you can always slip stitch your seams using a crochet hook instead. I can not wait to see all your finished Jordie.
Seaming:
Lay Back Panel and two Front Panels together at the shoulders with RS facing each other. Using your preferred seaming method attach front panels to back panel, leaving 25 sts unworked in the center of the back panel and 12 sts unworked on both front panels.

Attach the sleeves to the sides of the cardigan, using your preferred seaming method, making sure to align the center of the sleeve with the shoulder seam. Make sure the sleeves are attached evenly from the center shoulder seam, down the sides. Using stitch markers to hold the sleeve in place is recommended.
Fold cardigan so that the back and front panels are on top of each other. Then seam the sleeves from the underarm to the cuff. Seam the sides from the underarm down to the bottom.

Hood:
We will now be adding the hood directly on to the neckline working in turned rows. With RS facing you, attach yarn to the end of the right front panel.
Ch 1,
Row 1: esc in 12 sts of right front panel, 2 joining stitches on front and back panel, 25 sts across back panel, 2 joining stitches on front and back panel and 12 sts of left front panel, ch 1, turn. (53)
Row 2: 2esc in 1st st, esc 10, 2esc in next 3 sts, esc 10, 2esc in next st, esc 2, 2esc in next st, esc 10, 2esc in next 3 sts, esc 10, 2esc in last st, ch 1, turn. (62)
Row 3: esc in each st across, ch 1, turn. (62)
Row 4: esc 28, 2esc in next st, esc 4, 2esc in next st, esc 28, ch 1, turn. (64)
Row 5: esc in each st across, ch 1, turn. (64)
Row 6: esc 28, 2esc in next st, esc 6, 2esc in next st, esc 28, ch 1, turn. (66)
Row 7: esc in each st across, ch 1, turn. (66)
Row 8: esc 28, 2esc in next st, esc 8, 2esc in next st, esc 28, ch 1, turn. (68)
Row 9: esc in each st across, ch 1, turn. (68)
Row 10: esc 28, 2esc in next st, esc 10, 2esc in next st, esc 28, ch 1, turn. (70)
Row 11: esc in each st across, ch 1, turn. (70)
Row 12: esc 28, 2esc in next st, esc 12, 2esc in next st, esc 28, ch 1, turn. (72)
Row 13: esc in each st across, ch 1, turn. (72)
Row 14: esc 28, 2esc in next st, esc 14, 2esc in next st, esc 28, ch 1, turn. (74)
Row 15: esc in each st across, ch 1, turn. (74)
Row 16: esc 28, 2esc in next st, esc 16, 2esc in next st, esc 28, ch 1, turn. (76)
Row 17: esc in each st across, ch 1, tun. (76)
Row 18: esc 28, 2esc in next st, esc 18, 2esc in next st, esc 28, ch 1, turn. (78)
Row 19: esc in each st across, ch 1, turn. (78)
Row 20: esc 28, 2esc in next st, esc 20, 2esc in next st, esc 28, ch 1, turn. (80)
Row 21: esc in each st across, ch 1, turn. (80)
Row 22: esc 28, 2esc in next st, esc 22, 2esc in next st, esc 28, ch 1, turn. (82)
Row 23: esc in each st across, ch 1, turn. (82)
Row 24: esc 28, 2esc in next st, esc 24, 2esc in next st, esc 28, ch 1, turn. (84)
Row 25-36: esc in each st across, ch 1, tun. (84)
We will now be splitting the hood and working two sides separately. This will give the back of the hood a more curved edge.
Right Side:
Row 37: esc 40, esc2tog, ch 1, turn. (41)
Row 38: esc2tog, esc across, ch 1, turn. (40)
Row 39: esc 38, esc2tog, ch 1, turn. (39)
Row 40: sk 1st st, sc 3, esc across, ch 1, turn. (38)
Row 41: esc 32, sc 5, sl st in last st, ch 1, turn. (37)
Row 42: sk sl st, sc 7, esc across, ch 1, turn. (36)
Fasten off leaving a long tail for seaming.
With RS facing you attach yarn to left side of hood in the stitch next to the right side of hood.
Left Side:
Row 37: ch 1, esc2tog, esc across, ch 1, turn. (41)
Row 38: esc 39, esc2tog, ch 1, turn. (40)
Row 39: esc2tog, esc across, ch 1, turn. (39)
Row 40: esc 35, sc 2, sc2tog, ch 1, turn. (38)
Row 41: sk 1st st, sc 5, esc across, ch 1, turn. (37)
Row 42: esc 29, sc 6, sc2tog, ch 1, turn. (36)
Fasten off.
Using the long tail from the right side of hood, seam the top of the hood closed using your preferred method of seaming.
Trim:
Starting at the bottom right side of the cardigan (left side when facing you) with RS facing out, attach yarn and ch 1.
Row 1: esc in each end of row along the edge of the front right panel, around the hood and back down the front left panel, ch 1, turn. (284(284, 284, 294, 294, 304, 304, 304, 304)
Row 2: esc in each st across. (284(284, 284, 294, 294, 304, 304, 304, 304)
Fasten off.
Attach Pockets:
Position pockets on front panels approx. 6 inches from the bottom and 3.5 inches from center edge. Feel free to adjust to the position you feel works best. Using a tapestry needle sew the pockets to the front panels along each side and bottom.
Weave in all remaining ends and enjoy!

Thank you so much for joining in on the Jordie Crochet Along. It was so much fun! Don’t forget to share your finished piece in the Facebook group and on social media. Tag me @meghanmakesdo and use #thejordiecardigan so I can see and share.
Happy Crocheting,
Meghan

