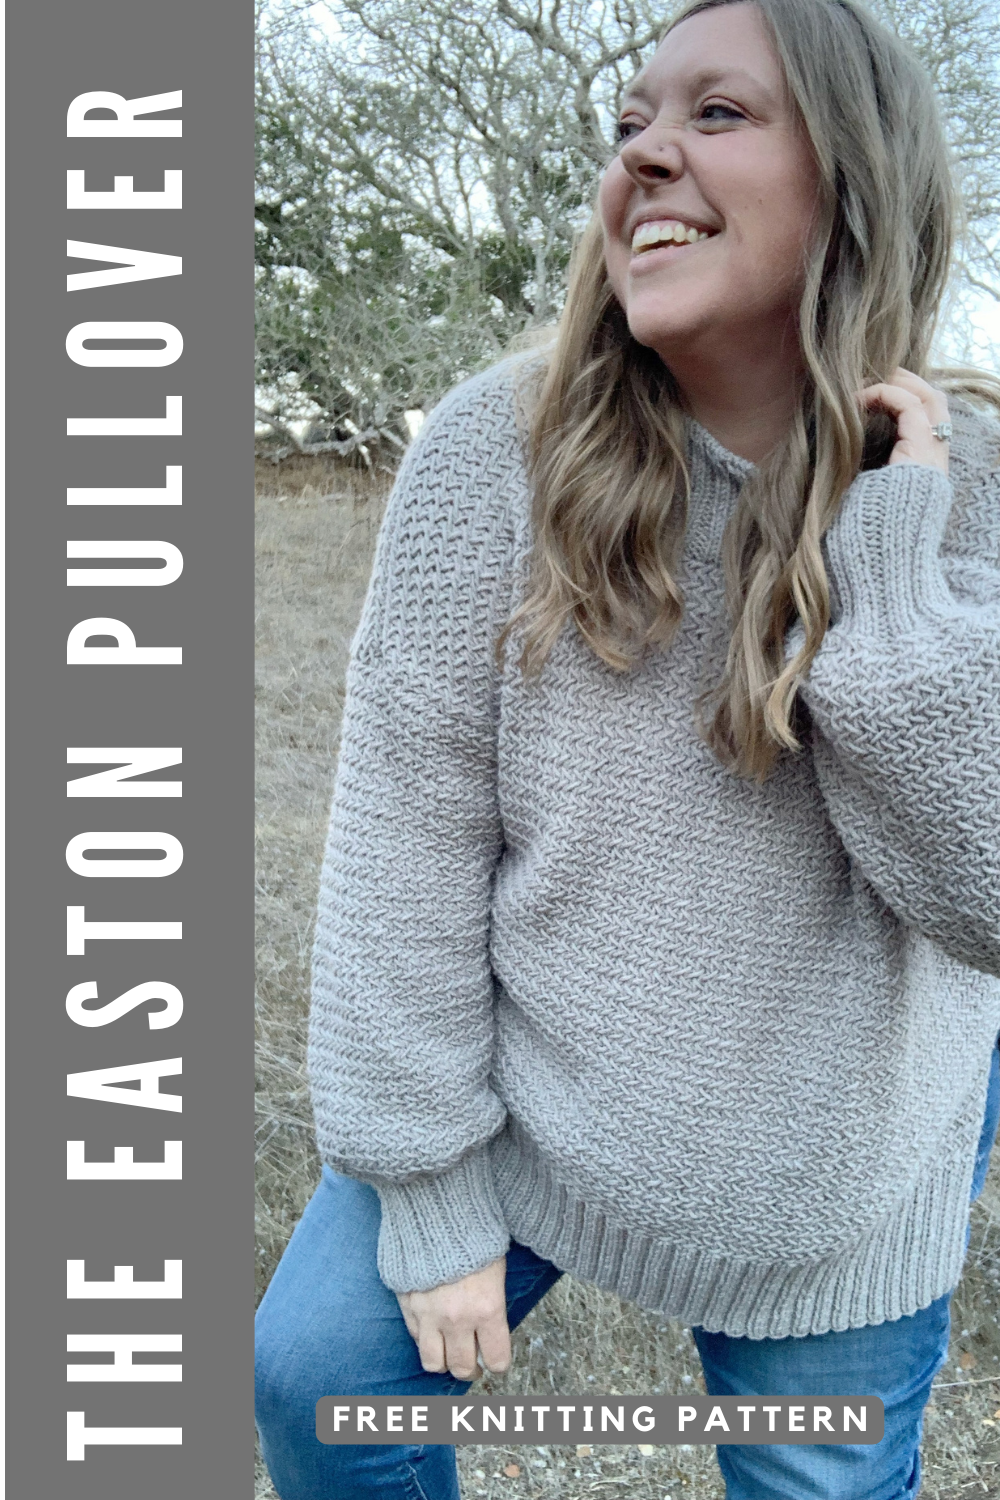
The Easton Pullover-Free Knitting Pattern
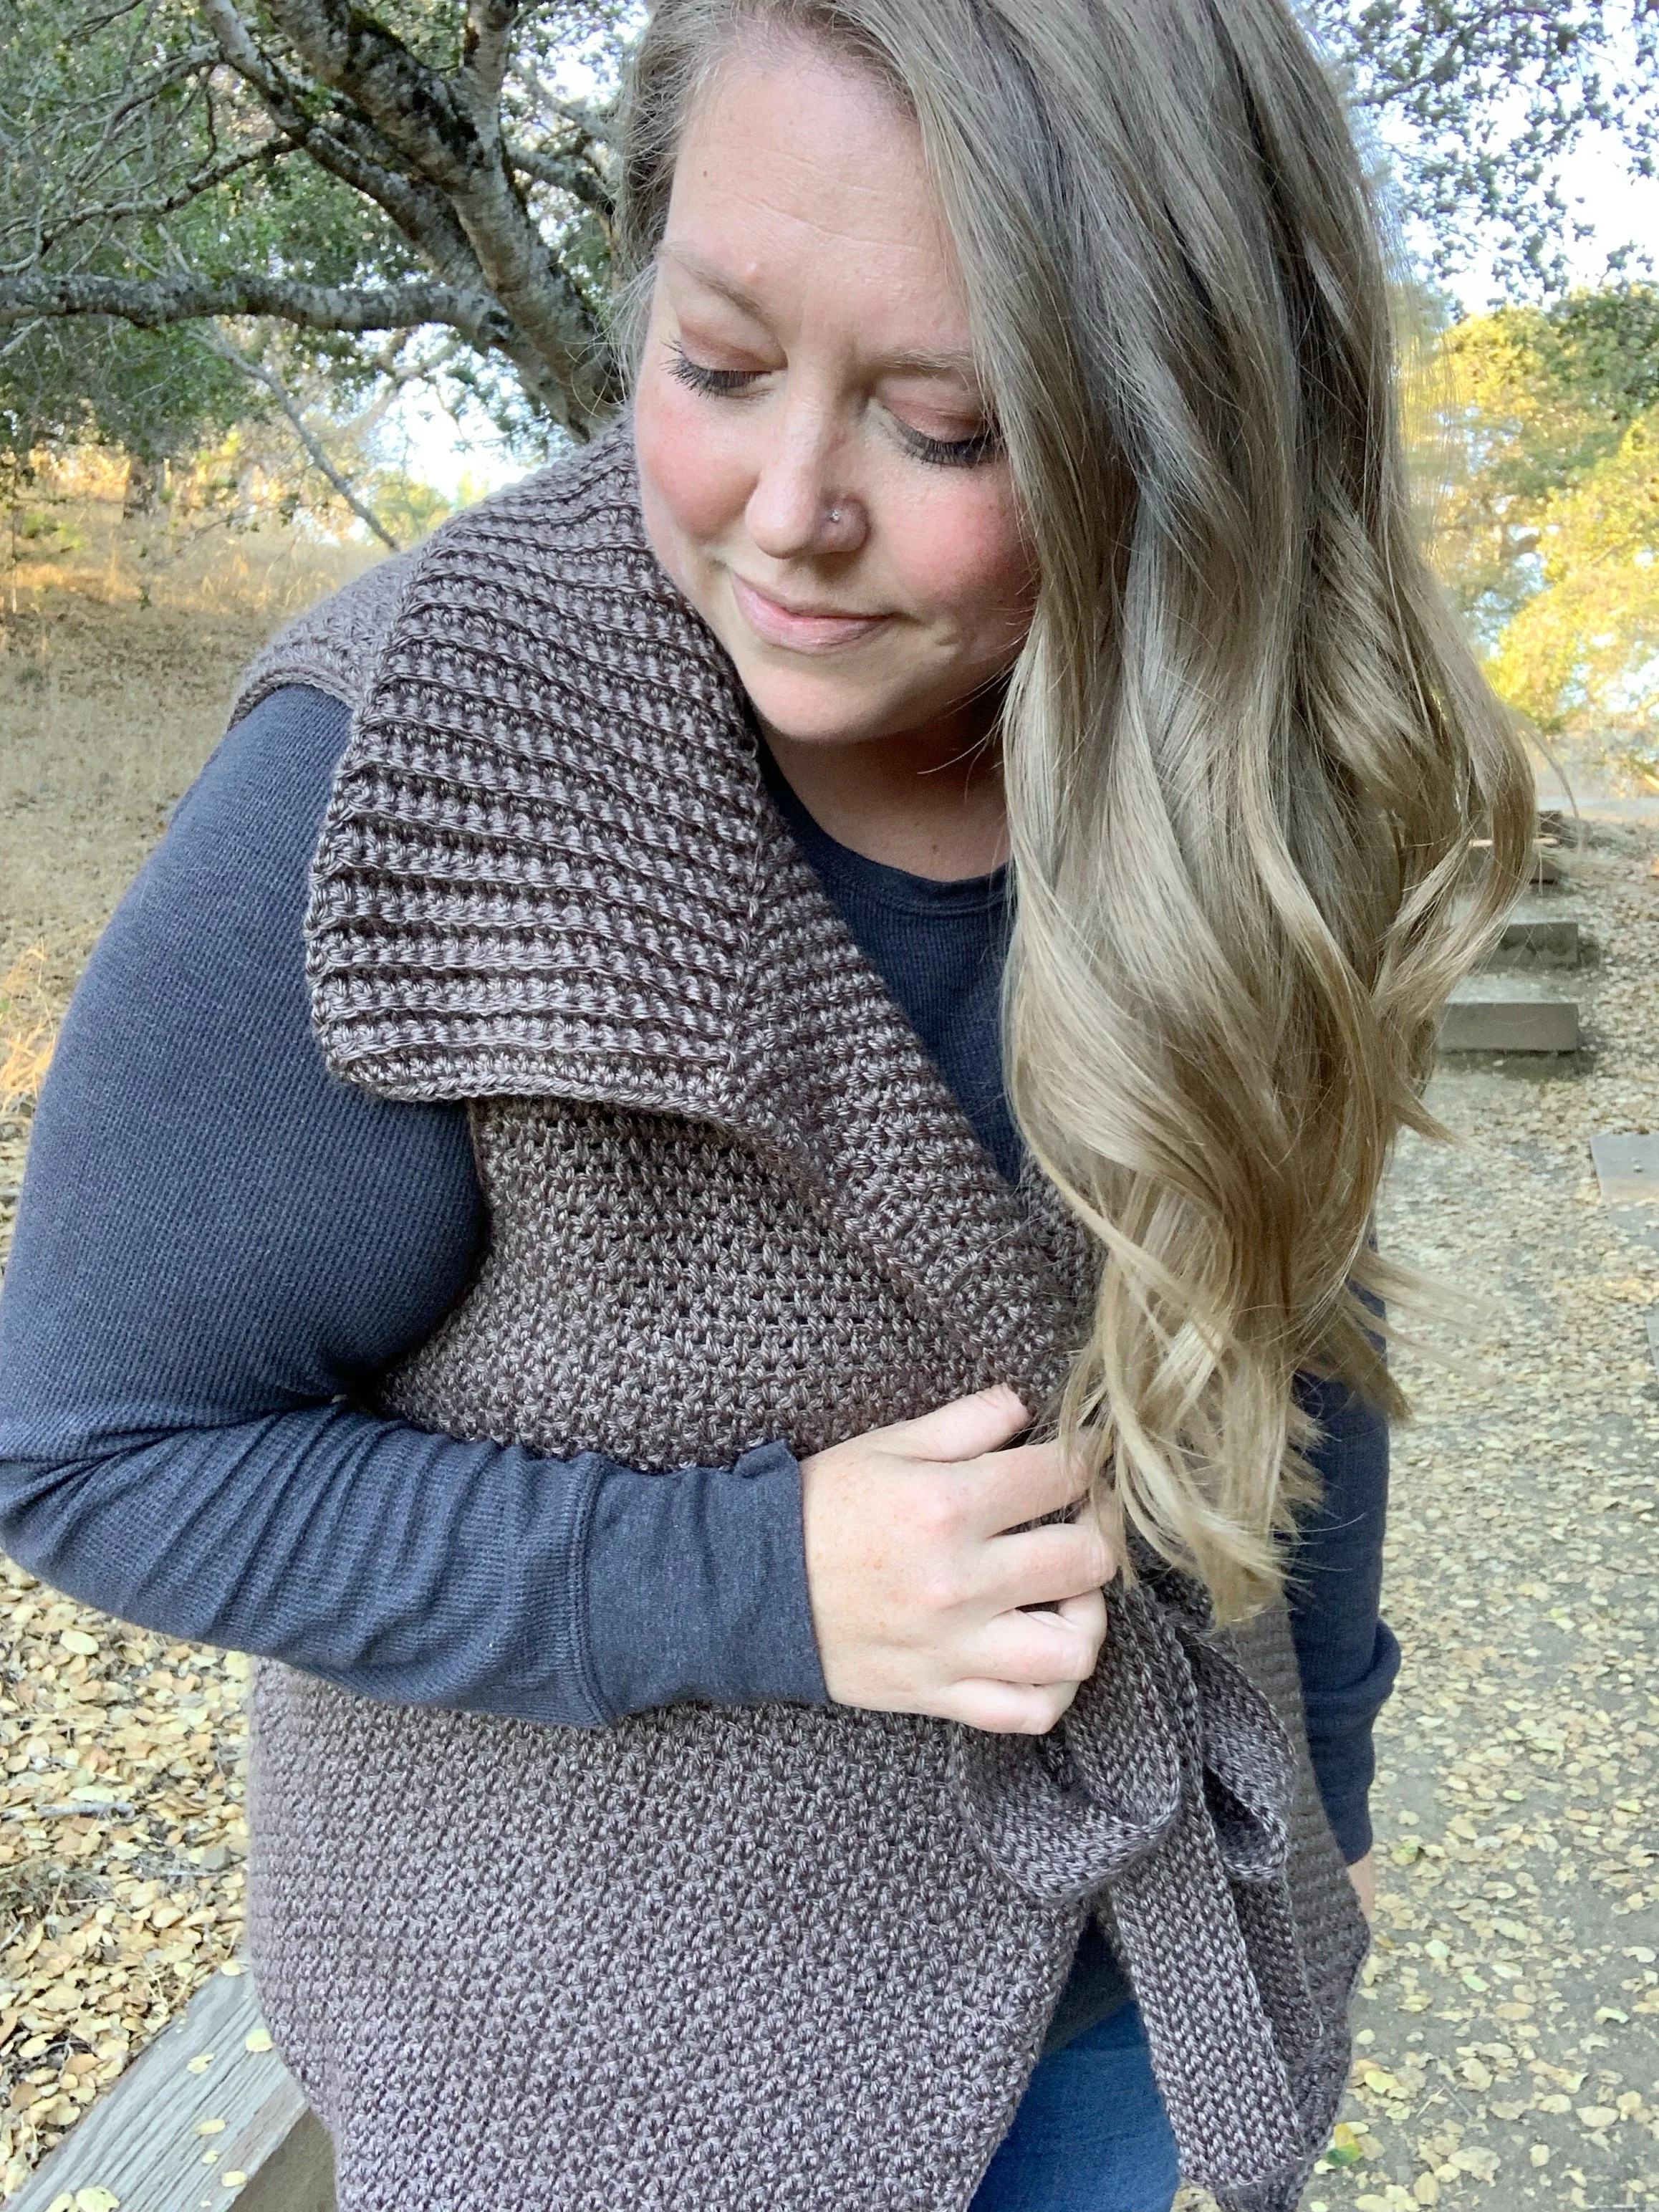
Get ready for the coziest sweater ever! The Easton features an oversized fit with a longer back, side slits and balloon sleeves. The textured stitches create a airy fabric with plenty of drape, perfect for winter. Find the free pattern below or grab a digital PDF in my shop.
I couldn’t wait to get my hands on the new Color Theory yarn from Lion Brand. The colors are gorgeous and they had the perfect grey for a sweater I knew I had to create. The yarn is so soft and squishy and gives amazing stitch definition.
When I first had the idea for a herringbone stitch pullover, I knew that knitting would be the best route as the fabric tends to have better drape. I experimented with the standard herringbone stitch, but wasn’t happy with the thickness of the fabric or the ease of the stitch. So in my search for an alternate stitch I stumbled upon the alternate herringbone and as soon as I worked up a swatch I knew it would be perfect. This modified herringbone is slightly easier to manage than the original and creates a more airy fabric while still providing warmth for the cold winter months.
I created the Easton with plenty of positive ease, slit sides and a longer back panel. Perfect for pairing with jeans or leggings and your favorite pair of boots. The balloon sleeves and mock turtle neck finish off the Easton to give you the ultimate cozy winter sweater.
I’ve also made a complete video tutorial that goes over how to make each panel, seam it together and add the collar. I finished off the collar with a tubular bind off, but feel free to do a regular bind off to get a tighter fit. I’m so pleased with how this pullover turned out and I can’t wait to start seeing yours!

The Easton Pullover Knitting Pattern
Materials:
1270-1996 yards of Lion Brand Color Theory in Satelite or similar weight 4 yarn
US size 7(4.5mm) 28” circular knitting needles
US size 11(8mm) 28” circular knitting needles
Tapestry needle
Scissors
Abbreviations:
CO- cast on
st(s)- stitch(es)
sk- skip
RS- right side
sl- slip
WS- wrong side
K- knit
P- purl
P2tog- purl 2 together
BO- bind off
Kfb- knit front and back
Ktbl- knit through the back loop
Gauge:
20.5 sts and 13 rows in pattern stitch = 4” square after blocking.
Repeat Rows 24-25 of back panel for pattern stitch.
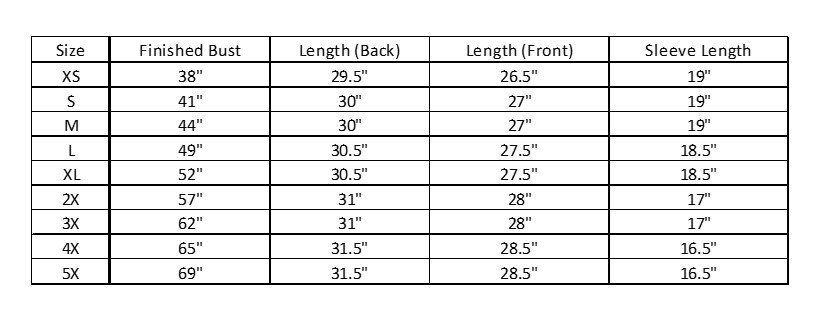
Size:
XS: fits bust 28-30” (approx. 1270 yards) 6 skeins
S: fits bust 32-34” (approx. 1339 yards) 6 skeins
M: fits bust 36-38” (approx. 1401 yards) 6 skeins
L: fits bust 40-42” (approx. 1491 yards) 7 skeins
XL: fits bust 44-46” (approx. 1602 yards) 7 skeins
2X: fits bust 48-50” (approx. 1690 yards) 7 skeins
3X: fits bust 52-54” (approx. 1786 yards) 8 skeins
4X: fits bust 56-58” (approx. 1899 yards) 8 skeins
5X: fits bust 60-62” (approx. 1996 yards) 9 skeins
Notes:
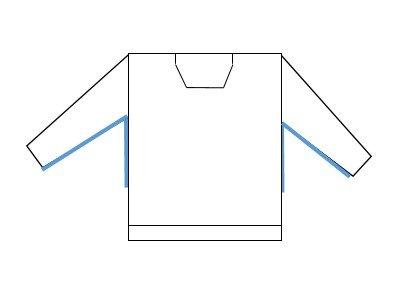
1. Pattern is worked in four pieces (front panel, back panel and two sleeves) worked bottom up. The front and back panels are seamed at the shoulders and then sleeves are sewn in place. The underarms and sides are then seamed and the collar is worked directly onto the neckline.
2. Pattern is made with 5-7” of positive ease. Size down for a tighter fit. It is made to be a bit oversized and boxy.
3. Model is wearing a size 2X and is 5’9”.
Video Tutorial:
Pattern:
Back: make one
With 4.5mm needles
CO 98(106, 114, 126, 134, 146, 158, 166, 178)
Ribbing:
Row 1(WS): P2, *K2, P2, repeat from * across. (98(106, 114, 126, 134, 146, 158, 166, 178)
Row 2 (RS): K2, *P2, K2, repeat from * across. (98(106, 114, 126, 134, 146, 158, 166, 178)
Rows 3-23: repeat Rows 1&2 ending on a Row 1 repeat.
Main Body:
We will now be switching to the horizontal herringbone stitch and going up to the larger needles.
If using interchangeable needles, change the right needle and then work row one of the smaller needle,
If using two separate circular needles, use the larger size as the right needle for row one and then continue on with all stitches transferred to the larger needles.
Row 1: K1, *sl 1, K1, using the left needle pull the slipped st over the last knit st without dropping it then Ktbl of the slipped st, repeat from * until 1 st remains, K1. (98(106, 114, 126, 134, 146, 158, 166, 178)
All stitches will now be on the larger needles if using separate circulars. If using interchangeable needles, switch all needles to the larger size.
Row 2: *P2tog, do not slip stitches off of needle, insert right needle into first st only and P again, then slip both sts off of left needle, repeat from * across. (98(106, 114, 126, 134, 146, 158, 166, 178)
Repeat Rows 1&2 for a total of 80(80, 80, 82, 82, 84, 84, 86, 86) rows.
On last row place st markers after st 29(33, 37, 43, 45, 51, 57, 61, 67) and after st 69(73, 77, 83, 89, 95, 101, 105, 111).
Neckline Shaping:
We will now be working a few rows of neckline shaping. We will work the first row of the right side, bind off the center stitches and then work the entire left side while keeping the right side stitches on our needle. Then we will attach yarn and complete the right side.
Row 1(initial BO row): K1, *sl 1, K1, using the left needle pull the slipped st over the last knit st without dropping it then Ktbl of the slipped st, repeat from * until 2 sts before 1st sm, sl 1, K1, pull slipped st over the knit st and ktbl, then ktfl in the same st.
Remove sm, BO sts until next sm. (For BO sts, slip the sts you would normally slip and knit the stitches you would normally knit.)
Remove sm and BO one additional st, current loop on needles will act as a slipped st.
*K1, using left needle pull the slipped st over the last knit st without dropping it then Ktbl of the slipped st, repeat from * until 1 st remains, K1.
Keep the right side sts on cord while continuing on to the left side.
Left Back:
Row 2: *P2tog, do not slip stitches off of needle, insert right needle into first st only and P again, then slip both sts off of left needle, repeat from * across until 1 st remains, slip last st purlwise. (29(33, 37, 43, 45, 51, 57, 61, 67)
Row 3: sl 1st st, K1, BO a st *sl 1, K1, using the left needle pull the slipped st over the last knit st without dropping it, then Ktbl of the slipped st, repeat from * until 1 st remains, K1. (28(32, 36, 42, 44, 50, 56, 60, 66)
Row 4: *P2tog, do not slip stitches off of needle, insert right needle into first st only and P again, then slip both sts off of left needle, repeat from * across. (28(32, 36, 42, 44, 50, 56, 60, 66)
Row 5: K1, sl 1, BO a st, K1, BO a st, *sl 1, K1, using the left needle pull the slipped st over the last knit st without dropping it, then Ktbl of the slipped st, repeat from * until 1 st remains, K1. (26(30, 34, 40, 42, 48, 54, 58, 64)
Row 6: repeat Row 4.
BO all stitches using the same BO method as the initial BO row. Slip the slip sts, knit the knit stitches, etc. Leave long tail for seaming.
Right Back:
We will now be working the right side of the back panel neckline starting on the WS and joining yarn at the neckline. Our decreases will now be worked on the WS along the neckline.
Row 2: join yarn to neckline with WS facing you, P1, P2tog, *P2tog do not slip stitches off of needle, insert right needle into first st only and P again, then slip both sts off of left needle, repeat from * across. (28(32, 36, 42, 44, 50, 56, 60, 66)
Row 3: K1, *sl 1, K1, using the left needle pull the slipped st over the last knit st without dropping it, then Ktbl of the slipped st, repeat from * until 1 st remains, K1. (28(32, 36, 42, 44, 50, 56, 60, 66)
Row 4: P2tog twice, * P2tog, do not slip stitches off of needle, insert right needle into first st only and P again, then slip both sts off of left needle, repeat from * across. (26(30, 34, 40, 42, 48, 54, 58, 64)
Row 5: K1, *sl 1, K1, using the left needle pull the slipped st over the last knit st without dropping it, then Ktbl of the slipped st, repeat from * until 1 st remains, K1. (26(30, 34, 40, 42, 48, 54, 58, 64)
Row 6: *P2tog,do not slip stitches off of needle, insert right needle into first st only and P again, then slip both sts off of left needle, repeat from * across. (26(30, 34, 40, 42, 48, 54, 58, 64)
BO all stitches using the same BO method as the initial BO row. Slip the slip sts, knit the knit stitches, etc. Fasten off.
Front: make one
With 4.5mm needles
CO 98(106, 114, 126, 134, 146, 158, 166, 178)
Ribbing:
Row 1(WS): P2, *K2, P2, repeat from * across. (98(106, 114, 126, 134, 146, 158, 166, 178)
Row 2 (RS): K2, *P2, K2, repeat from * across. (98(106, 114, 126, 134, 146, 158, 166, 178)
Rows 3-23: repeat Rows 1&2 ending on a Row 1 repeat.
Main Body:
We will now be switching to the horizontal herringbone stitch and going up to the larger needles.
Row 1: K1, *sl 1, K1, using the left needle pull the slipped st over the last knit st without dropping it then Ktbl of the slipped st, repeat from * until 1 st remains, K1. (98(106, 114, 126, 134, 146, 158, 166, 178)
All stitches will now be on the larger needles if using separate circulars. If using interchangeable needles, switch all needles to the larger size.
Row 2: *P2tog, do not slip stitches off of needle, insert right needle into first st only and P again, then slip both sts off of left needle, repeat from * across. (98(106, 114, 126, 134, 146, 158, 166, 178)
Repeat Rows 1&2 for a total of 64(66, 66, 66, 66, 68, 68, 70, 70) rows.
On last row place st markers after st 31(35, 39, 45, 49, 53, 59, 63, 69) and after st 67(71, 75, 81, 85, 93, 99, 103, 109).
Neckline Shaping:
We will now be working a few rows of neckline shaping. We will work the first row of the right side, bind off the center stitches and then work the entire left side while keeping the right side stitches on our needle. Then we will attach yarn and complete the right side.
Row 1(initial BO row): K1, *sl 1, K1, using the left needle pull the slipped st over the last knit st without dropping it then Ktbl of the slipped st, repeat from * until 2 sts before 1st sm, sl 1, K1, pull slipped st over the knit st and ktbl, then ktfl in the same st.
Remove sm, BO sts until next sm. (For BO sts, slip the sts you would normally slip and knit the stitches you would normally knit.)
Remove sm and BO one additional st, current loop on needles will act as a slipped st.
*K1, using left needle pull the slipped st over the last knit st without dropping it then Ktbl of the slipped st, repeat from * until 1 st remains, K1.
Keep the left side sts on cord while continuing on to the right side.
Right Front:
Row 2: *P2tog, do not slip stitches off of needle, insert right needle into first st only and P again, then slip both sts off of left needle, repeat from * across until 1 st remains, slip last st purlwise. (31(35, 39, 45, 47, 53, 59, 63, 69)
Row 3: sl 1st st, K1, BO a st *sl 1, K1, using the left needle pull the slipped st over the last knit st without dropping it, then Ktbl of the slipped st, repeat from * until 1 st remains, K1. (30(34, 38, 44, 46, 52, 58, 62, 68)
Row 4: *P2tog, do not slip stitches off of needle, insert right needle into first st only and P again, then slip both sts off of left needle, repeat from * across. (30(34, 38, 44, 46, 52, 58, 62, 68)
Row 5: K1, sl 1, BO a st, K1, BO a st, *sl 1, K1, using the left needle pull the slipped st over the last knit st without dropping it, then Ktbl of the slipped st, repeat from * until 1 st remains, K1. (28(32, 36, 42, 44, 46, 56, 60, 66)
Row 6: repeat Row 4.
Row 7: repeat Row 5. (26(30, 34, 40, 42, 48, 54, 58, 64)
Row 8: repeat Row 4.
Row 9: K1, *sl 1, K1, using the left needle pull the slipped st over the last knit st without dropping it, then Ktbl of the slipped st, repeat from * until 1 st remains, K1. 26(30, 34, 40, 42, 48, 54, 58, 64)
Row 10: repeat Row 4.
BO all stitches using the same BO method as the initial BO row. Slip the slip sts, knit the knit stitches, etc. Leave long tail for seaming.
Left Front:
We will now be working the left side of the back panel neckline starting on the WS and joining yarn at the neckline. Our decreases will now be worked on the WS along the neckline.
Row 2: join yarn to neckline with WS facing you, P1, P2tog, *P2tog do not slip stitches off of needle, insert right needle into first st only and P again, then slip both sts off of left needle, repeat from * across. (30(34, 38, 44, 46, 52, 58, 62, 68)
Row 3: K1, *sl 1, K1, using the left needle pull the slipped st over the last knit st without dropping it, then Ktbl of the slipped st, repeat from * until 1 st remains, K1. (30(34, 38, 44, 46, 52, 58, 62, 68)
Row 4: P2tog twice, * P2tog, do not slip stitches off of needle, insert right needle into first st only and P again, then slip both sts off of left needle, repeat from * across. (28(32, 36, 42, 44, 50, 56, 60, 66)
Row 5: K1, *sl 1, K1, using the left needle pull the slipped st over the last knit st without dropping it, then Ktbl of the slipped st, repeat from * until 1 st remains, K1. (28(32, 36, 42, 44, 50, 56, 60, 66)
Row 6: P2tog twice, *P2tog,do not slip stitches off of needle, insert right needle into first st only and P again, then slip both sts off of left needle, repeat from * across. (26(30, 34, 40, 42, 48, 54, 58, 64)
Row 7: repeat Row 5
Row 8: *P2tog,do not slip stitches off of needle, insert right needle into first st only and P again, then slip both sts off of left needle, repeat from * across. (26(30, 34, 40, 42, 48, 54, 58, 64)
Row 9: repeat Row 7
Row 10: repeat Row 8.
BO all stitches using the same BO method as the initial BO row. Slip the slip sts, knit the knit stitches, etc. Fasten off.
Sleeves: make two
With 4.5mm needles
CO 40(40, 40, 40, 44, 44, 44, 48, 48)
Ribbing:
Row 1(WS): P2, *K2, P2, repeat from * across. (40(40, 40, 40, 44, 44, 44, 48, 48)
Rows 2-25: repeat Row 1.
Row 26: K1fb in each st across. (80(80, 80, 80, 88, 88, 88, 96, 96)
Main Sleeve:
We will now be switching to the horizontal herringbone stitch and going up to the larger needles.
Row 1: *P2tog, do not slip stitches off of needle, insert right needle into first st only and P again, then slip both sts off of left needle, repeat from * across. (80(80, 80, 80, 88, 88, 88, 96, 96)
Row 2: K1, *sl 1, K1, using the left needle pull the slipped st over the last knit st without dropping it then Ktbl of the slipped st, repeat from * until 1 st remains, K1. (80(80, 80, 80, 88, 88, 88, 96, 96)
Repeat Rows 1&2 ending on a Row 1 repeat for a total of 61(61, 61, 59, 59, 55, 55, 53, 53) rows.
Pro Tip: stop here before fastening off the sleeve and seam the shoulders. Then hold the sleeve up to the edge of the shoulder to make sure the length is correct. Adjust the amount of rows on the sleeve to get the perfect length for you.
BO all sts.
Seaming:
Shoulders: With RS facing up, line up shoulders and seam them together using your preferred method of seaming.
Sleeves: With RS facing up, find the center of the sleeve and line it up with the shoulder seam. Pin sleeve in place using stitch markers making sure it evenly is placed down the front and back panels. Starting in the center/shoulder seam, seam the sleeve to the back of the sweater using your preferred method of seaming. Then go back to the center and seam the sleeve to the front of the sweater.
Repeat for second sleeve.

Main Body:
Fold the sweater in half so the arms and side seams are lined up. Then seam the sides and sleeves using your preferred seaming method. It can be helpful to start at the underarm and work your way to the cuffs and down the sides. Leave a 4-5” slit on each side.
Collar:
Collar is made by picking up stitches along neck opening and working in rounds.
Use 4.5mm needles.
With RS facing out pick up stitches along neck opening, starting at the right shoulder seam. Pick up 6 sts along the right side back, 40(40, 40, 40, 44, 44, 44, 44, 44) sts along back center, 6 sts along the left side back, 10 sts along left side front, 36(36, 36, 36, 40, 40, 40, 40, 40)sts along front center, and 10 sts along left side front. Feel free to add or subtract stitches to get desired neckline and to ensure you are able to fit it over your head. If adjusting the stitch count make sure to end with multiple of 4.
Approx. 108(108, 108, 108, 116, 116, 116, 116, 116)
Rounds 1-20: *K2, P2, repeat from * around.
BO using your preferred method. I used a tubular BO which you can find a video tutorial for here. Choose whichever method you think looks best.
Weave in all ends and block.

Now you can stay cozy this winter with your new Easton Pullover. If you make one I’d love to see it. Make sure to tag me @meghanmakesdo on social media and use #theeastonpullover
As always you can find a PDF version of this pattern in my shop, Etsy or Ravelry. Or treat yourself to a complete kit with Lion Brand Yarn!
Happy Knitting,
Meghan