
The Concord Vest- Free Crochet Pattern
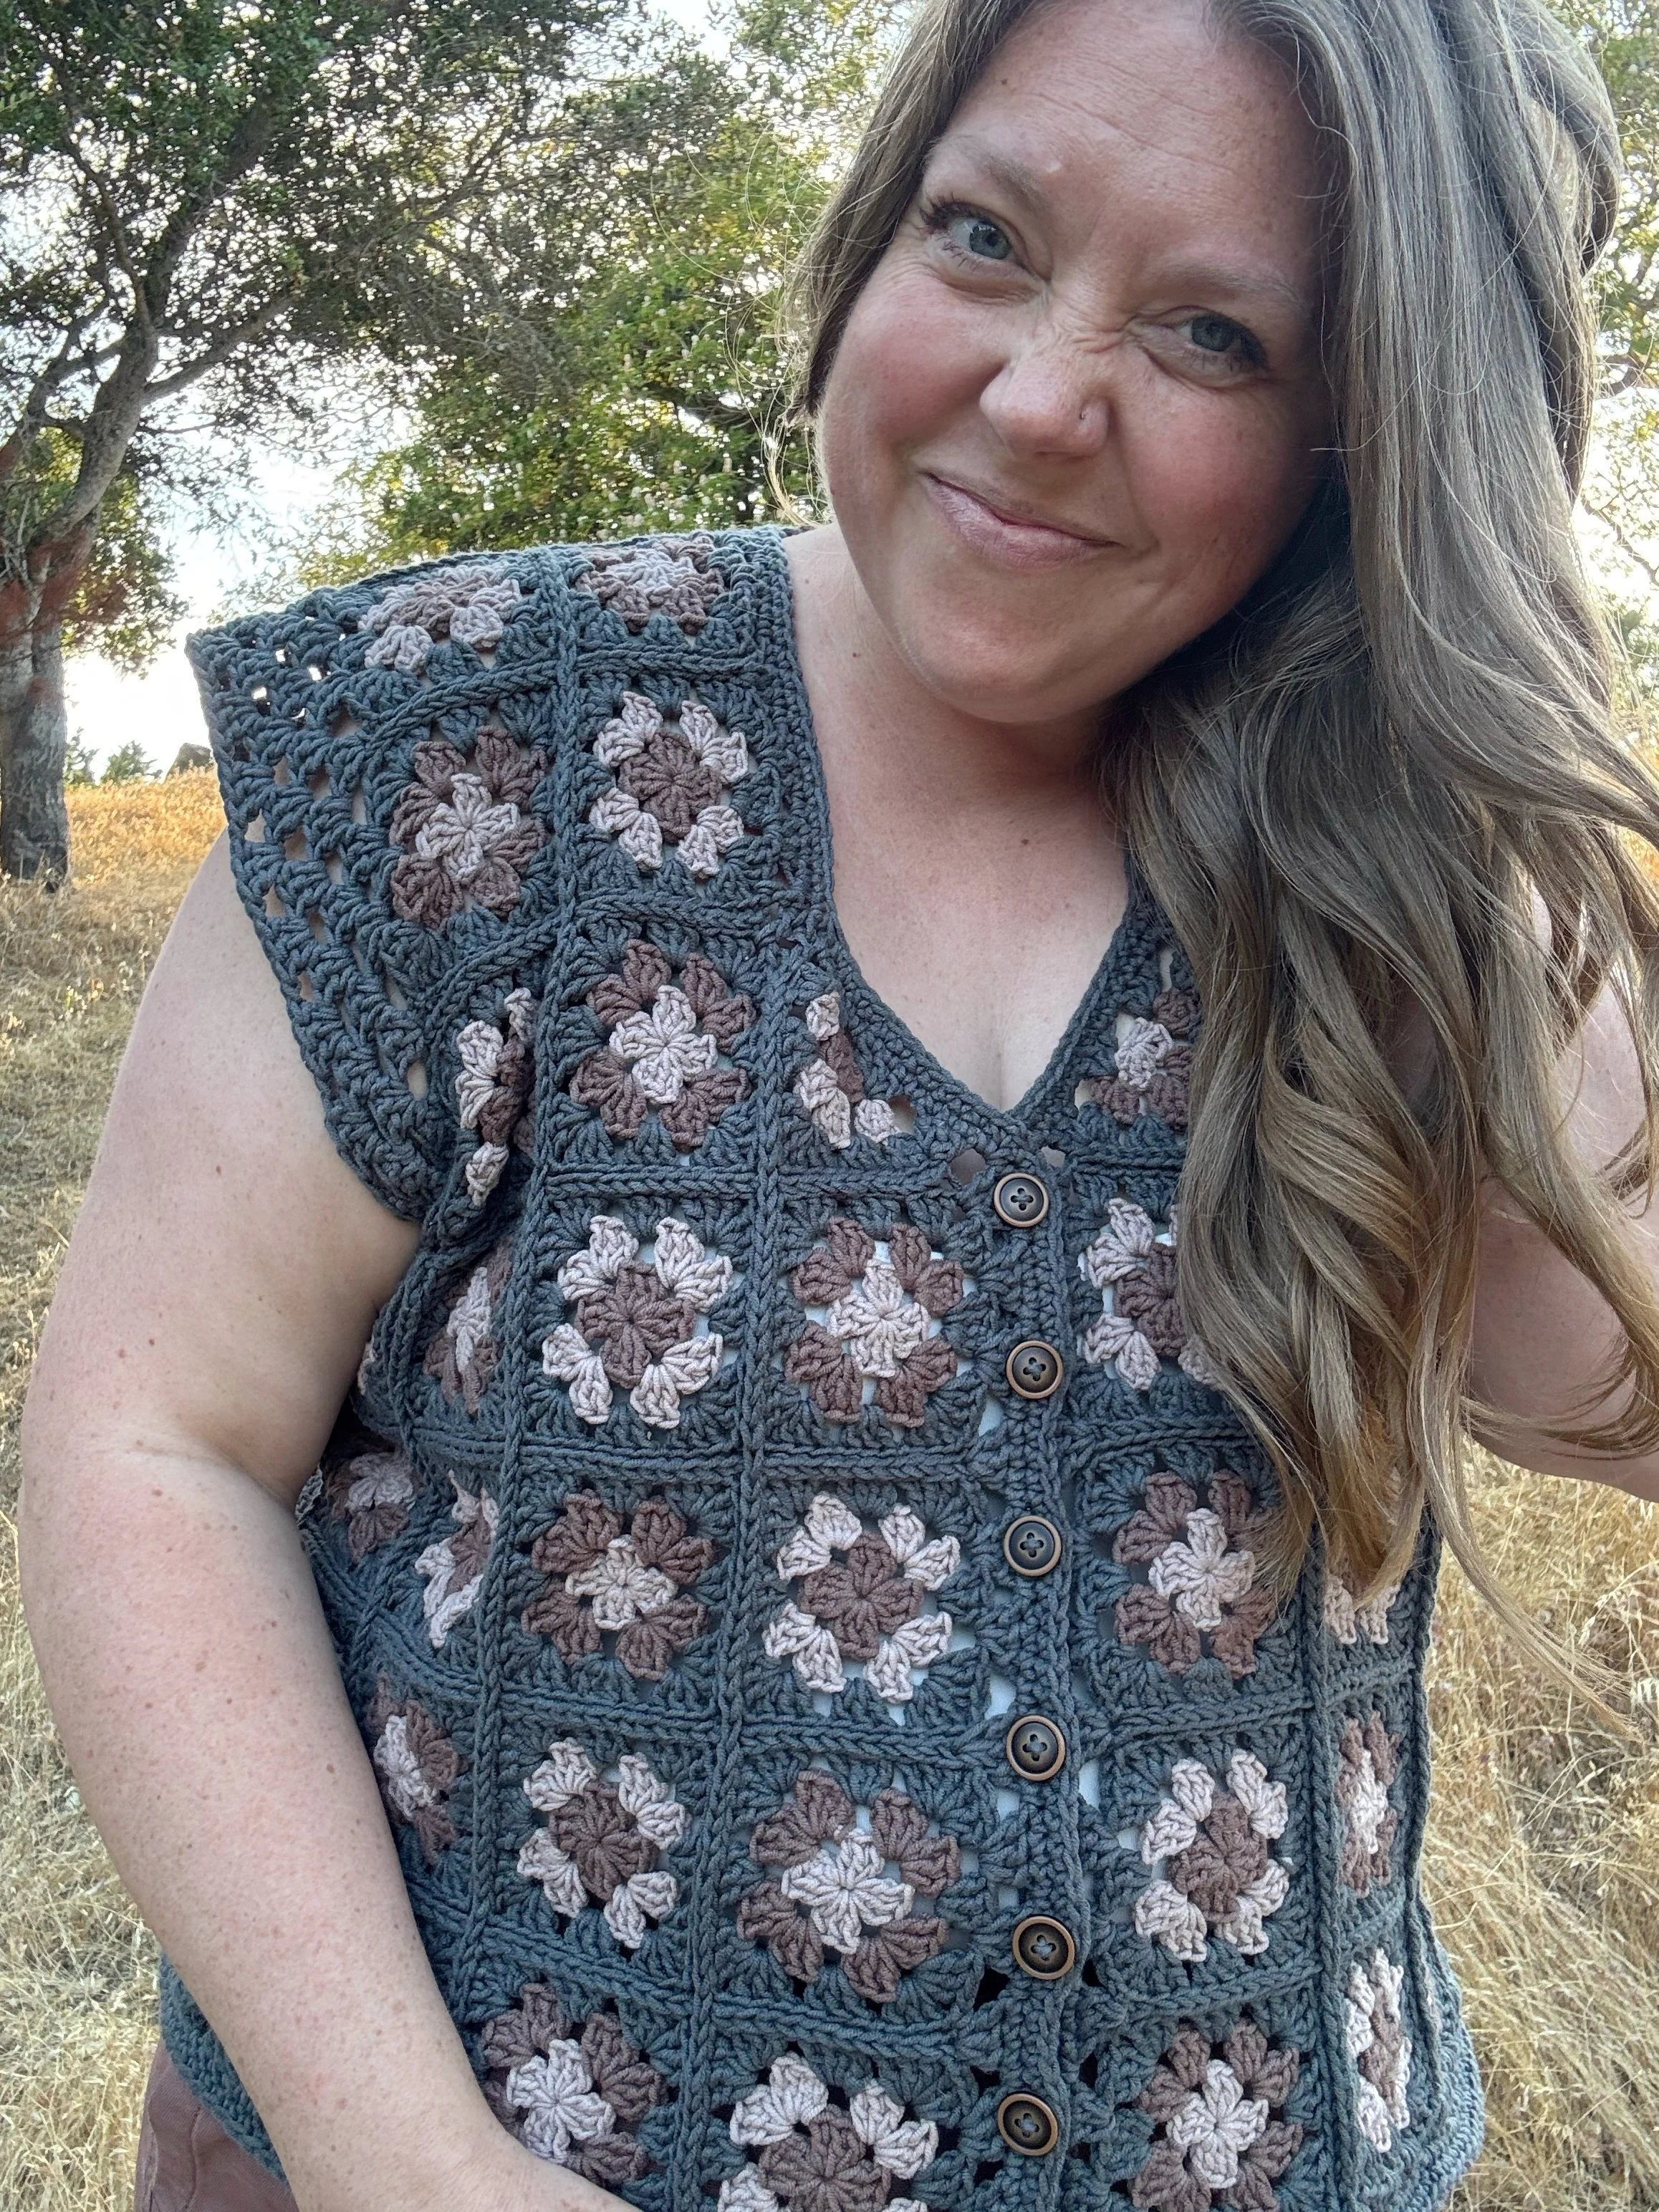
The Concord Vest is a modern take on the classic granny square, featuring checkered color motifs joined together for a fun and functional layering piece. Made with Lion Brand’s Made with Love: The Cottony One, it’s soft, breathable, and perfect for year-round wear. With combined sizing and simple construction, this pattern is approachable for adventurous beginners and seasoned crocheters alike. Keep scrolling for the free version, head to the shop for the PDF or treat yourself to the complete kit from Lion Brand Yarn.

The day has finally arrived to share my new Concord Vest with you. This feels like it’s been months in the making, but really it’s only been weeks. I first started making these granny squares while traveling around Iceland in early May. I figured it would be an easy project for being on the go during that week. I ended up making about 40 squares total during my time abroad, which was just under half of what I actually needed to make. I love that this project has traveled across an ocean and back and it will always remind me a bit of my time in Iceland.


Here are a few photos of the granny making process while I was away. As soon as I got back it was time to really buckle down and get the rest of the squares made. I had a bit of an idea of how many I would need, but it ended up taking quite a bit of time to get them all finished. It helped that I wove the ends in after ever round as I went.
Once the majority of the squares were complete I went ahead and gave them a bit of a wet blocking by pinning them down and spraying them with water. This helped me get a better idea of the size of each square and how many I would need for each size. It’s crazy how crisp those corners get with just a bit of water.
Working with granny square for a garment can be a bit tricky since the size of the square is a bit limiting. The solution was to combine sizes. I recommend going off of the finished measurements to determine which size will get you the best fit. I was a bit nervous about the size I made (XL/2X) when I first started piecing them together because I wasn’t sure if it would fit comfortably around my mid section. Luckily once it was all put together it fit great! Feel free to make whatever adjustments you need in order to get the perfect fit.

This was my first time working with Lion Brand’s Made With Love The Cottony One and I absolutely love it. It’s a cotton/acrylic blend and was a breeze to work up. It also comes in so many pretty colors that no matter which 3 you pick you’ll end up with a stunning new vest that is sure to be the envy of all your friends.
Feel free to substitute with a different worsted weight yarn, just make sure you check your gauge by making a sample square before you begin. You may need to adjust your hook size too. The Concord features two different color orders, but you can also just use the same color combo throughout if you wish. Just note you may need an extra skein of the color you use for round 2. Or use some worsted weight yarn you already have and make a fun scrappy vest. So many possibilities!
I’m already dreaming of making a long sleeve version with lighter weight yarn and maybe a wool? Maybe look out for that later this year. 😉
I’ve also included a full video tutorial for the Concord Vest so you’ll know exactly how to make it. Make sure you are following along with the written instructions as you go since some sizes are different for the armholes.

The Concord Vest Crochet Pattern
Materials:
483-973 yards (3-6 skeins) of Lion Brand Made With Love The Cottony One worsted weight cotton/acrylic blend yarn (185yd/100g)- Color A (shown in Pewter Pan)
161-325 yards (1-2 skeins) of Lion Brand Made With Love The Cottony One worsted weight cotton/acrylic blend yarn (185yd/100g)- Color A (shown in Hot Cocoa)
141-284 yards (1-2 skeins) of Lion Brand Made With Love The Cottony One worsted weight cotton/acrylic blend yarn (185yd/100g)- Color A (shown in Marvelous Mushroom)
Tapestry needle, scissors, tape measure
Gauge:
completed granny square= 3.15”
Notes:
1.The vest is made using granny squares and granny triangles in two color combos for the main body. The sleeves and front button band and edging are worked directly onto the seamed vest.
2.Pattern is written in combined sizes as follows XS/S(M/L, XL/2X, 3X/4X, 5X/6X). See sizing info for measurements to determine which size will fit best.
3.Every round of the granny squares, triangles and initial rounds for edging and sleeves will start with a chainless double crochet.
Abbreviations:
Ch(s)- chain(s)
St(s)- stitch(es)
sk- skip
sl st- slip stitch
sc- single crochet
sc3tog- single crochet 3 together
dc- double crochet
Chainless dc- work a sc, insert hook into left leg of sc, yo and draw up a loop, yo and draw through both loops.
sp(s)- space(s)
yo-yarn over
RS- right side
WS- wrong side
Size:
XS-S: fits bust 28-34” (483yds/3 skeins Color A, 161/1 skein Color B, 141/1 skein Color C)
M/L: fits bust 36-42” (602yds/4 skeins Color A, 201/2 skeins Color B, 175/1 skein Color C)
XL/2X: fits bust 44-50” (720yds/4 skeins Color A, 240yds/2 skeins Color B, 210yds/2 skeins Color C)
3X/4X: fits bust 52-58” (840/5 skeins Color A, 280/2 skeins Color B, 245/2 skeins Color C)
5X/6X: fits bust 60-66” (973/6 skeins Color A, 325/2 skeins Color B, 284/2 skeins Color C)

Video Tutorial:
Pattern
Granny Square A
Make 31(40, 47, 56, 64)
With Color C,
Round 1: make a magic ring, ch1, working all stitches into the ring, chainless dc, 2dc, [ch 2, 3dc] x3, ch 2, sl st to 1st st to join. (12 dc)
Fasten off and weave in ends.
Attach Color B into a ch-2 sp, ch 1.
Round 2: working into the ch-2 sp, chainless dc, 2dc, ch 2, 3dc, *ch 1, [3dc, ch 2, 3dc] into next ch-2 sp, repeat from * around, ch 1, sl st to 1st st to join. (24 dc)
Fasten off and weave in ends.
Attach Color A into a ch-1 sp, ch 1.
Round 3: working into the ch-1 sp, chainless dc, 2dc, *ch 1, [3dc, ch 2, 3dc] into next ch-2 sp, ch 1, 3dc into next ch-1 sp, repeat from * around, ch 1, sl st to 1st st to join. (36 dc)
Fasten off and weave in ends.
Granny Square B
Make 31(40, 47, 56, 64)
With Color B,
Round 1: make a magic ring, ch1, working all stitches into the ring, chainless dc, 2dc, [ch 2, 3dc] x3, ch 2, sl st to 1st st to join. (12 dc)
Fasten off and weave in ends.
Attach Color C into a ch-2 sp, ch 1.
Round 2: working into the ch-2 sp, chainless dc, 2dc, ch 2, 3dc, *ch 1, [3dc, ch 2, 3dc] into next ch-2 sp, repeat from * around, ch 1, sl st to 1st st to join. (24 dc)
Fasten off and weave in ends.
Attach Color A into a ch-1 sp, ch 1.
Round 3: working into the ch-1 sp, chainless dc, 2dc, *ch 1, [3dc, ch 2, 3dc] into next ch-2 sp, ch 1, 3dc into next ch-1 sp, repeat from * around, ch 1, sl st to 1st st to join. (36 dc)
Fasten off and weave in ends.
Granny Triangle A
Make 3(1, 3, 1, 3)
With Color C,
Row 1: make a magic ring, ch1, working all stitches into the ring, chainless dc, 2dc, ch 2, 3dc. (6 dc)
Fasten off.
Attach Color B into chainless dc of previous row with RS facing, ch 1.
Row 2: working into the same st, chainless dc, 2dc, [3dc, ch 2, 3dc] into next ch-2 sp, ch 1, 3dc into last st.(12 dc)
Fasten off.
Granny Triangle B
Make 3(1, 3, 1, 3)
With Color B,
Row 1: make a magic ring, ch1, working all stitches into the ring, chainless dc, 2dc, ch 2, 3dc. (6 dc)
Fasten off.
Attach Color C into chainless dc of previous row with RS facing, ch 1.
Row 2: working into the same st, chainless dc, 2dc, [3dc, ch 2, 3dc] into next ch-2 sp, ch 1, 3dc into last st.(12 dc)
Fasten off.
Attach Color A into chainless dc of previous row with RS facing, ch 1.
Round 3: working into the same st, chainless dc, 2dc, ch 1, 3dc into ch-1 sp, [3dc, ch 2, 3dc] into ch-2 sp, ch 1, 3dc into next ch-1 sp, 3dc in last st. (18 dc)
Fasten off and weave in all ends.
Assembly:
Using the surface slip stitch joining method, seam all squares and triangles together according to the charts for your size.
It is recommended to do all the horizontal seams first and then the vertical seams. (see video tutorial)
Once the back and front panels are assembled, seam the sides and shoulders together using the same seaming method.
For sizes XS/S, M/L and 5X/6X, the front panels are one square taller than the back panel. The middle of that square will rest at the top of the shoulder.


Sleeves:
The sleeves are made directly into the armholes using the granny stitch. Note that select sizes are written separately depending on how many squares are in the underarm area.
XS/S(XL/2X, 5X/6X)-ONLY
With RS facing, join Color A to underarm in center seam, ch 1.
Round 1: working into the seam, [chainless dc, 2dc], [ch 1, 3dc into sp between row 1 and 2 of triangle] x2, [ch 1, 3dc] into the next 2 ch-2 sps, [ch 1, 3dc] into each ch-1 sp and seam around the arm hole until the next triangle, ch1, 3dc into seam at top of triangle, [ch 1, 3dc into sp between row 1 and 2 of triangle] x2, ch 1, sl st to 1st st to join. (51, 60, 69) dc
Rounds 2-4: sl st into next 2 dc and the next ch-1 sp, ch 1, [chainless dc, 2dc] into same sp, *ch 1, 3dc into next ch-1 sp, repeat from * around, ch 1, sl st to 1st st to join. (51, 60, 69) dc
*continue adding rounds here if a longer sleeve is desired. Note that you may need an extra amount of Color A if making longer sleeves.
Fasten off and weave in ends. Repeat on other armhole.
M/L(3X/4X)-ONLY
With RS facing, join Color A to underarm in ch-1 sp to the right of the center cluster of dc, ch 1.
Round 1: working into the same sp as join, [chainless dc, 2dc], [ch 1, 3dc] into next ch-1 sp, [ch 1, 3dc] into the center ch-2 sp where 3 squares meet, [ch 1, 3dc] into each ch-1 sp and seam around the arm hole until the last ch-1 sp of the last square, [ch 1, 3dc] ] into the center corner where 3 squares meet, ch 1, sl st to 1st st to join. (54, 63) dc
Rounds 2-4: sl st into next 2 dc and the next ch-1 sp, ch 1, [chainless dc, 2dc] into same sp, *ch 1, 3dc into next ch-1 sp, repeat from * around, ch 1, sl st to 1st st to join. (54, 63) dc
*continue adding rounds here if a longer sleeve is desired. Note that you may need an extra amount of Color A if making longer sleeves.
Fasten off and weave in ends. Repeat on other armhole.

Collar:
The collar is made directly onto the front and bottom edges of the vest. The button holes are made during Round 2 along the right side of the vest.
The instructions for each round can be confusing so it is recommended to watch the video tutorial while creating the collar.
With RS facing, join Color A to center seam on back panel, ch 1.
Round 1: working into the seam, [chainless dc, 2dc], [ch 1, 3dc] into each ch-1 sp and seam until first neckline corner, dc1 into the next 3 ch-2 sps, [ch 1, 3dc] into each ch-1 sp and seam until the 1st triangle, dc1 into the next 3 ch-2 sps, [ch1, 3dc] in sps between Rows 1 and 2 of triangle, ch 1, 3dc into corner of triangle, ch 2, 3dc into next ch-2 sp, [ch 1, 3dc] in each ch-1 sp and seam until bottom of front panel, ch 1, [3dc, ch2, 3dc] into ch-2 sp, [ch1, 3dc] into each ch-1 sp and seam until bottom of next front panel, [3dc, ch 2, 3dc] into next ch-2 sp, [ch 1, 3dc] into each ch-1 sp and seam until triangle, ch 1, 3dc into ch-2 sp, ch 2, 3dc into corner of triangle, [ch 1, 3dc] in sps between Rows 1 and 2 of triangle, dc1 into the next 2 ch-2 sps, [ch 1, 3dc] in each ch-1 sp and seam until neckline corner, dc1 into the next 3 ch-2 sps, [ch1, 3dc] in each ch-1 sp and seam, ch 1, sl st to 1st st to join.(approx. 264, 282, 300, 318, 360) dc
Round 2: ch 1, sc in same st as join and in each st until neckline corner, sc3tog into the 3 dc that make the corner, sc in each st until next corner, sc3tog into the 3 dc that make the corner, sc in each st until ch-2 sp, [sc, ch 1, sc] into the ch-2 sp, sc in each st until bottom front corner, [sc, ch 1, sc] into ch-2 sp, sc in each stitch around the bottom until the next front corner, [sc, ch 1, sc] into ch-2 sp, sc in next st, ch 1, sk 1, *sc 7, ch 1, sk 1, repeat from * six times, sc in next st, [sc, ch 1, sc] in ch-2 sp, sc in each st until neckline corner, sc3tog into the dc that make the corner, sc in each st until next corner, sc3tog into the 3dc that make the corner, sc in each st to end, sl st to 1st st to join.
Round 3: ch 1, sc in same st as join and in each st until 1 st before the sc3tog from the row below, sc3tog, sc in each st until 1 st before the sc3tog from the row below, sc3tog, sc in each st until the ch-1 sp, [sc, ch 1, sc] into the ch-1 sp, sc in each st until the next ch-1 sp, [sc, ch 1, sc] into the ch-1 sp, sc in each st until the next ch-1 sp, [sc, ch 1, sc] into the ch-1 sp, sc in each st until the ch-1 sp in the corner of front right side, [sc, ch 1, sc] in ch-1 sp, sc in each st until 1 st before the sc3tog from the row below, sc3tog, sc in each st until 1 st before the sc3tog from the row below, sc3tog, sc in each st to end, sl st to 1st st to join.
Fasten off and weave in ends.
Attach Buttons:
Sew buttons to the top of the center dc st of each cluster that is in line with the button holes along the left hand side of the front of the vest using a strand of Color A and a tapestry needle.
Weave in any remaining ends. Block if needed.

Now go enjoy your new Concord Vest for the summer. If you make one I’d love to see it. Make sure to tag me @meghanmakesdo and use #theconcordvest on social media so I can share.
As always you can find the PDF version in my shop, Etsy and Ravelry or grab the complete kit from Lion Brand Yarn.
Happy Crocheting,
Meghan

