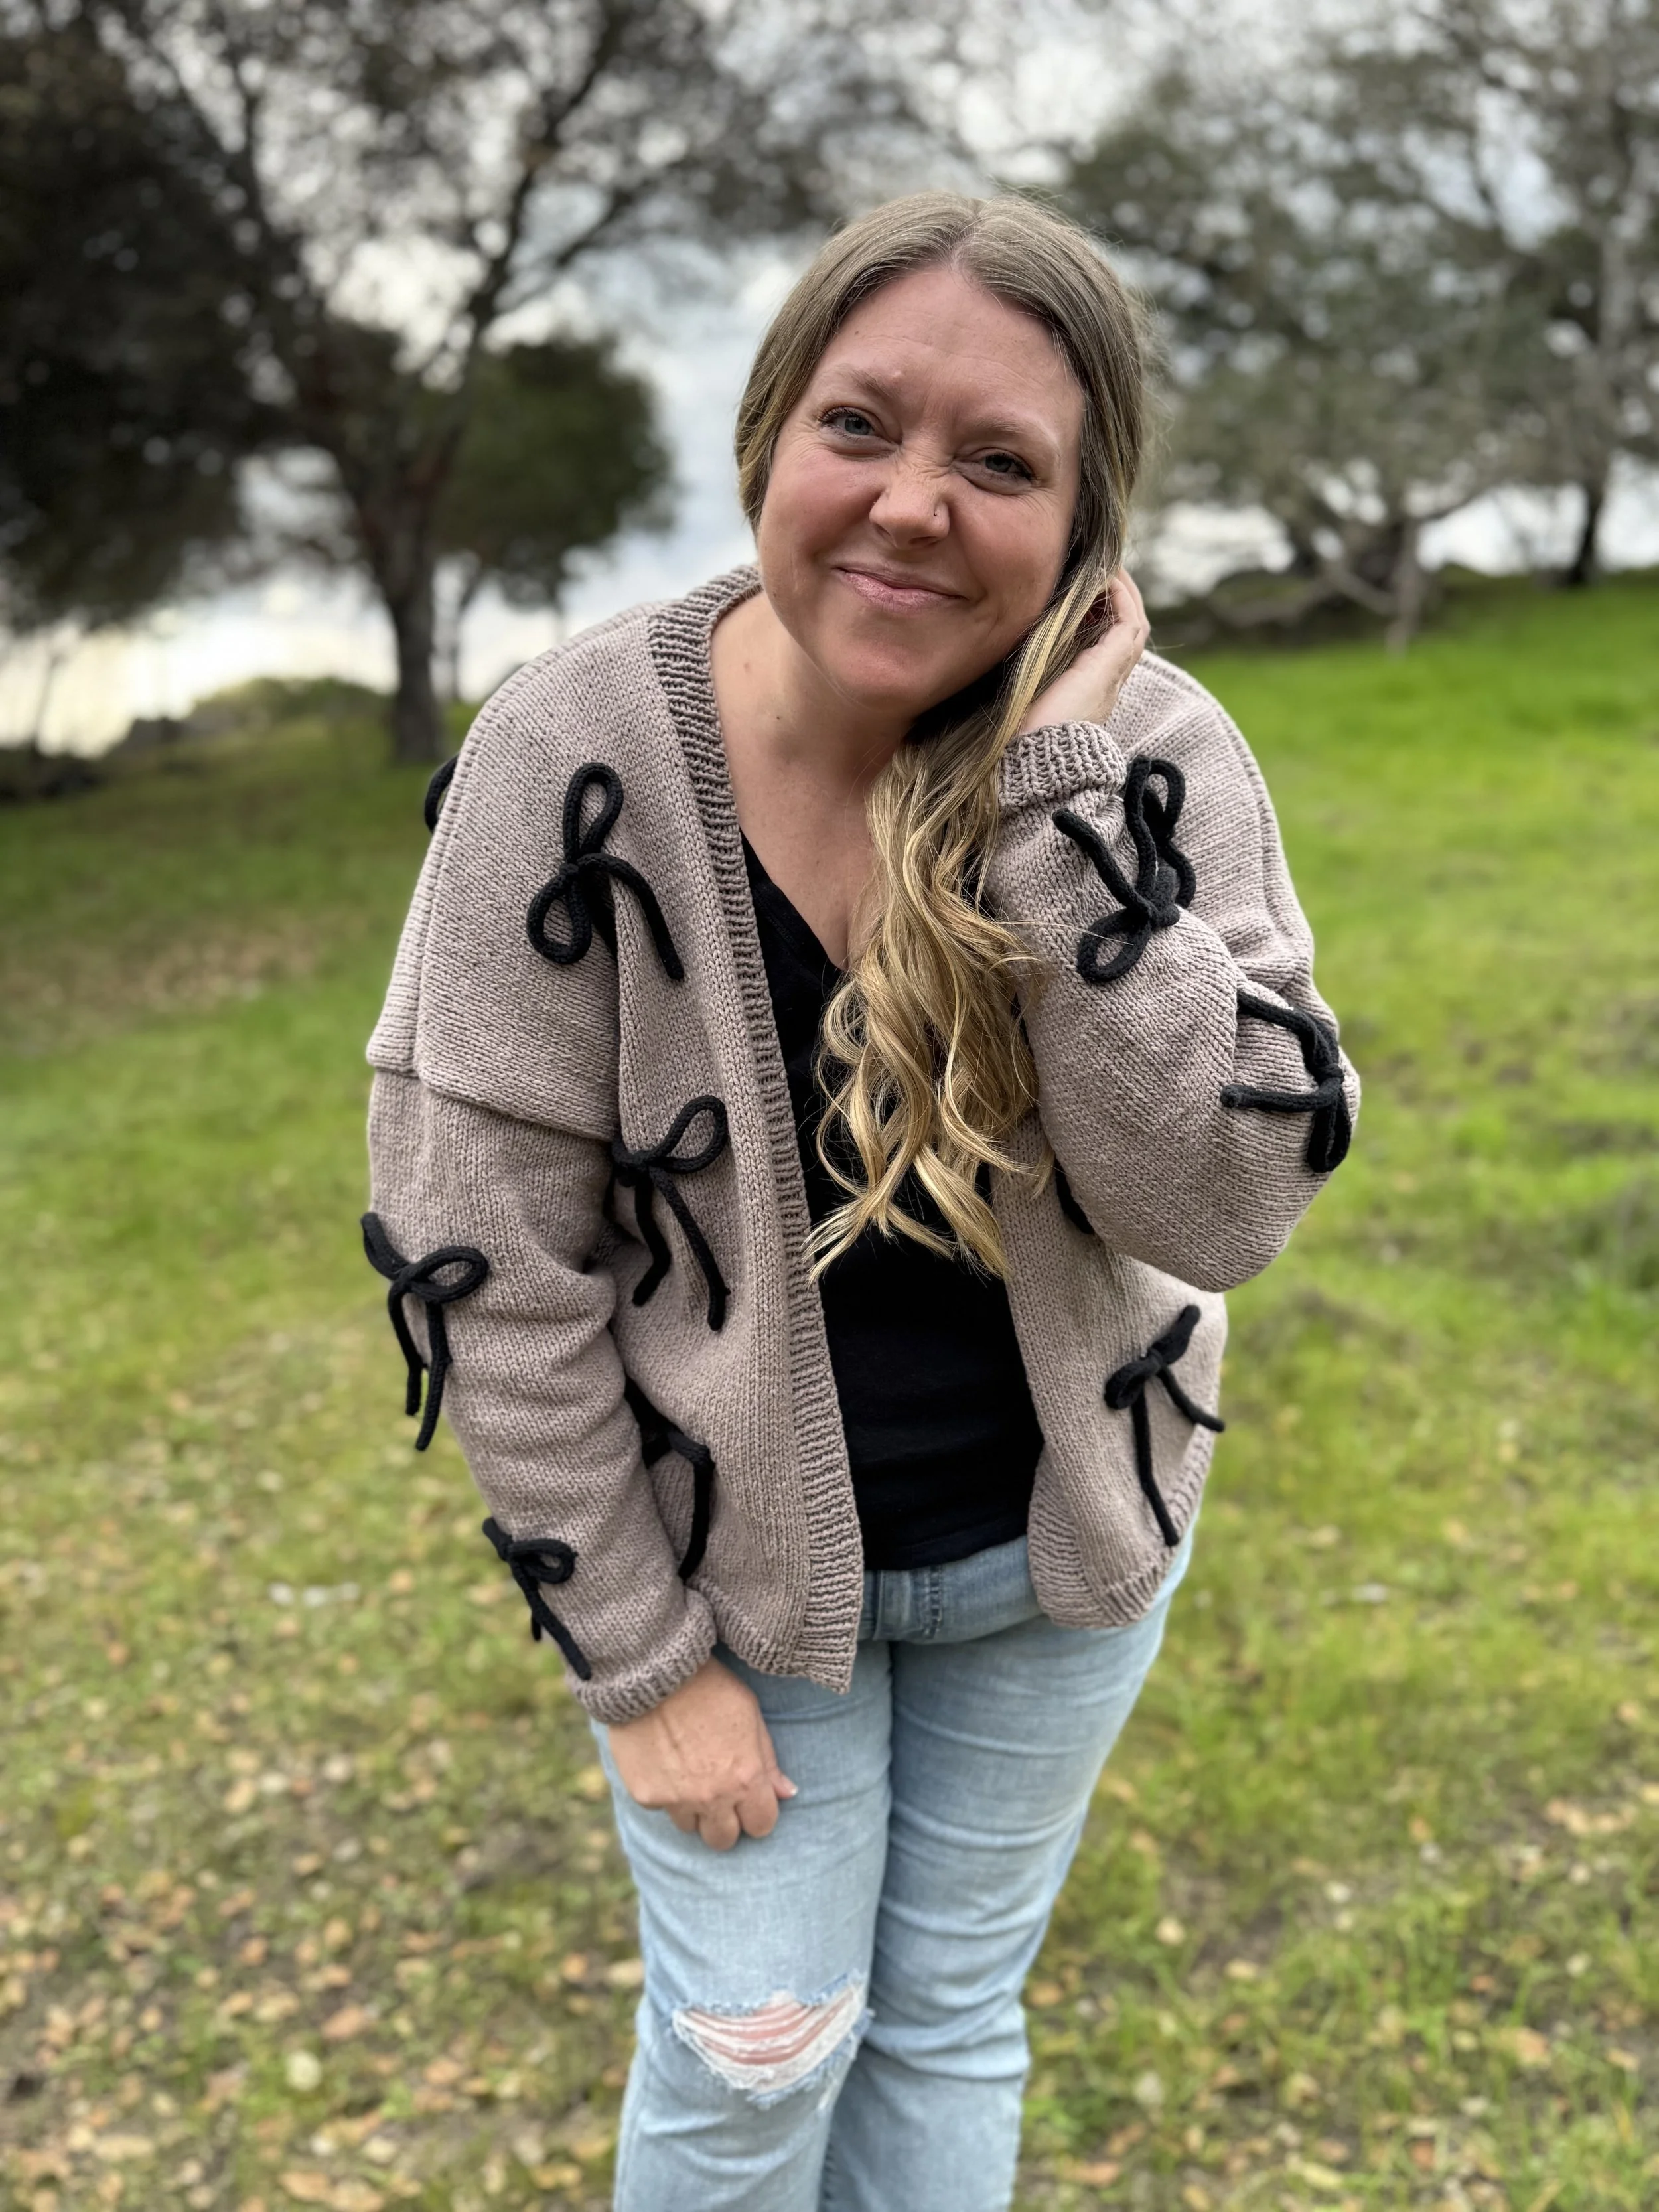
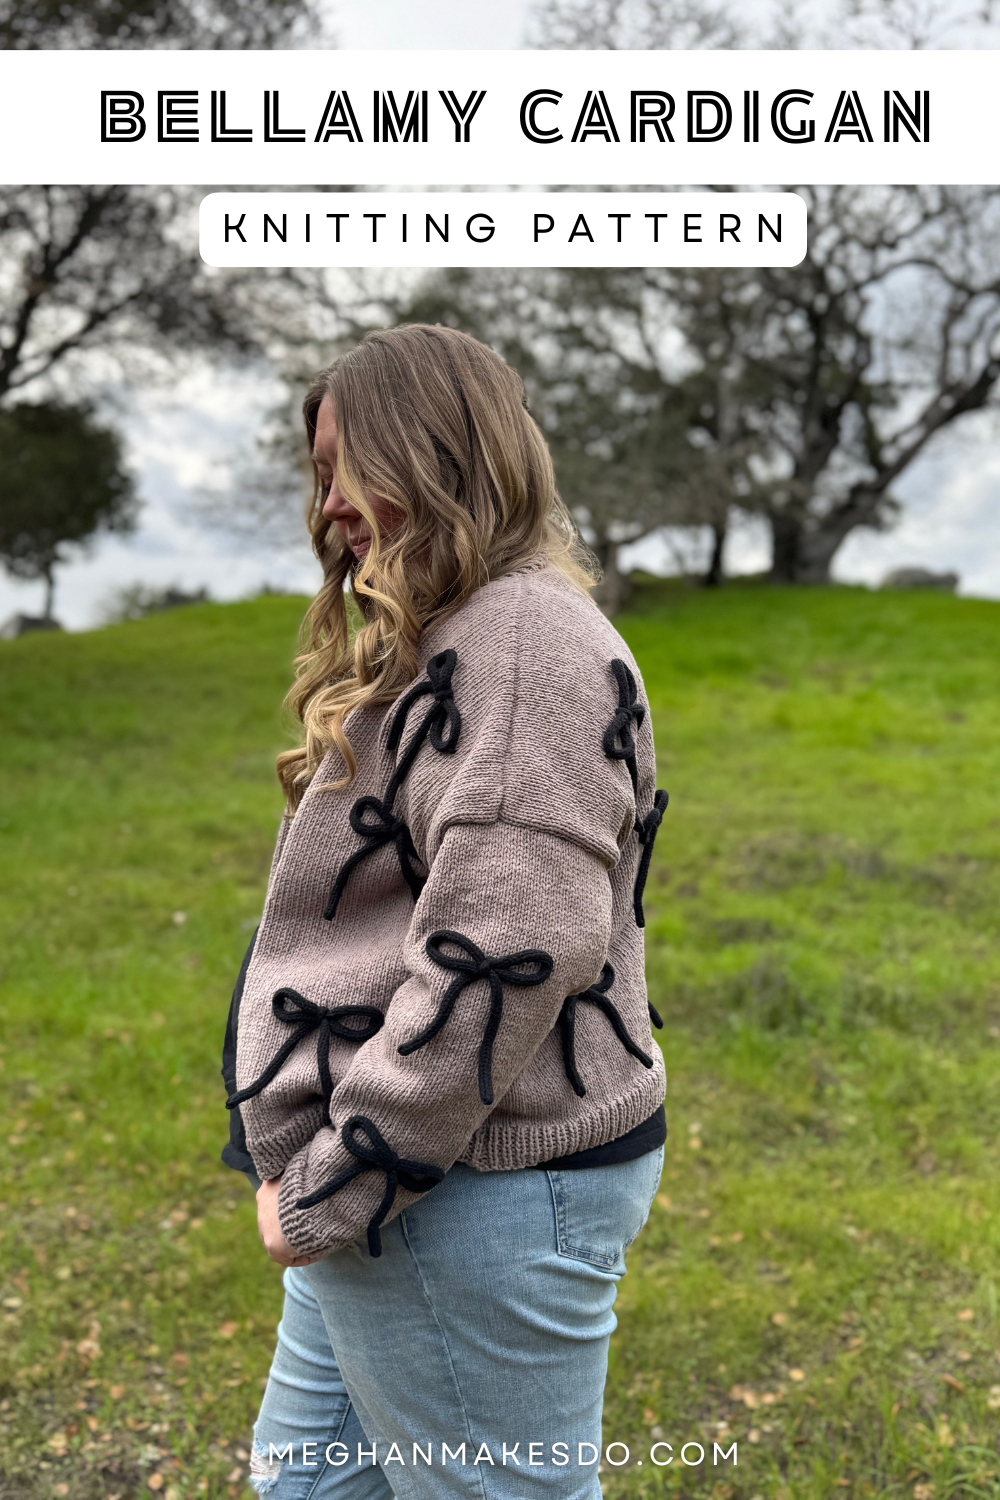
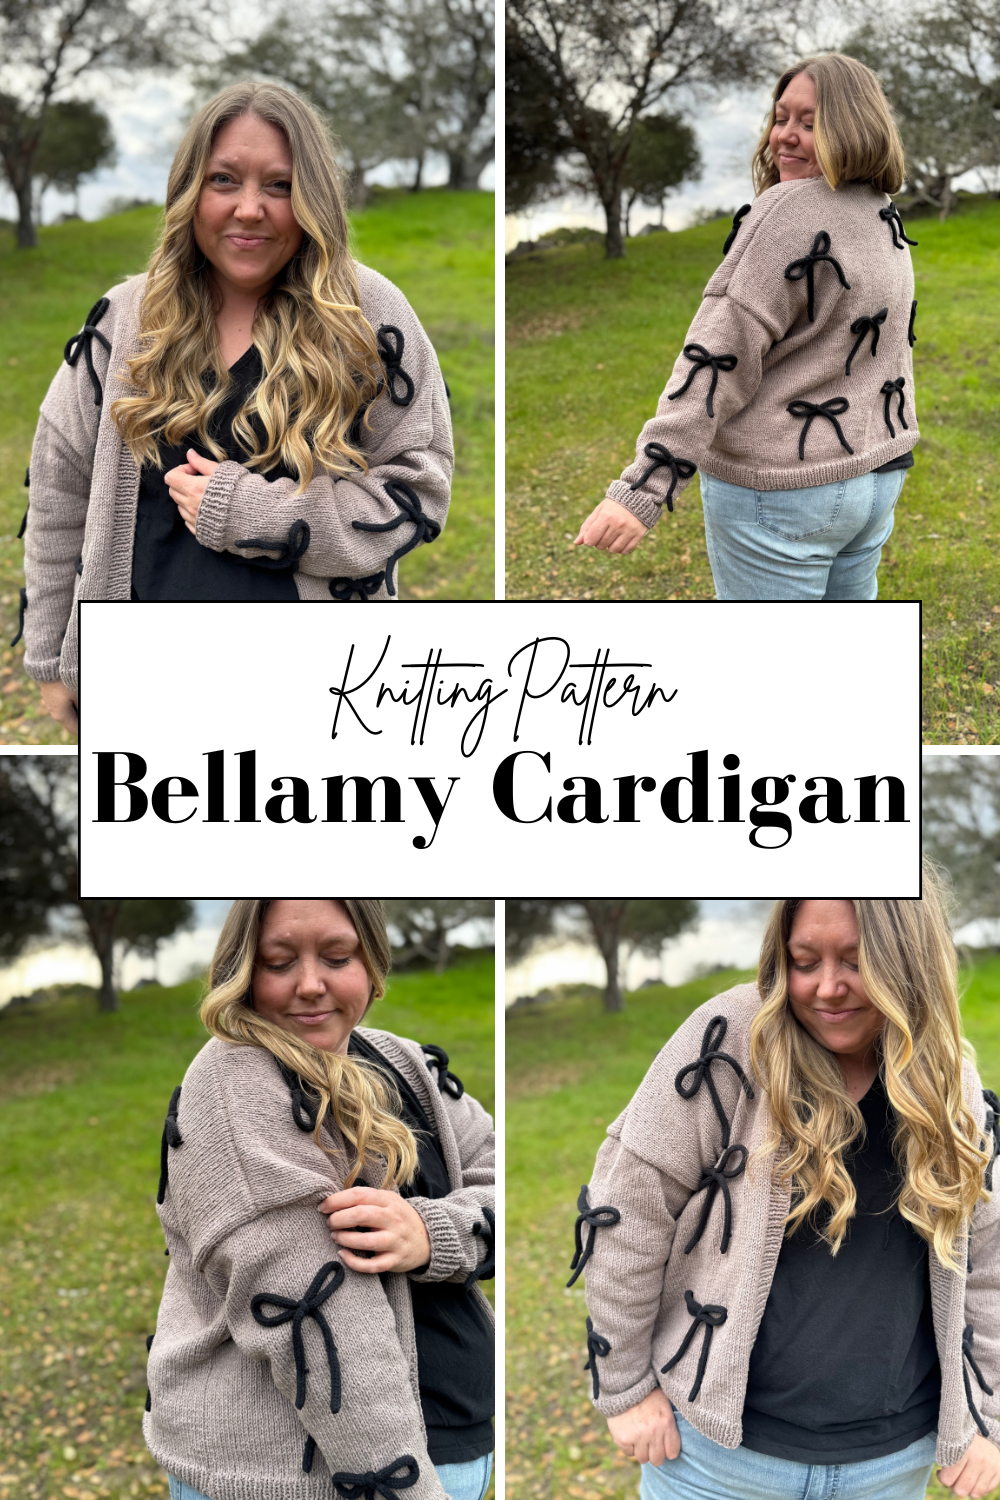
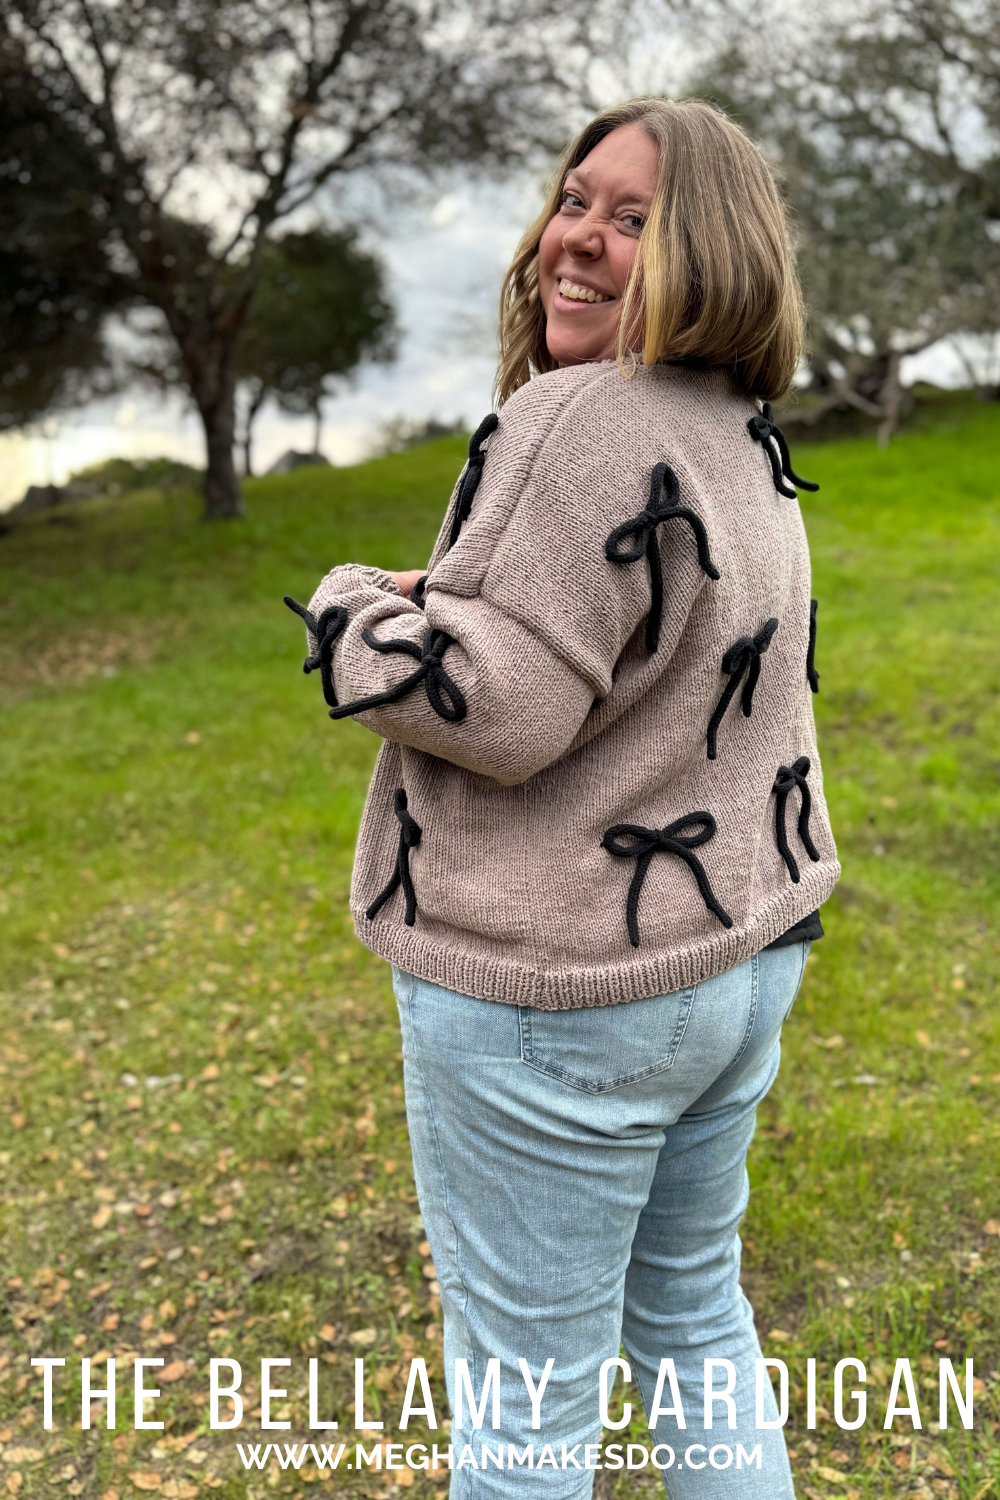
The Bellamy Cardigan-Free Knitting Pattern
This cozy cardigan is knit in buttery-soft Feels Like Butta yarn from Lion Brand using classic stockinette stitch and an easy, approachable construction. Delicate bows made from coordinating knitted I-cord are tacked on for a fun, feminine detail you can customize. Simple to make but full of personality, this pattern is perfect for knitters looking for an easy win with a little extra flair. Find the free version below, snag a PDF version in my shop or treat yourself to the kit from Lion Brand Yarn.
When I designed the Bowden Cardigan crochet pattern last year, I never imagined how much you all would love those little bows. What started as a playful detail quickly became the thing everyone commented on, shared, and recreated. Ever since, that design has been living rent-free in my head, quietly asking, “what would this look like in knit form?” And after many sketches, swatches, and cups of coffee, this cardigan finally came to life.
This knitted cardigan is the sister design to the original Bowden Cardigan, using the same cozy Feels Like Butta yarn from Lion Brand and a similarly approachable construction. I wanted to keep everything I loved about the original (the softness, wearability, and ease) while translating it into a knitting-friendly version that feels just as fun to make as it is to wear. The stockinette stitch keeps the fabric smooth and simple, making it a great project even if you’re newer to garment knitting.
Instead of working the bows directly into the fabric with colorwork, I decided to try something a little different this time. I used my Caydo I-cord machine to knit yards of I-cord in a coordinating color, then formed them into bows and tacked them onto the finished cardigan. This approach not only adds dimension and texture, but also makes the bows feel like little embellishments you can place exactly where you want them. Feel free to switch up the placement from what I have in the instructions to make it truly your own.
I’ve included a video tutorial on how to create the bows. I loved how quick and easy the Caydo I-cord machine made this process and I highly recommend getting one if you think you’ll make i-cord in the future. But don’t worry if you don’t have an I-cord machine, you can also make the I-cord using double point needles instead. It just might take a bit longer.
This cardigan is meant to be joyful and low-pressure. The construction is straightforward, the yarn is forgiving, and the bows are a reminder that not every garment has to be serious or complicated to be special. Whether you loved the original crochet version or you’re just discovering this design for the first time, I hope this knitted Bow Cardigan feels like a cozy, creative win from cast-on to final stitch.
The Bellamy Cardigan Knitting Pattern
Materials:
1149-1900 yards (6-9 skeins) of Lion Brand Feels Like Butta in Color A (Cocoa)
350-390 yards (2 skeins) of Lion Brand Feels Like Butta in Color B (Black)
US size 7(4.5mm) circular knitting needles (24” and 60”)
US size 6(4mm) Double Point Needles or Automatic i-Cord machine
Tapestry needle, scissors, tape measure
Notes:
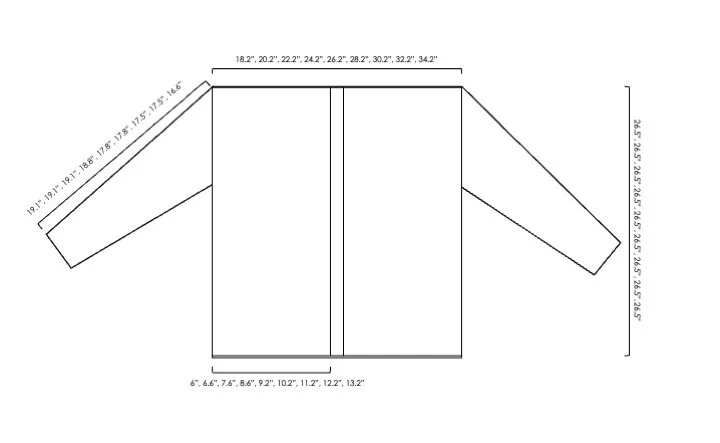
1.Pattern is made of 5 panels (back, front right, front left and sleeves). All panels are worked from the bottom up. The collar is worked directly onto the front edge of the cardigan.
2.Pattern is written in sizes XS(S, M, L, XL, 2X, 3X, 4X, 5X). It is recommended to go through and highlight your size in all sections.
3.The bows are made from i-cord and are added after each panel is made.
Abbreviations:
CO- cast on
st(s)- stitch(es)
K- knit
P- purl
M1R- make one right
M1L- make one left
BO- bind off
RS- right side
WS- wrong side
Gauge:
20 sts X 25 rows = 4” X 4” in stockinette stitch
Size:
XS: fits bust 28-30” (approx. 1149 yards/6 skeins Color A; 350 yards/2 skeins Color B)
S: fits bust 32-34” (approx. 1231 yards/6 skeins Color A; 350 yards/2 skeins Color B)
M: fits bust 36-38” (approx. 1330 yards/7 skeins Color A; 350 yards/2 skeins Color B)
L: fits bust 40-42” (approx. 1442 yards/7 skeins Color A; 350 yards/2 skeins Color B)
XL: fits bust 44-46” (approx. 1498 yards/7 skeins Color A; 390 yards/2 skeins Color B)
2X: fits bust 48-50” (approx. 1595 yards/8 skeins Color A; 390 yards /2 skeins Color B)
3X: fits bust 52-54” (approx. 1706 yards/8 skeins Color A; 390 yards /2 skeins Color B)
4X: fits bust 56-58” (approx. 1813 yards/9 skeins Color A; 390 yards /2 skeins Color B)
5X: fits bust 60-62” (approx. 1900 yards/9 skeins Color A; 390 yards /2 skeins Color B)
Bow Tutorial:
Pattern:
Back Panel
Ribbing:
With Color A and 24” needles CO 91(101, 111, 121, 131, 141, 151, 161, 171) sts.
Row 1: K1, *P1, K1, repeat from * across, turn. (91(101, 111, 121, 131, 141, 151, 161, 171)
Row 2: P1, *K1, P1, repeat from * across, turn. (91(101, 111, 121, 131, 141, 151, 161, 171)
Rows 3-9: Repeat Rows 1 & 2, ending on a Row 1 repeat.
Main Body:
Row 1(RS): K all sts across, turn. (91(101, 111, 121, 131, 141, 151, 161, 171)
Row 2(WS): P all sts across, turn. (91(101, 111, 121, 131, 141, 151, 161, 171)
Rows 3-156: Repeat Rows 1 & 2.
BO all sts leaving a long tail for seaming.
Front Panels- make two
Ribbing:
With Color A and 24” needles CO 30(33, 38, 43, 46, 51, 56, 61, 66) sts.
S(L, 2X, 4X)-ONLY
Row 1: K1, *P1, K1, repeat from * across, turn. (33(43, 51, 61)
Row 2: P1, *K1, P1, repeat from * across, turn. (33(43, 51, 61)
Rows 3-9: Repeat Rows 1 & 2, ending on a Row 1 repeat.
XS(M, XL, 3X, 5X)-ONLY
Row 1: *K1, P1, repeat from * across, turn. (30(38, 46, 56, 66)
Rows 2-9: Repeat Row 1.
Main Body:
Row 1(RS): K all sts across, turn. (30(33, 38, 43, 46, 51, 56, 61, 66)
Row 2(WS): P all sts across, turn. (30(33, 38, 43, 46, 51, 56, 61, 66)
Rows 3-156: Repeat Rows 1 & 2.
BO all sts leaving a long tail for seaming.
Sleeves- make two
Ribbing:
With Color A and 24” needles CO 39(39, 41, 41, 41, 41, 45, 45, 45) sts.
Row 1: K1, *P1, K1, repeat from * across, turn. (39(39, 41, 41, 41, 41, 45, 45, 45)
Row 2: P1, *K1, P1, repeat from * across, turn. (39(39, 41, 41, 41, 41, 45, 45, 45)
Rows 3-9: Repeat Rows 1 & 2, ending on a Row 1 repeat.
Main Body:
Sizes split off here. Make sure to follow the instructions for the size you are making. You will continue in stockinette stitch while increasing on both sides at set intervals.
XS(S, M)- ONLY
XS-ONLY Row 1(RS): K all sts across, turn. (39)
S(M)-ONLY Row 1(RS): K1, M1R, K all sts across until 1 st remains, M1L, K1, turn. (41(43)
Row 2(WS) and all even rows: P all sts across, turn. (39(41, 43)
Rows 3 & 5: K all sts across, turn. (39(41, 43)
Row 7: K1, M1R, K all sts across until 1 st remains, M1L, K1, turn. (41(43, 45)
Rows 9-99: Repeat Rows 3-7. (71(73, 75)
Rows 101-110: Repeat Rows 3-6. (71(73, 75)
BO all sts leaving a long tail for seaming.
L(XL, 2X, 3X)- ONLY
L(XL, 2X)-ONLY Row 1(RS): K all sts across, turn. (41(41, 41)
3X-ONLY Row 1(RS): K1, M1R, K all sts across until 1 st remains, M1L, K1, turn. (47)
Row 2(WS) and all even rows: P all sts across, turn. (41(41, 41, 47)
Row 3: K all sts across, turn. (41(41, 41, 47)
Row 5: K1, M1R, K all sts across until 1 st remains, M1L, K1, turn. (43(43, 43, 49)
L-ONLY
Rows 7-82: Repeat Rows 3-6. (81)
Rows 83-108: Repeat Rows 3-4. (81)
BO all sts leaving a long tail for seaming.
XL-ONLY
Rows 7-86: Repeat Rows 3-6. (83)
Rows 87-102: Repeat Rows 3-4. (83)
BO all sts leaving a long tail for seaming.
2X-ONLY
Rows 7-90: Repeat Rows 3-6. (85)
Rows 91-102: Repeat Rows 3-4. (85)
BO all sts leaving a long tail for seaming.
3X-ONLY
Rows 7-90: Repeat Rows 3-6. (91)
Rows 91-100: Repeat Rows 3-4. (91)
BO all sts leaving a long tail for seaming.
4X(5X)- ONLY
Row 1(RS): K1, M1R, K all sts across until 1 st remains, M1L, K1, turn. (47(47)
Row 2(WS) and all even rows: P all sts across, turn. (47(47)
Row 3: K1, M1R, K all sts across until 1 st remains, M1L, K1, turn. (49(49)
Row 5: K all sts across, turn. (49(49)
4X-ONLY
Rows 7-72: Repeat Rows 1-6. (93)
Rows 73-74: Repeat Rows 3-4. (95)
Rows 75-100: Repeat Rows 5-6. (95)
BO all sts leaving a long tail for seaming.
5X-ONLY
Rows 7-84: Repeat Rows 1-6. (101)
Rows 85-94: Repeat Rows 5-6. (101)
BO all sts leaving a long tail for seaming.
The bows for your Bellamy Cardigan are made with a knit i-cord. You can create one long i-cord from a whole skein of Color B yarn and then cut it into smaller pieces for each bow. You can use DPNs(double point needles) or an automatic i-cord machine.
Once you have used your preferred method to create the i-cord you will need to cut it into 21-22” pieces.
The ends of each piece will need to be finished off using the instructions below.
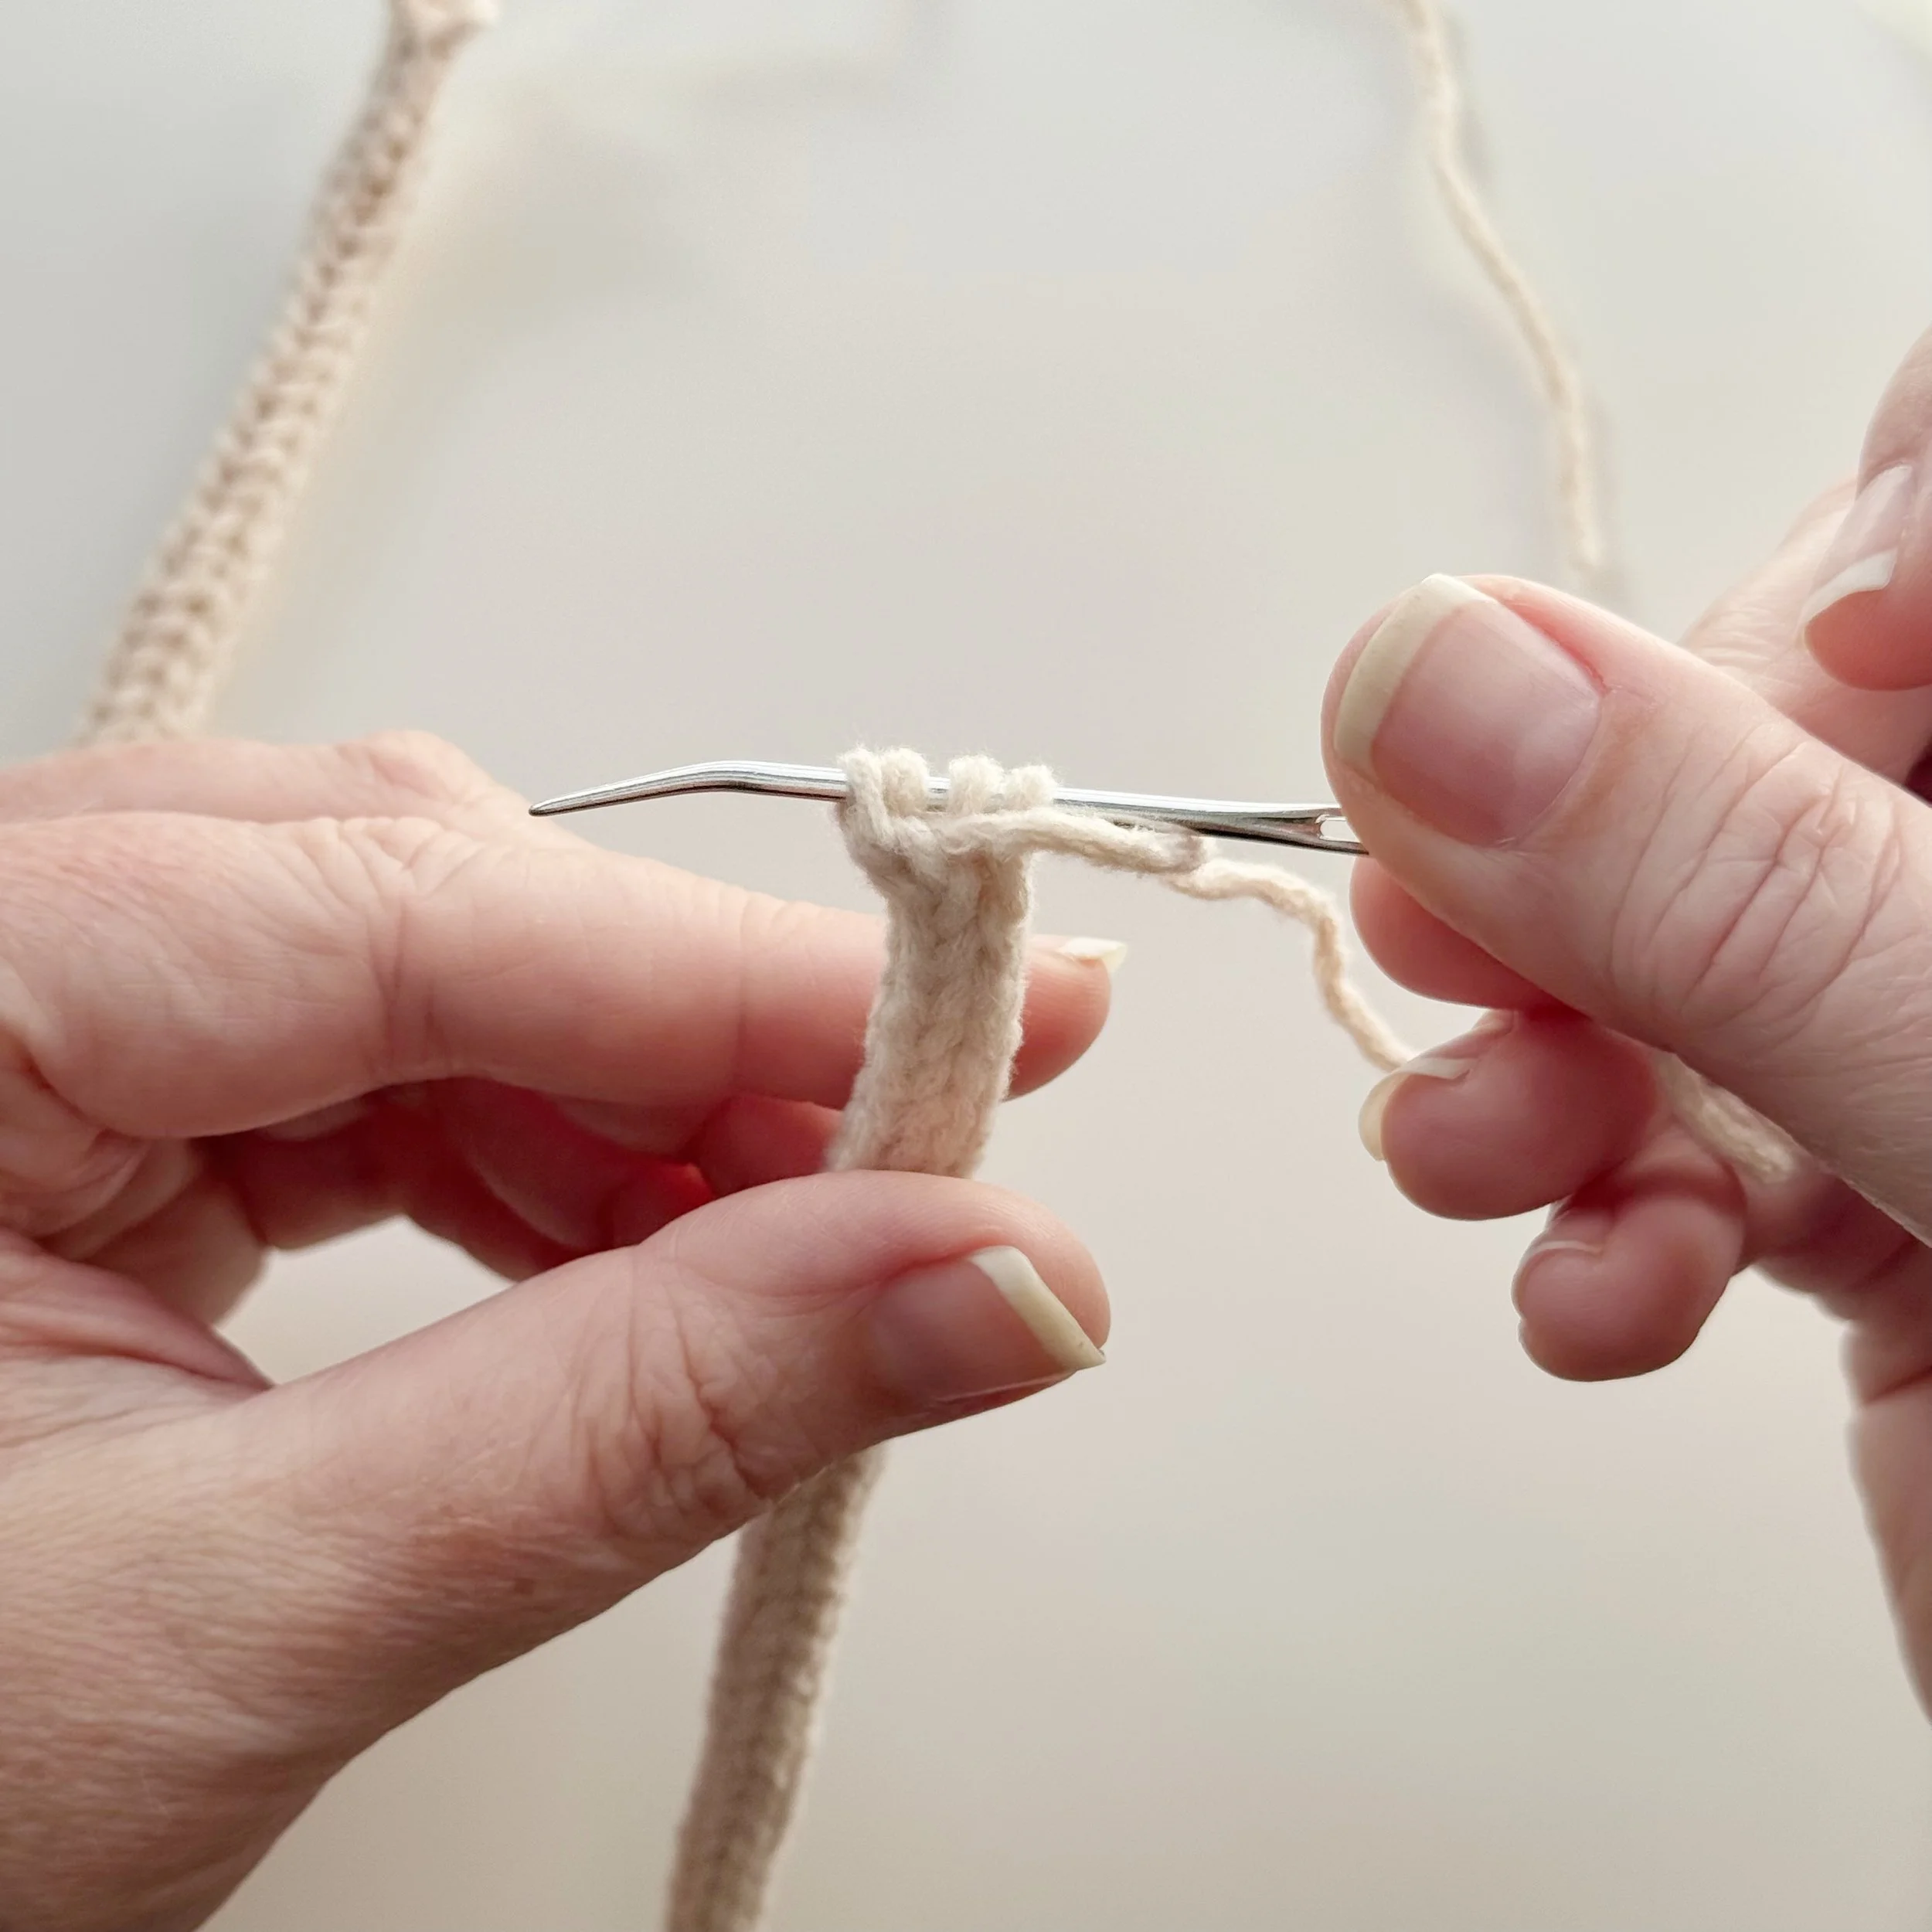
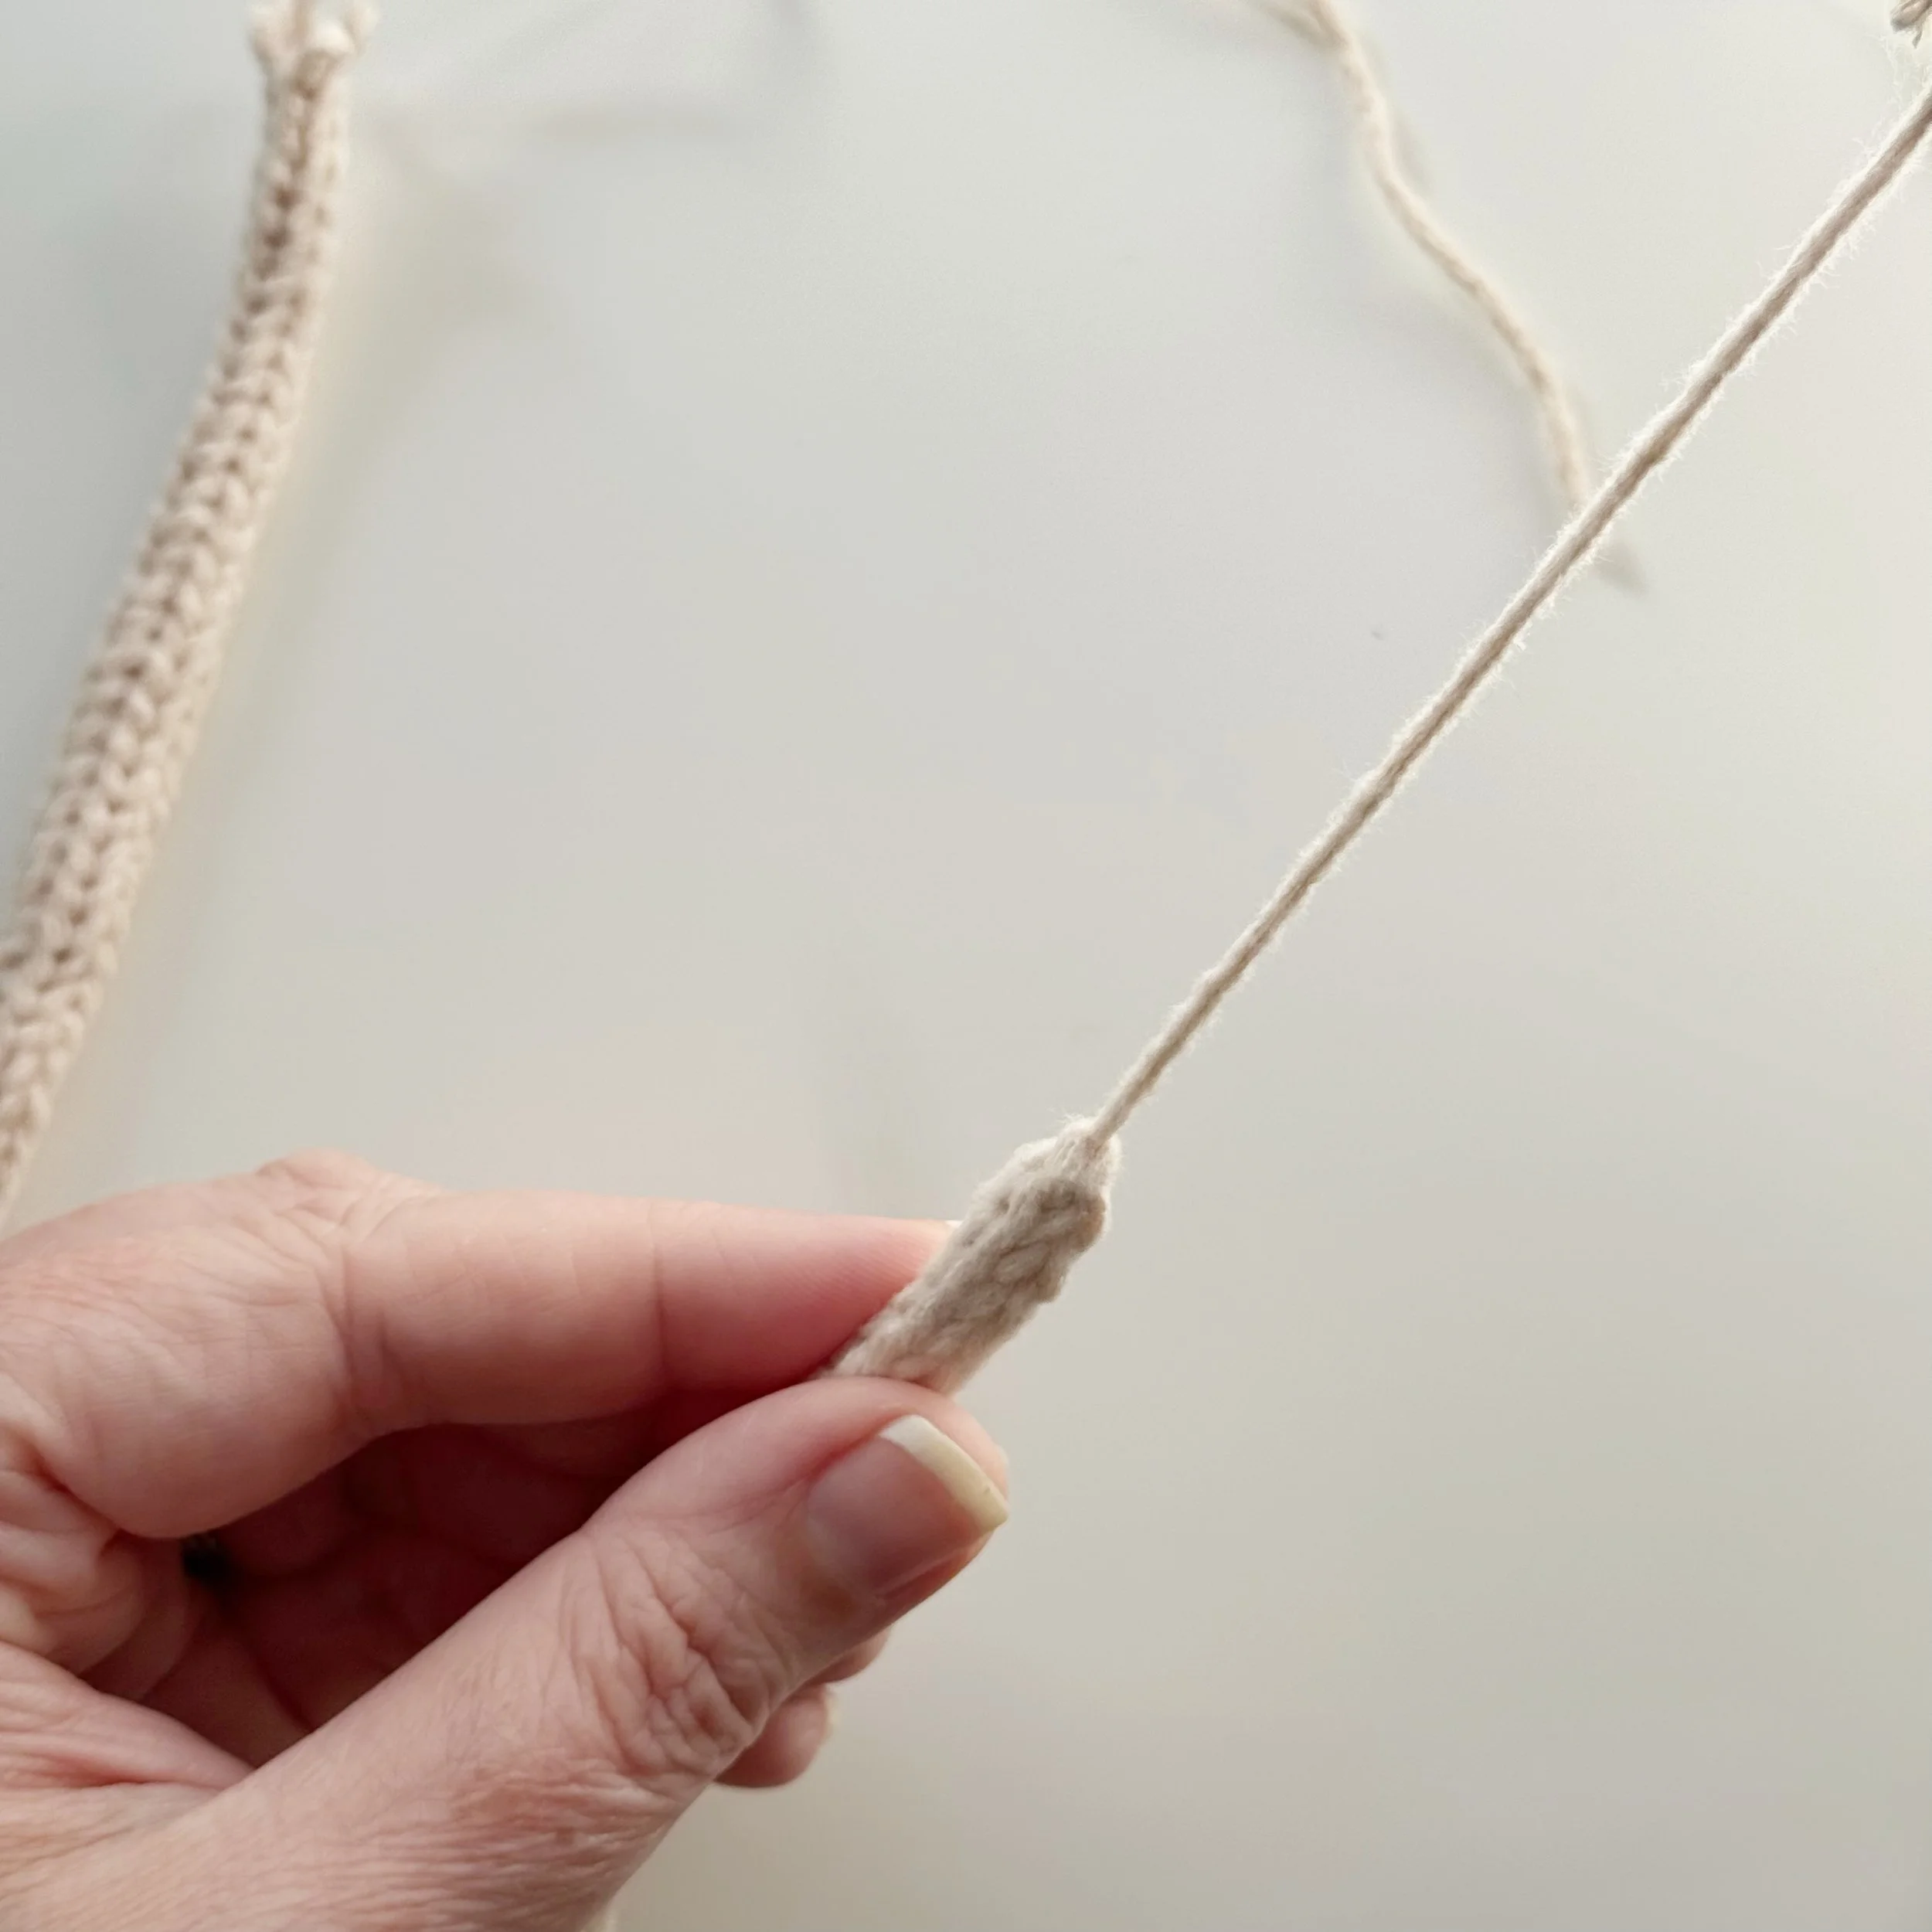
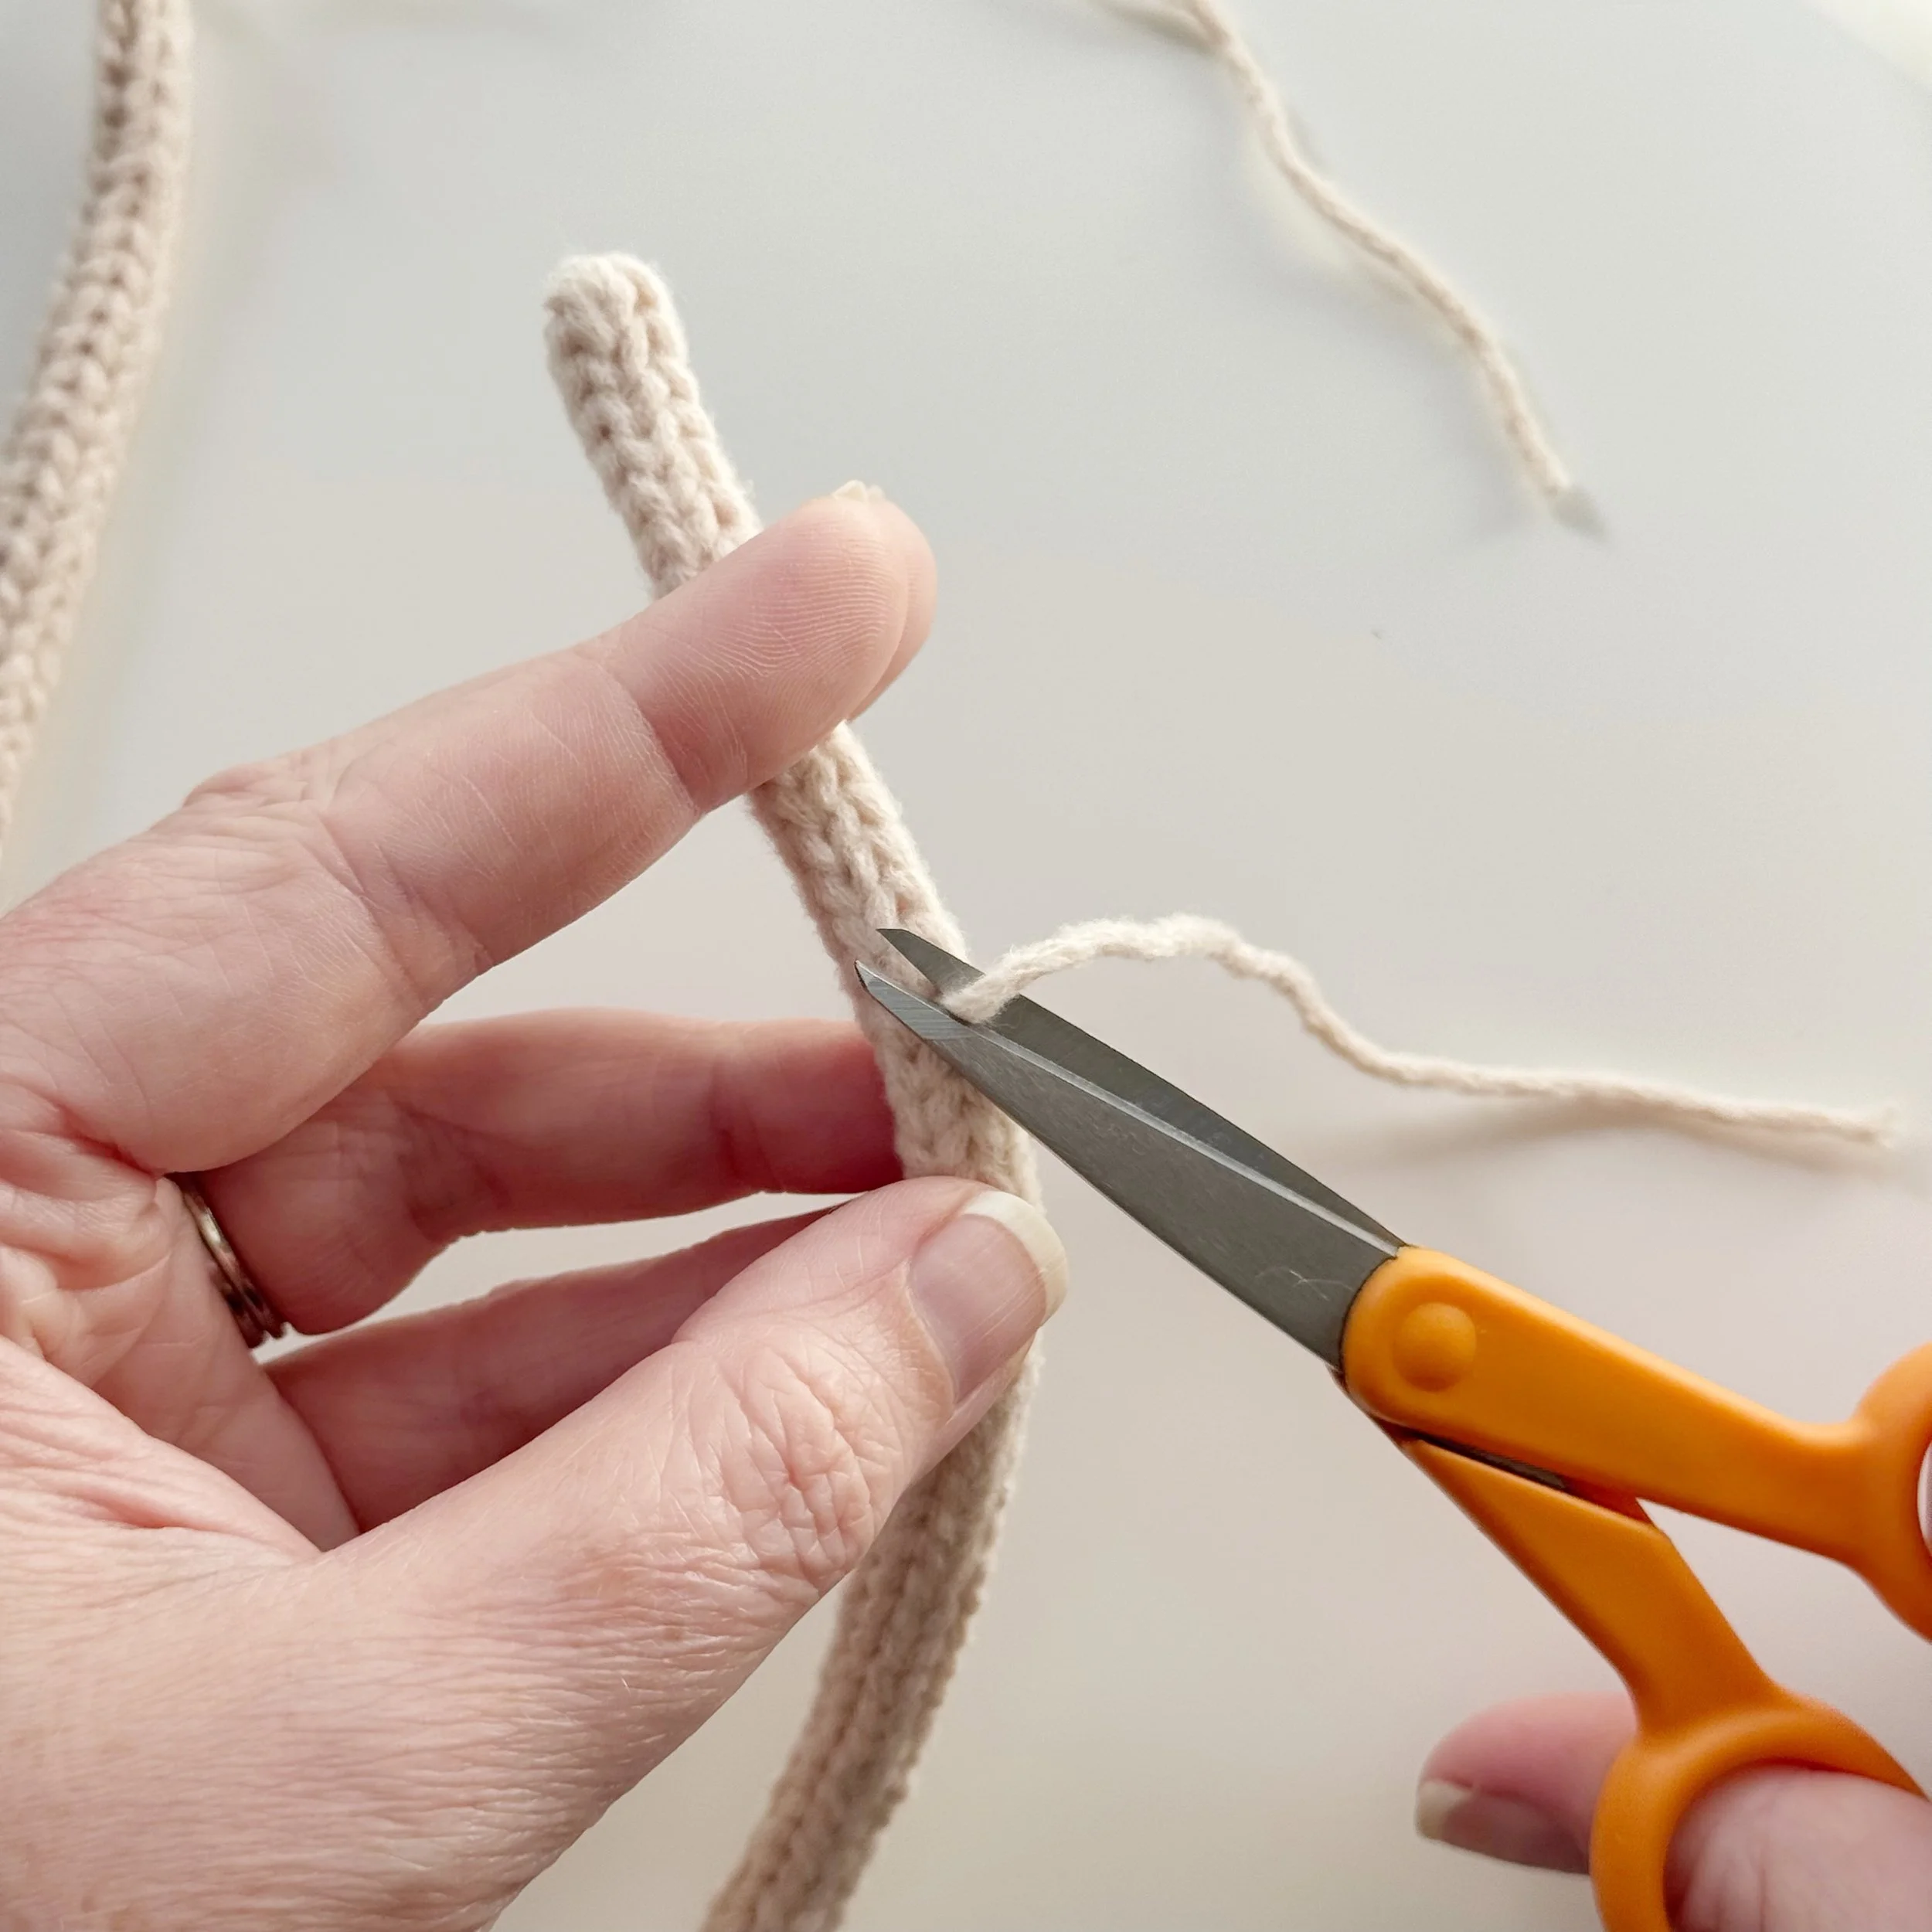
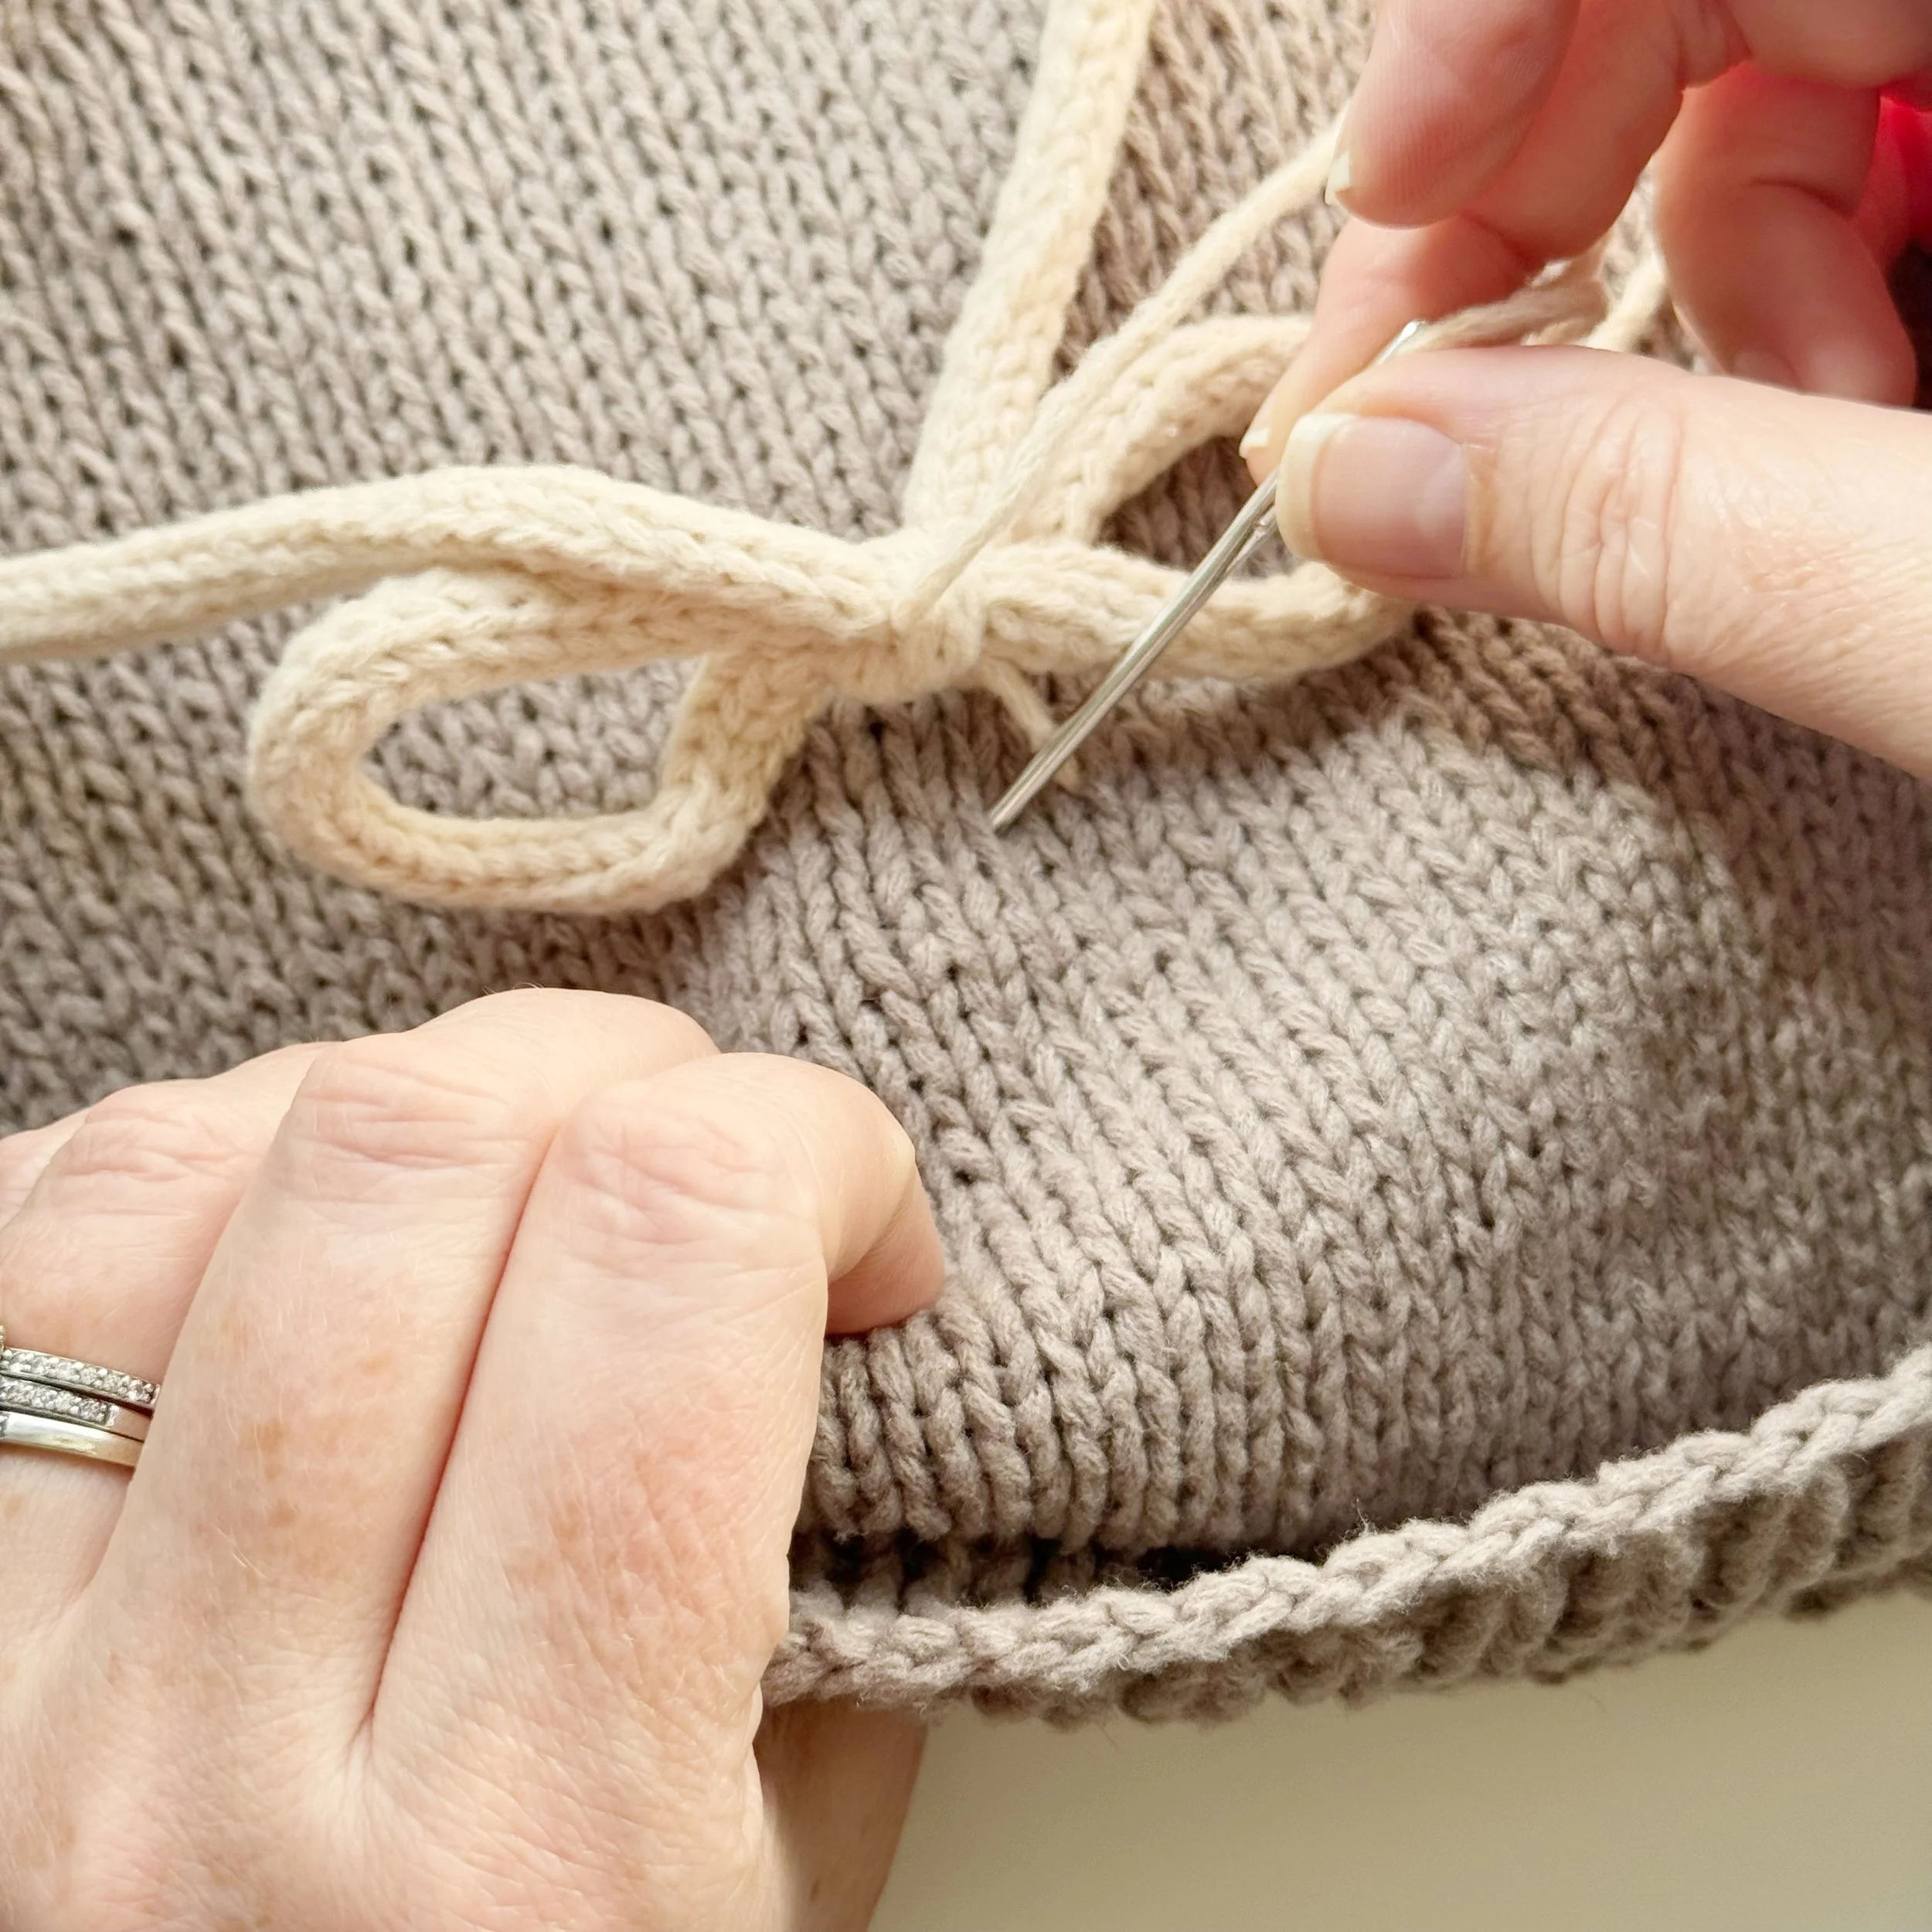
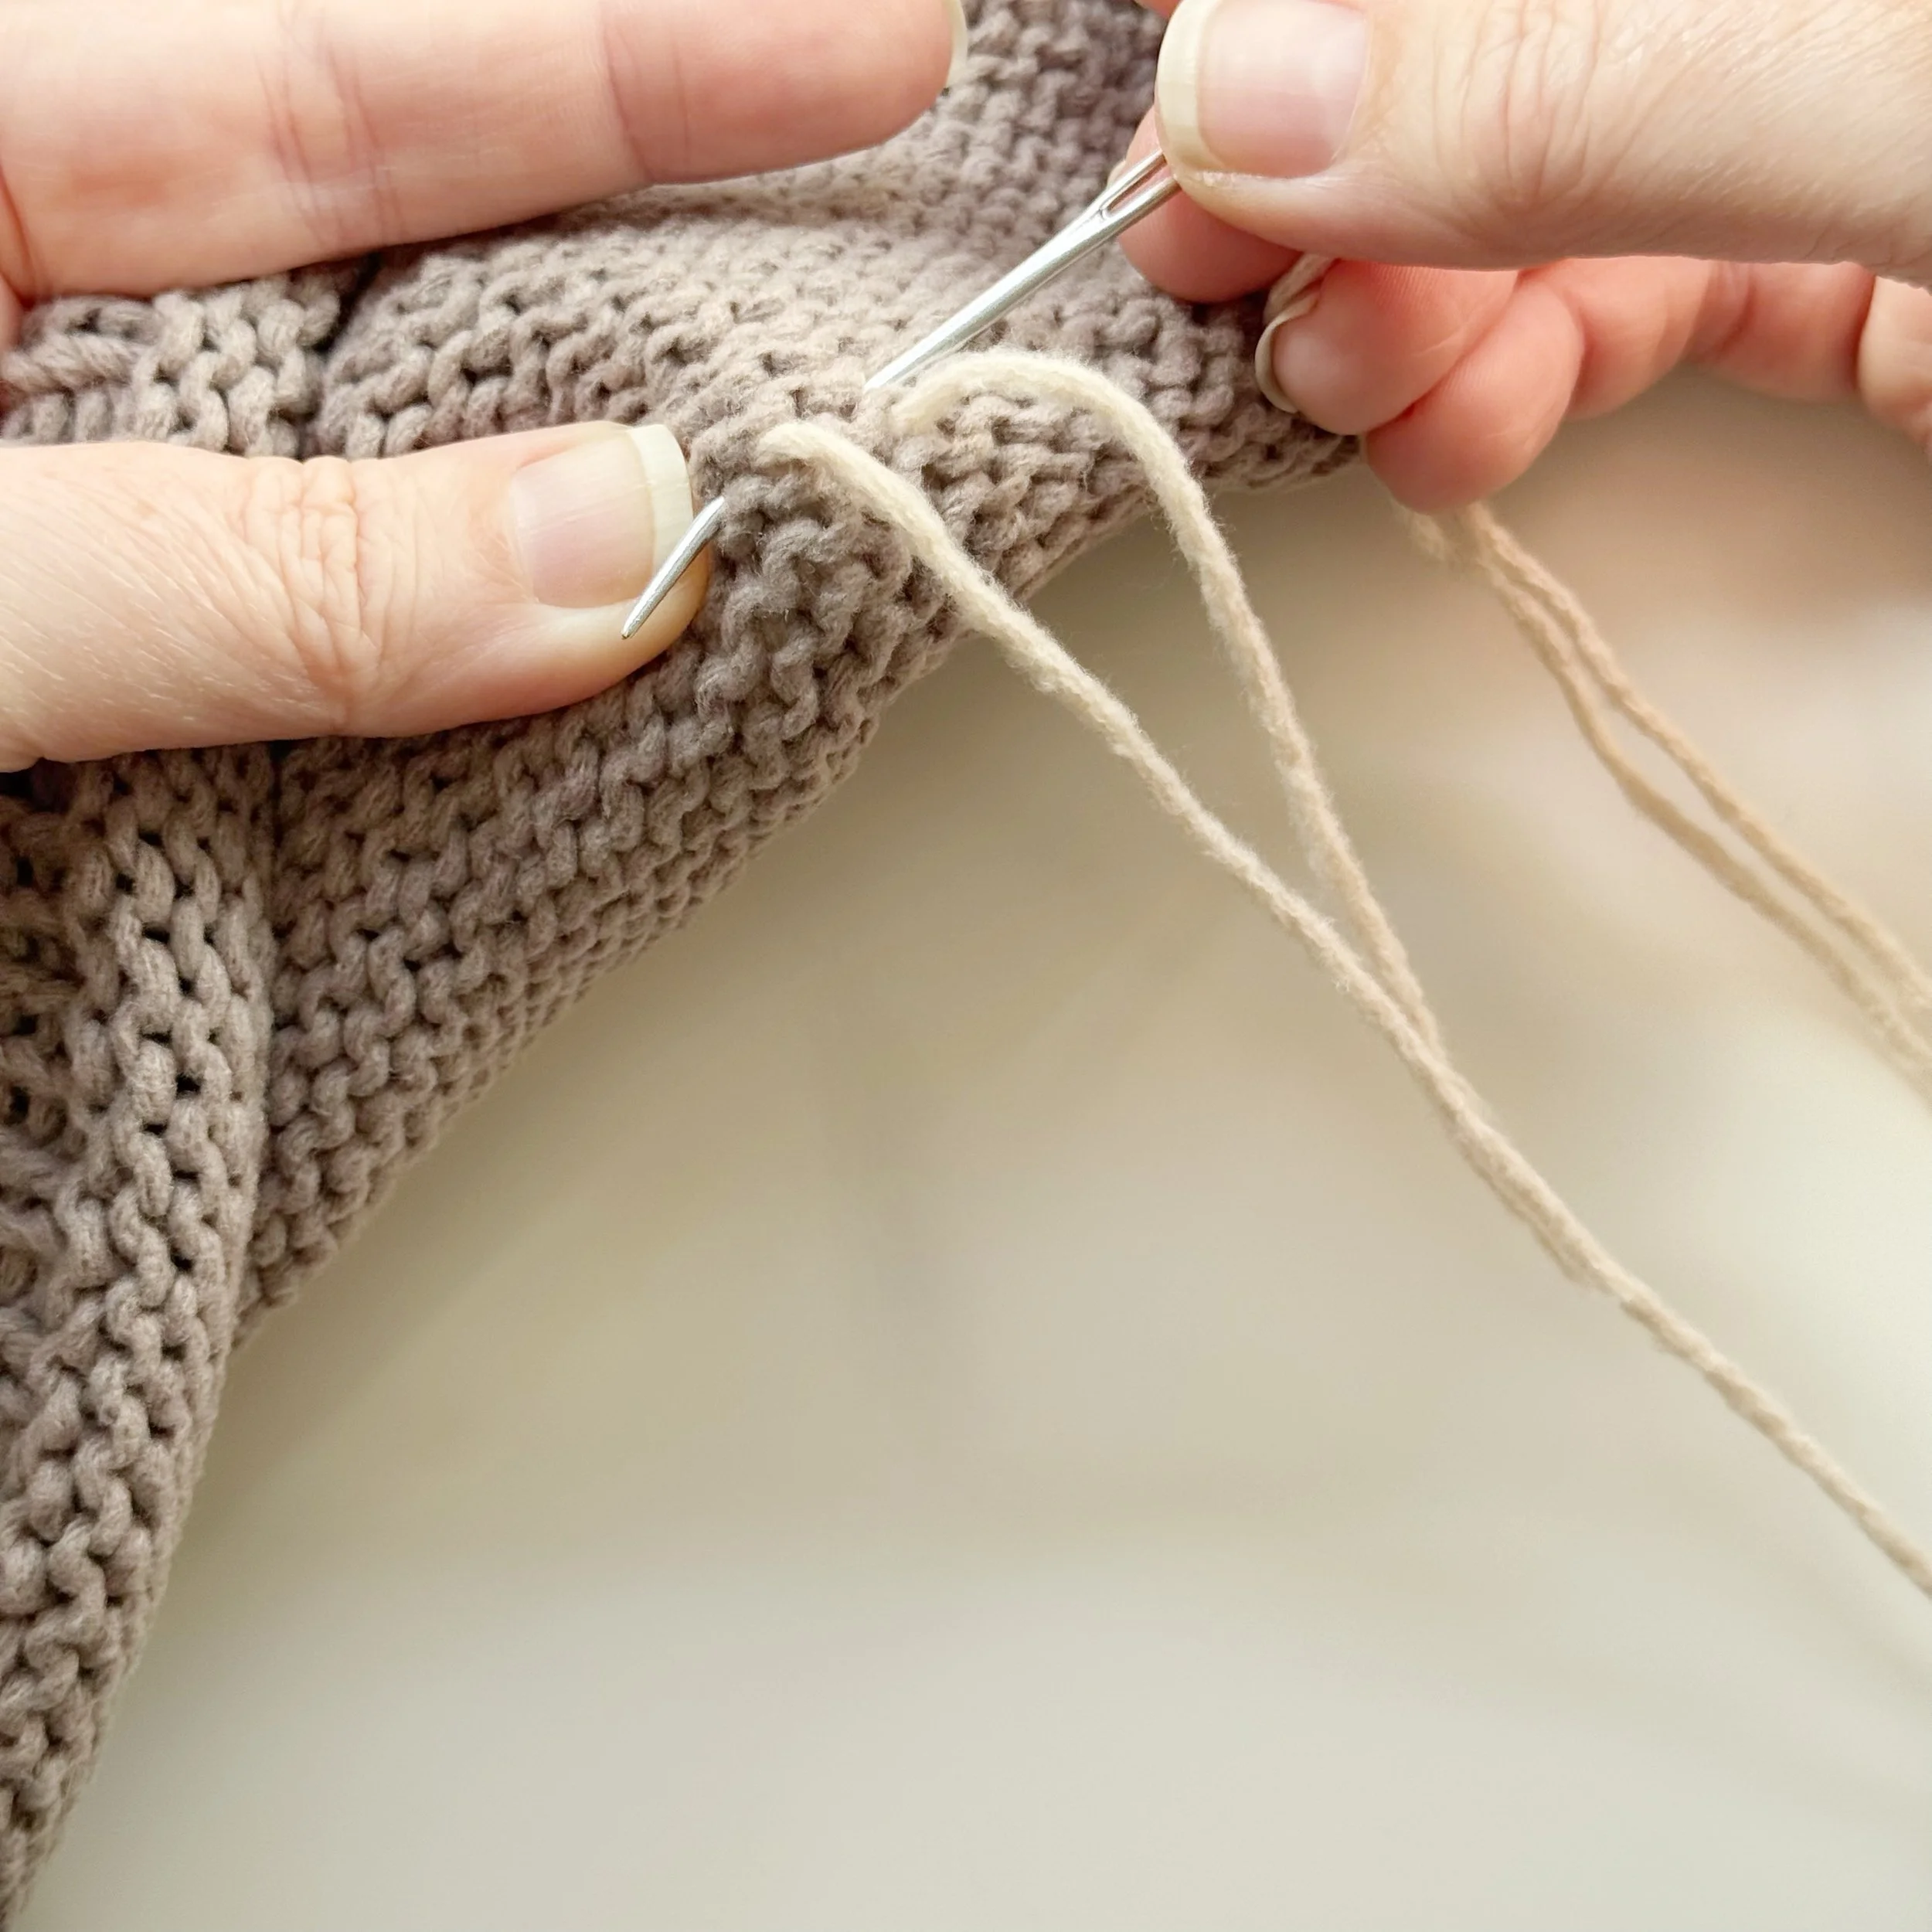
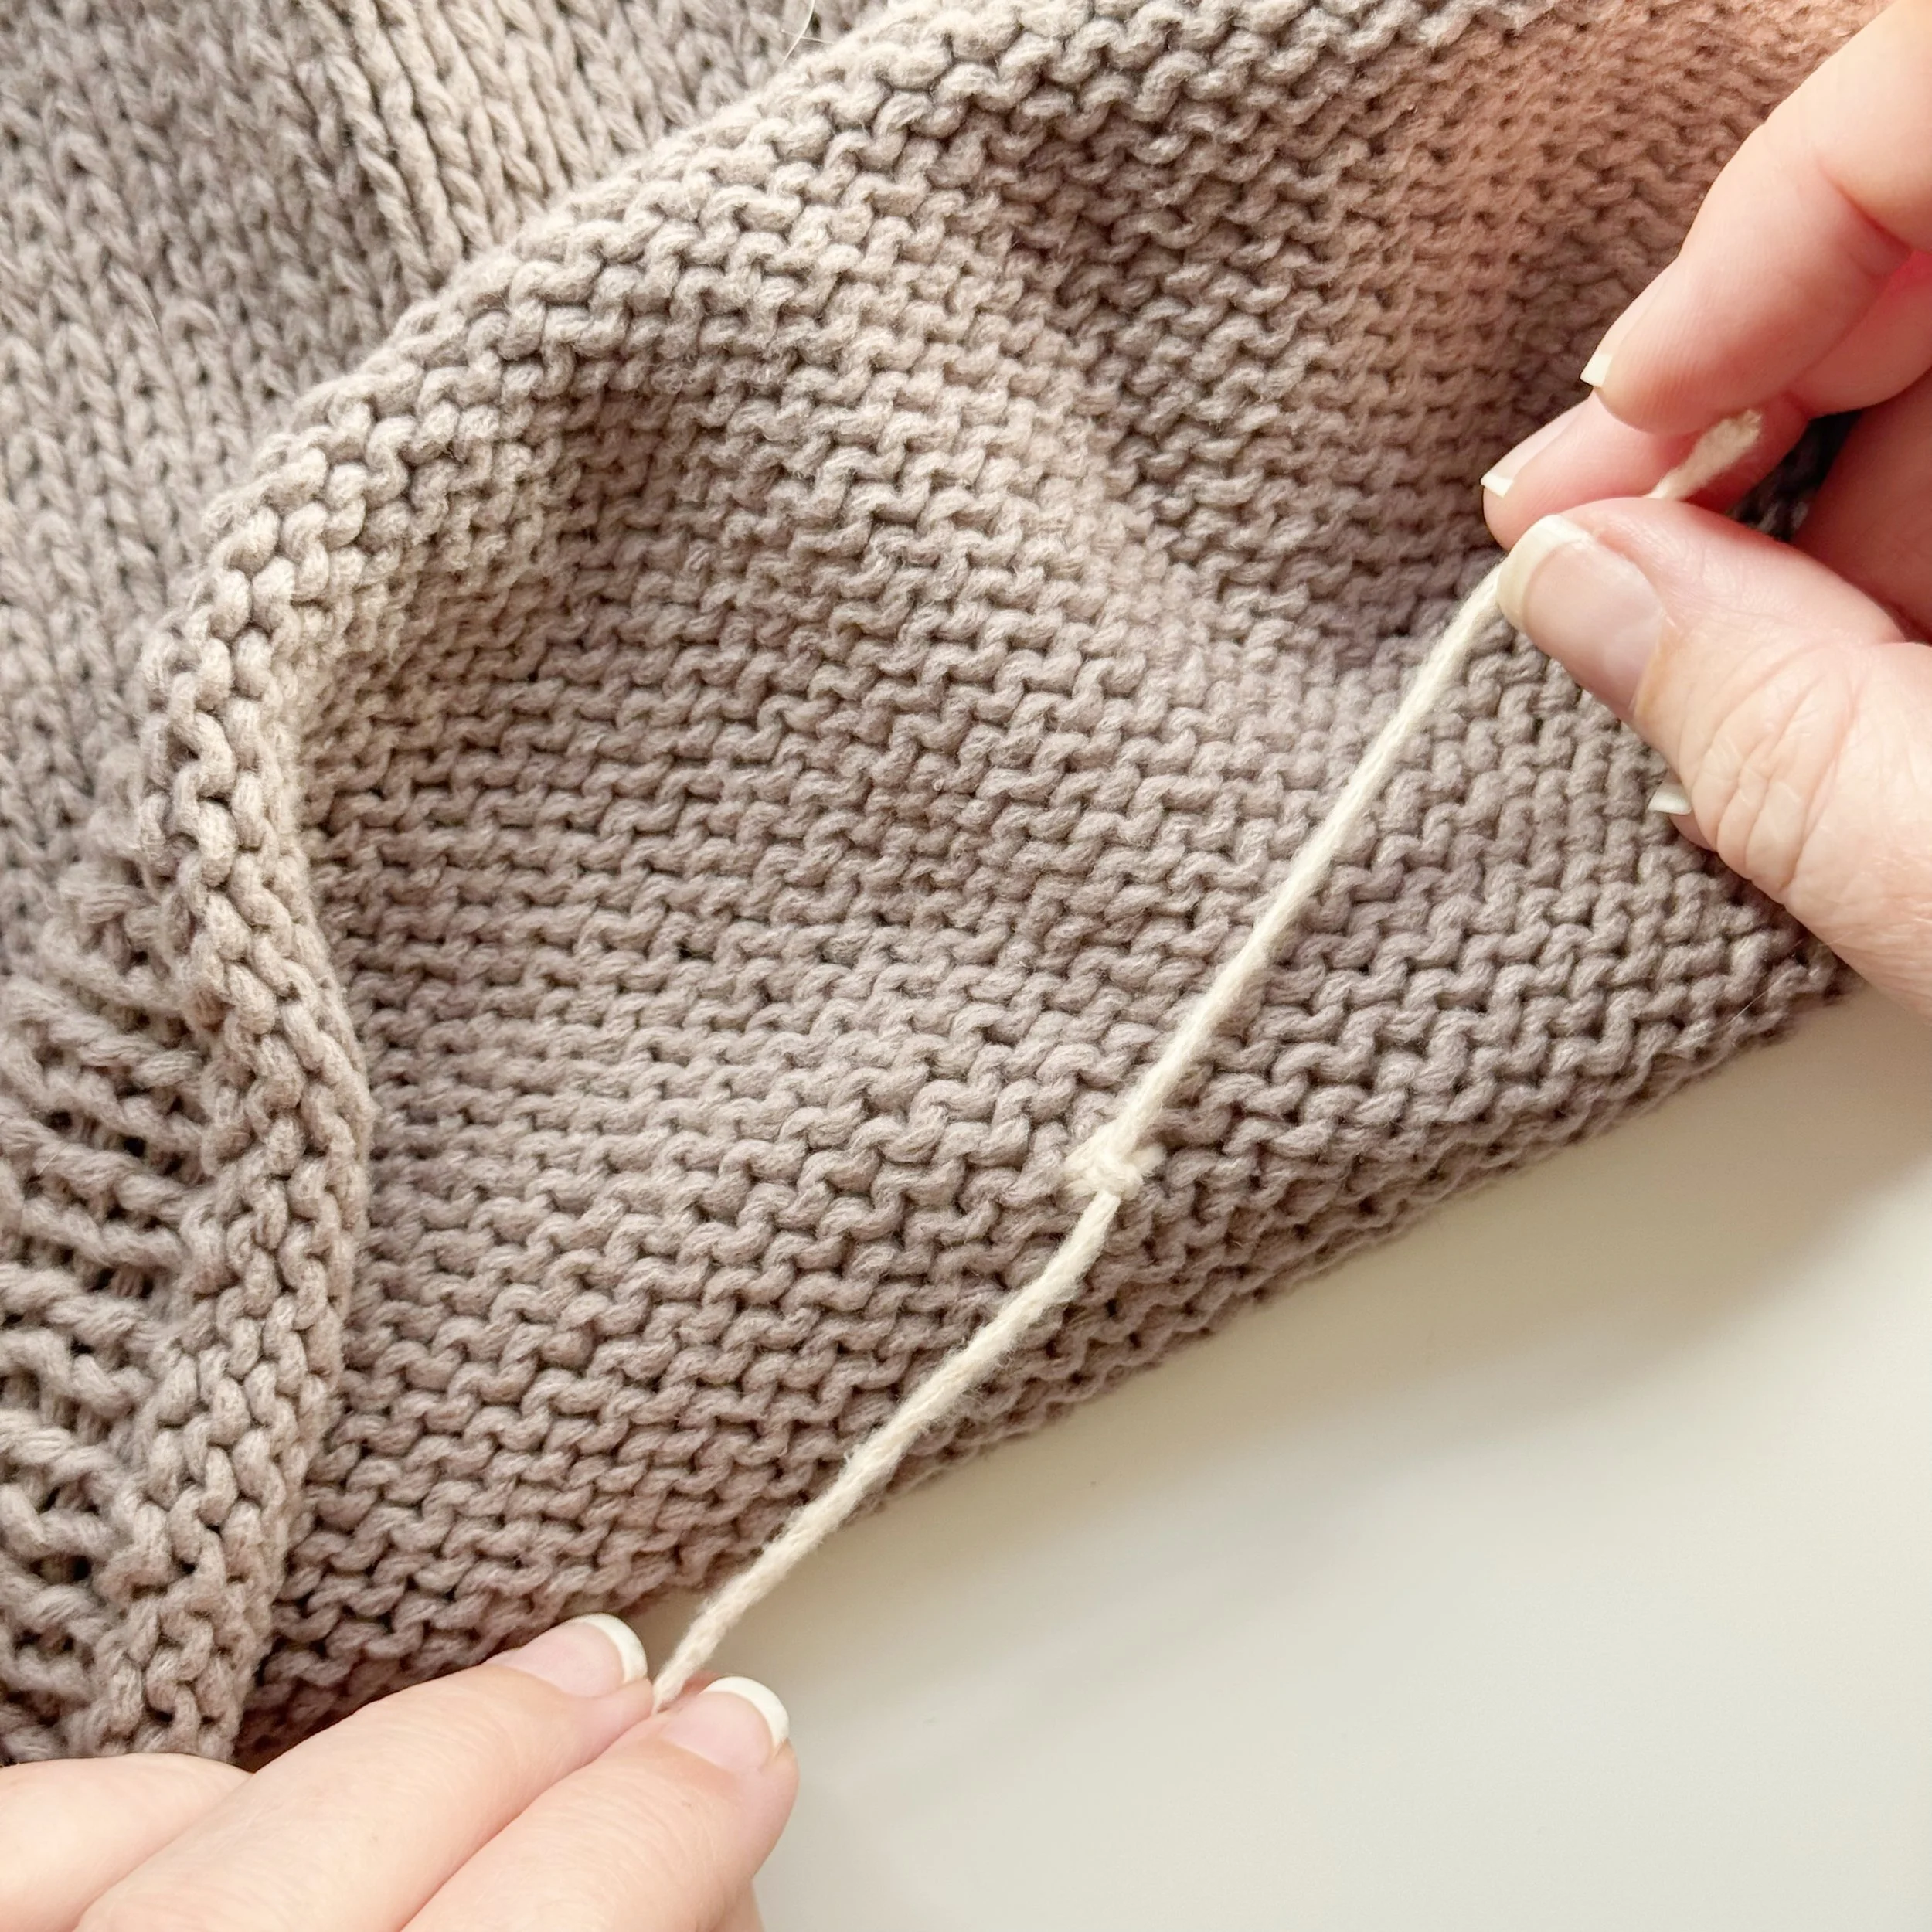
Using a tapestry needle, thread the tail into all four loops of the i-cord and pull tight. Then thread the tail into the center of the i-cord and through one side. Clip the tail with a pair of scissors.
Making the Bows:
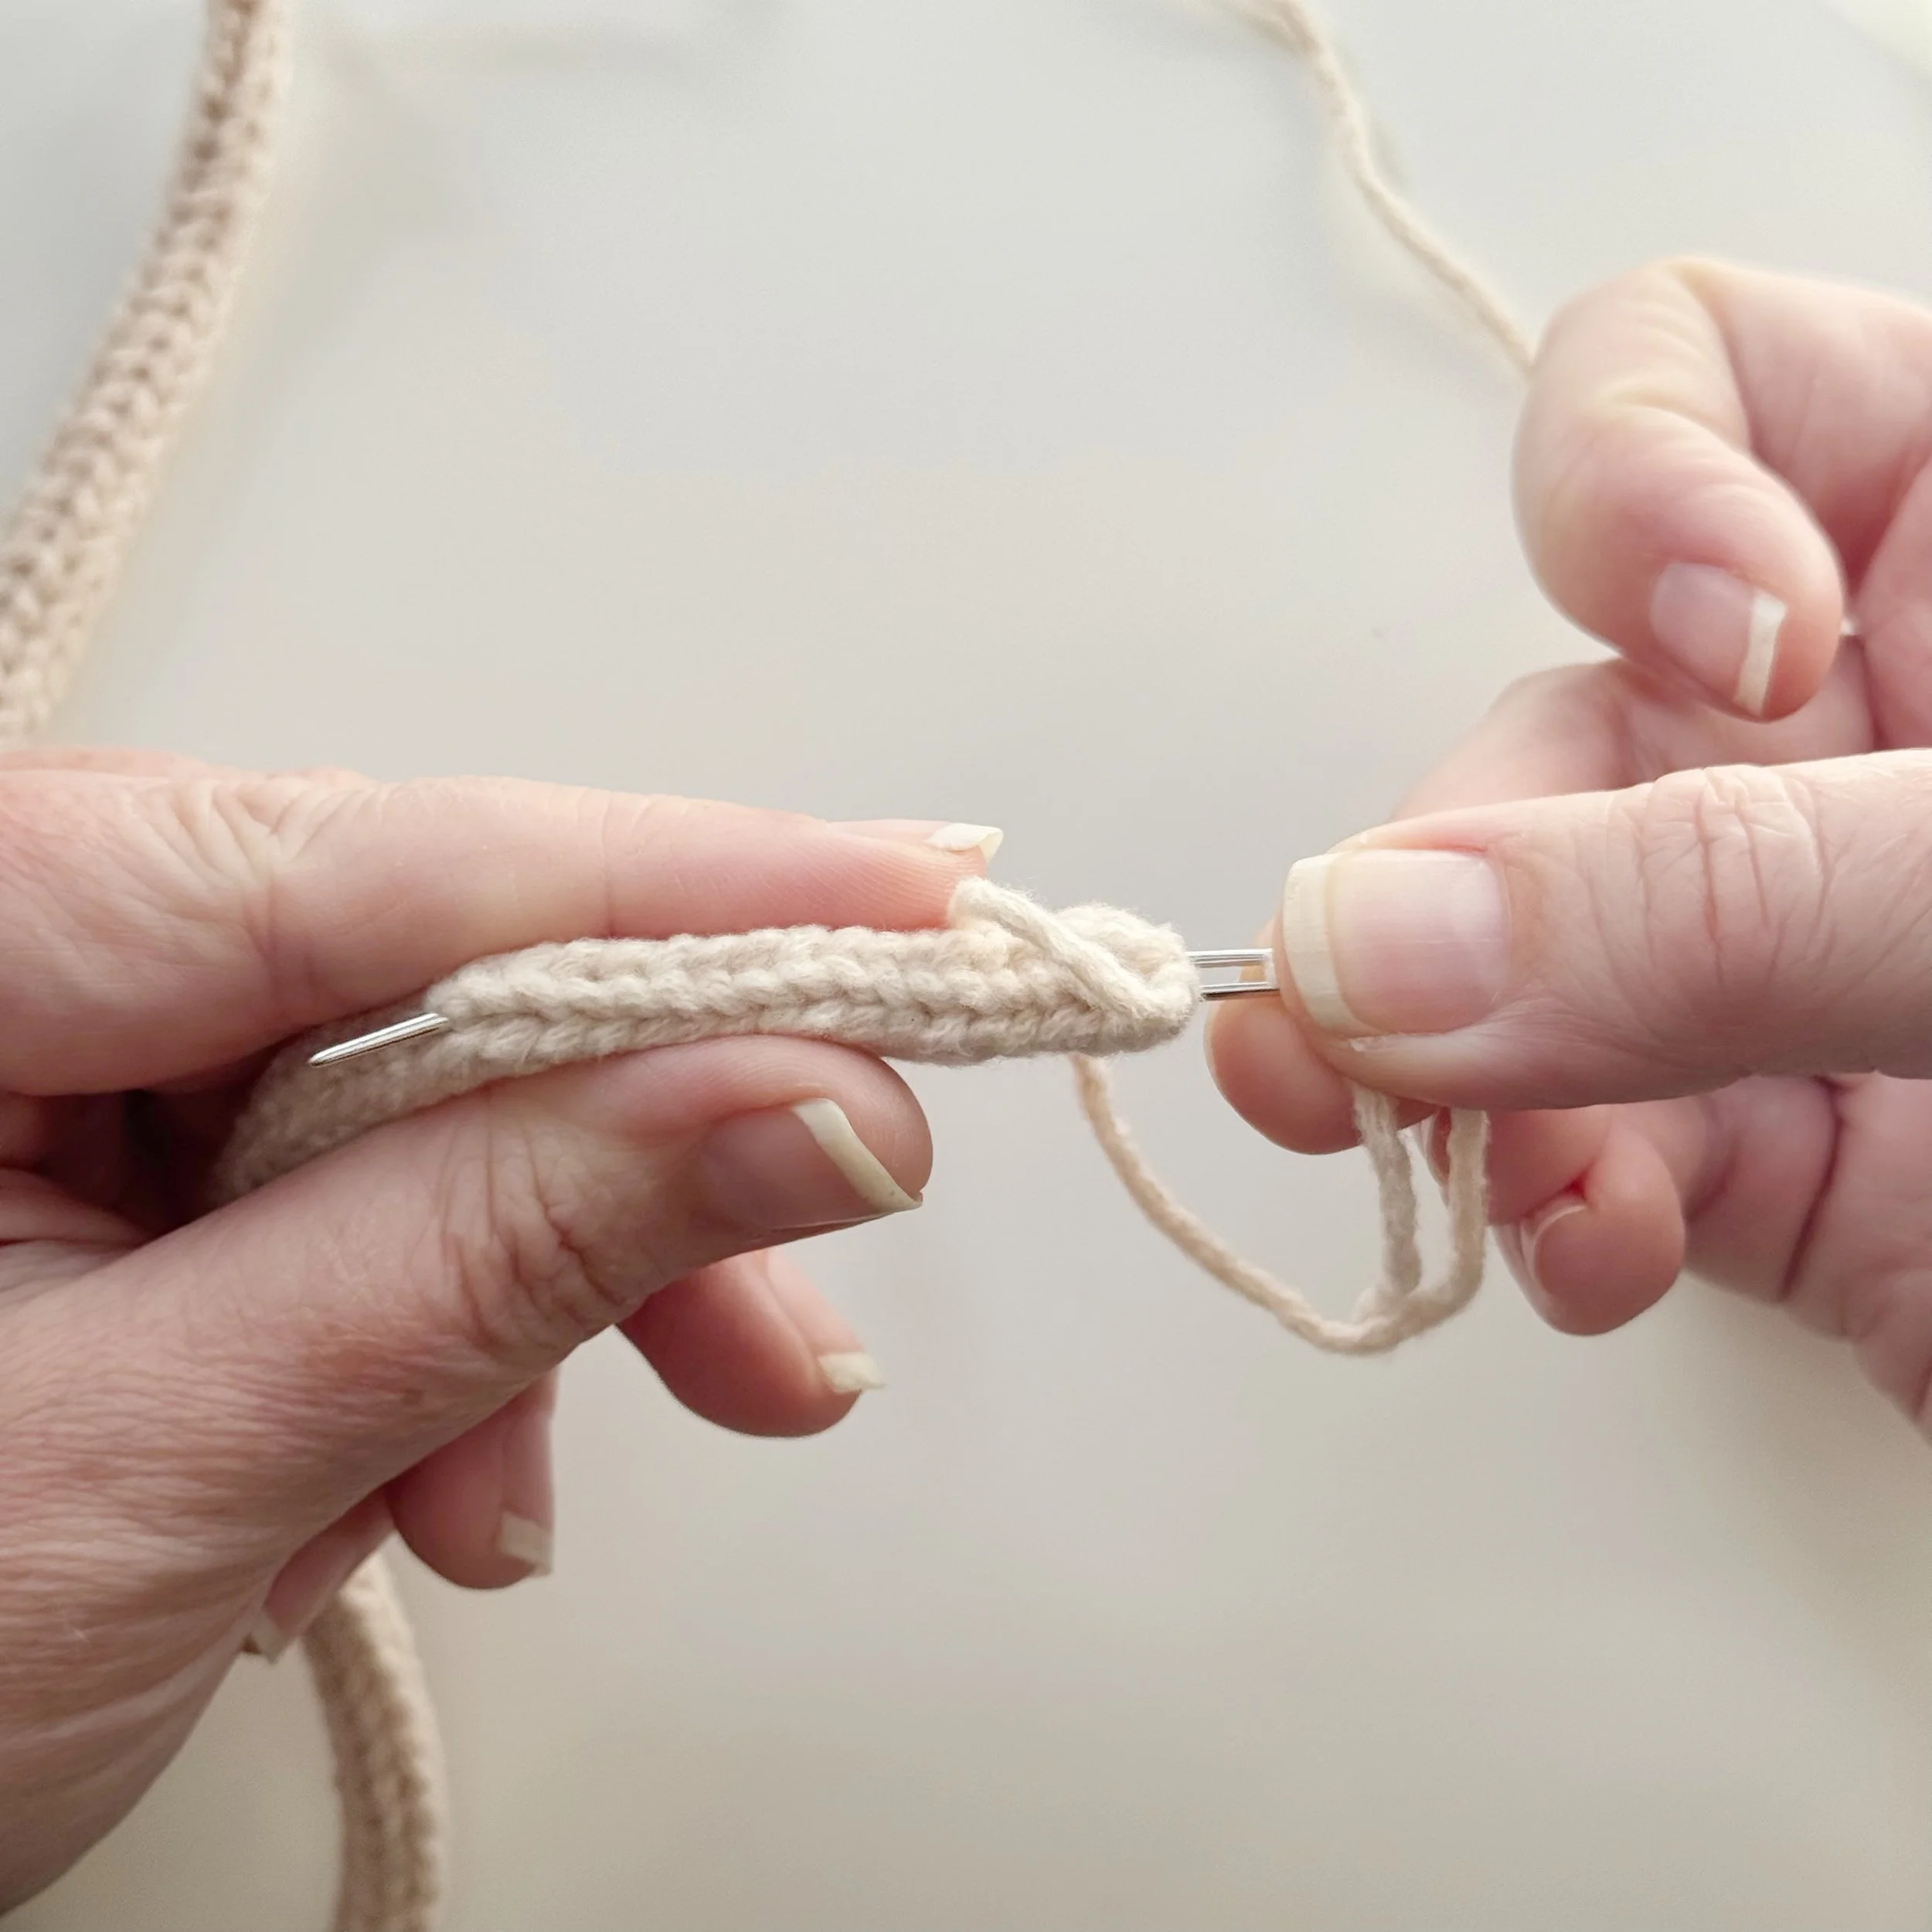
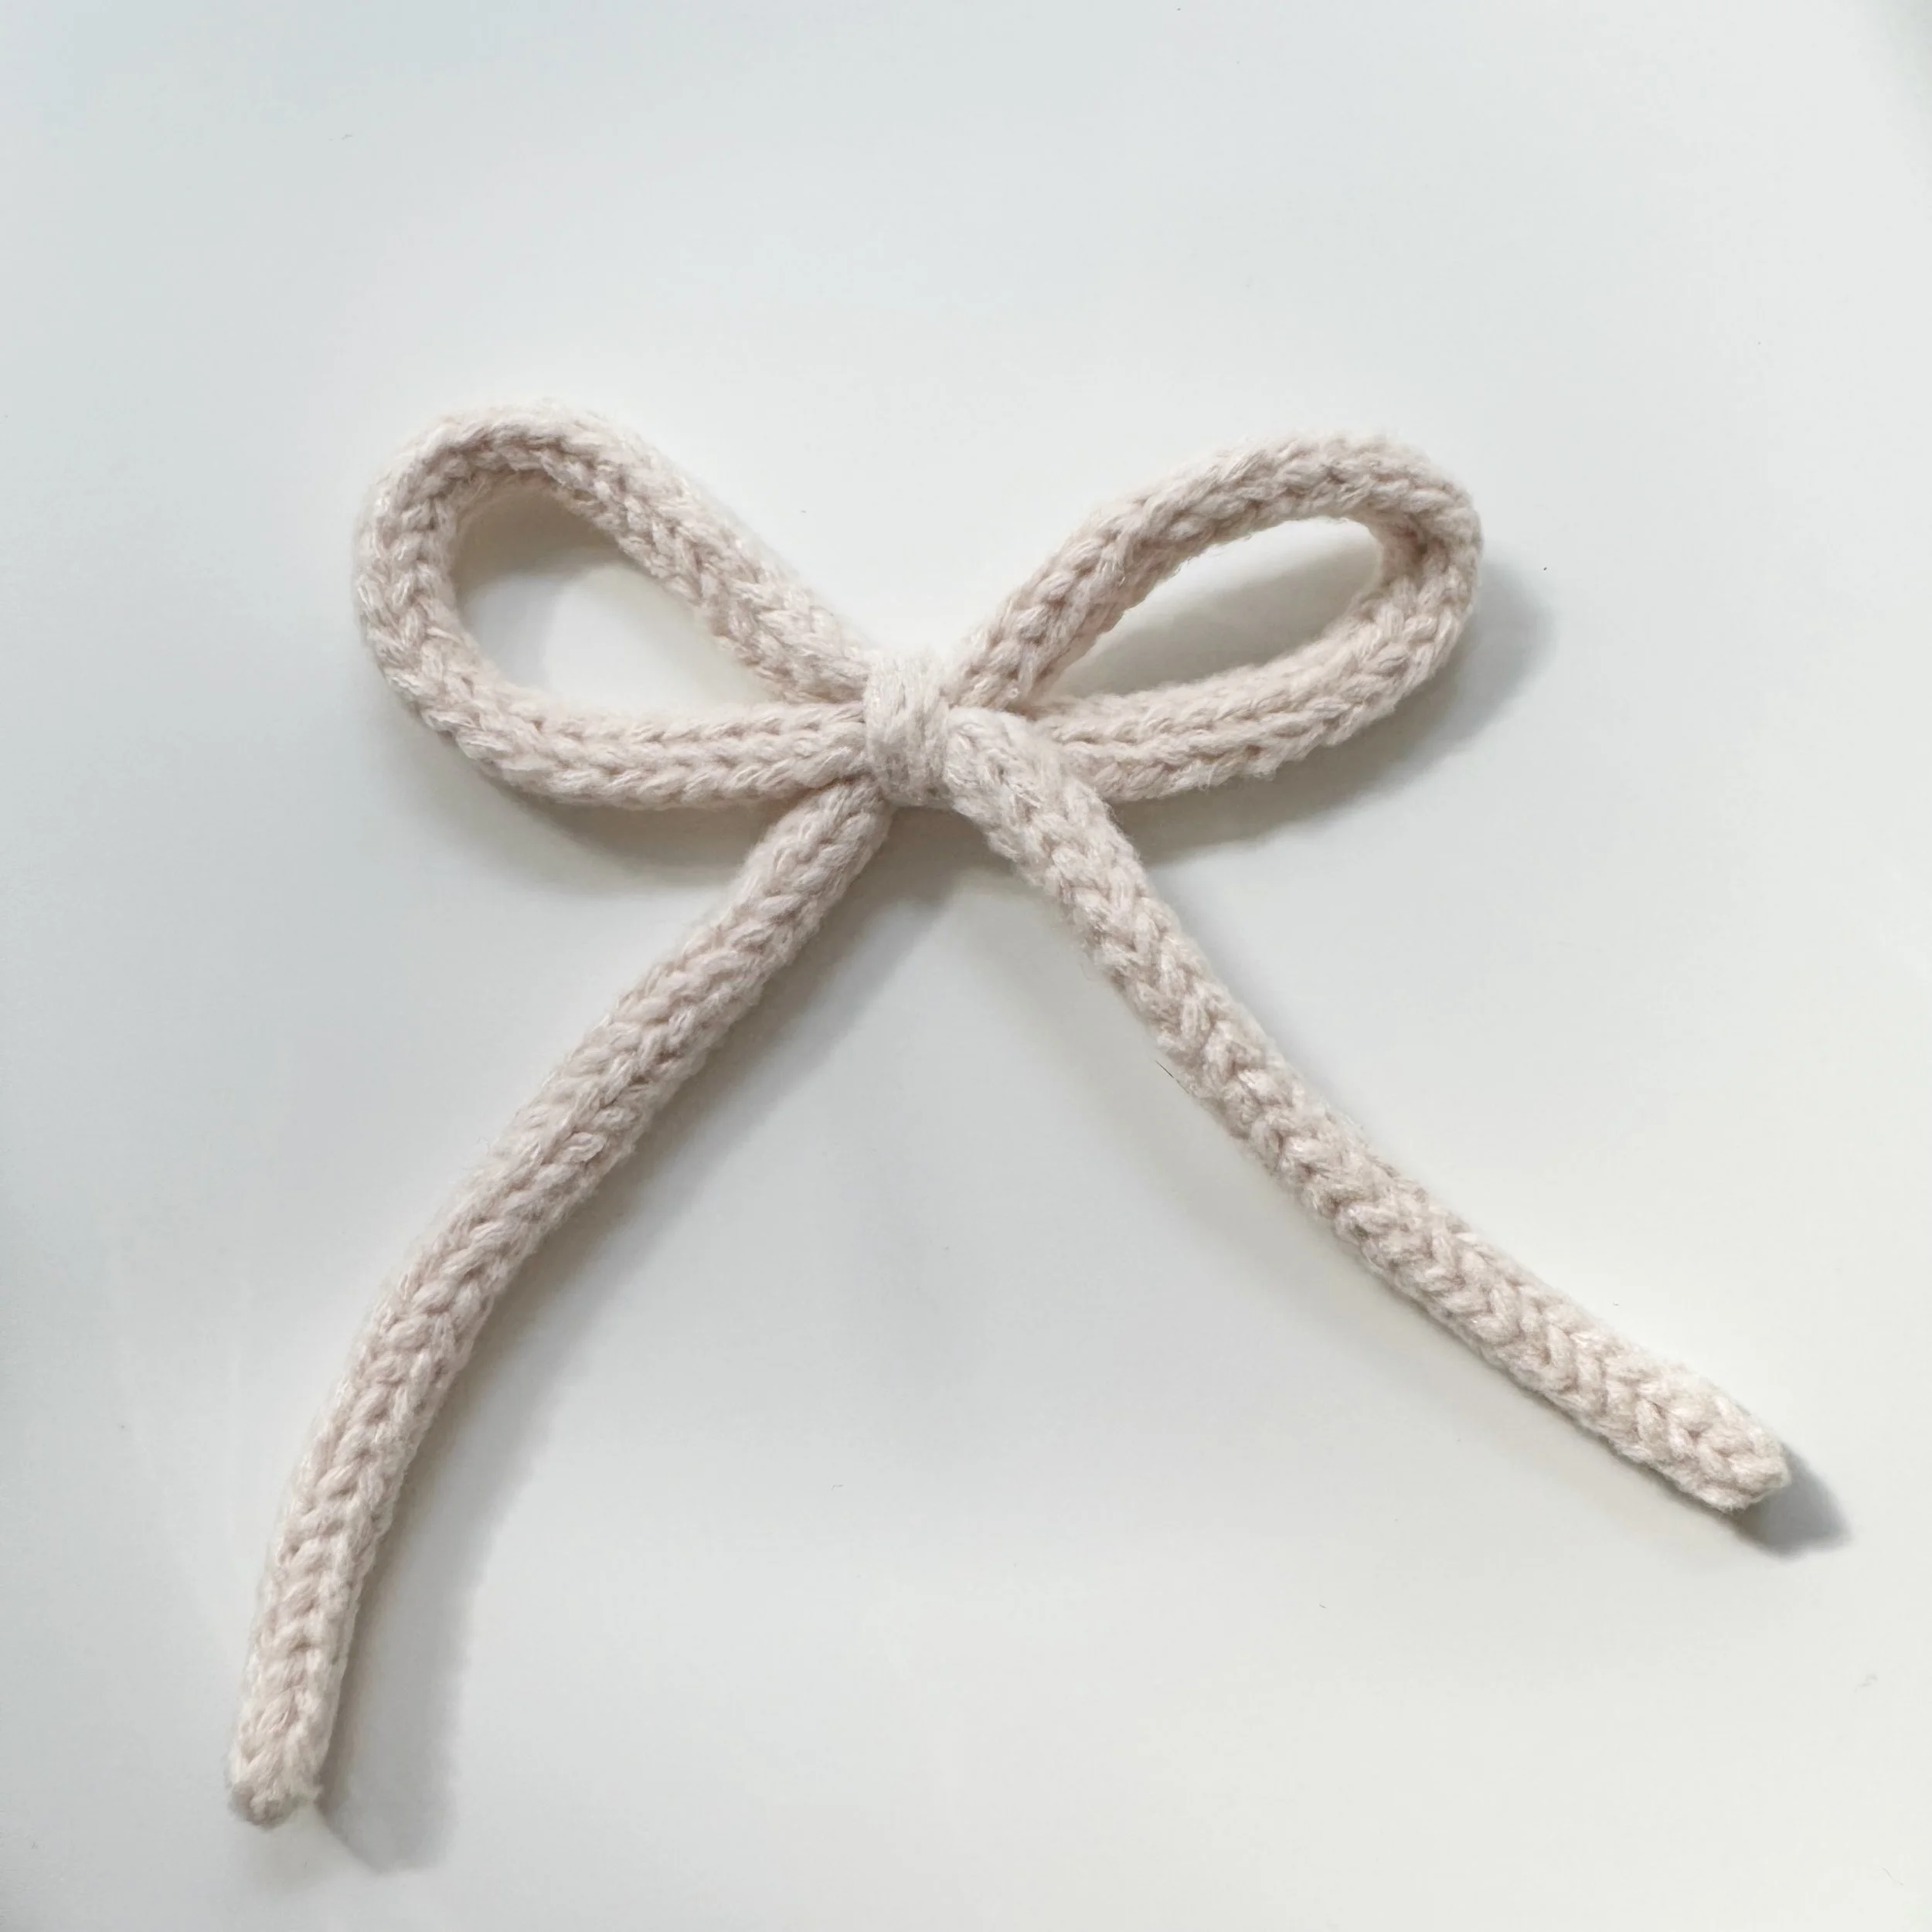
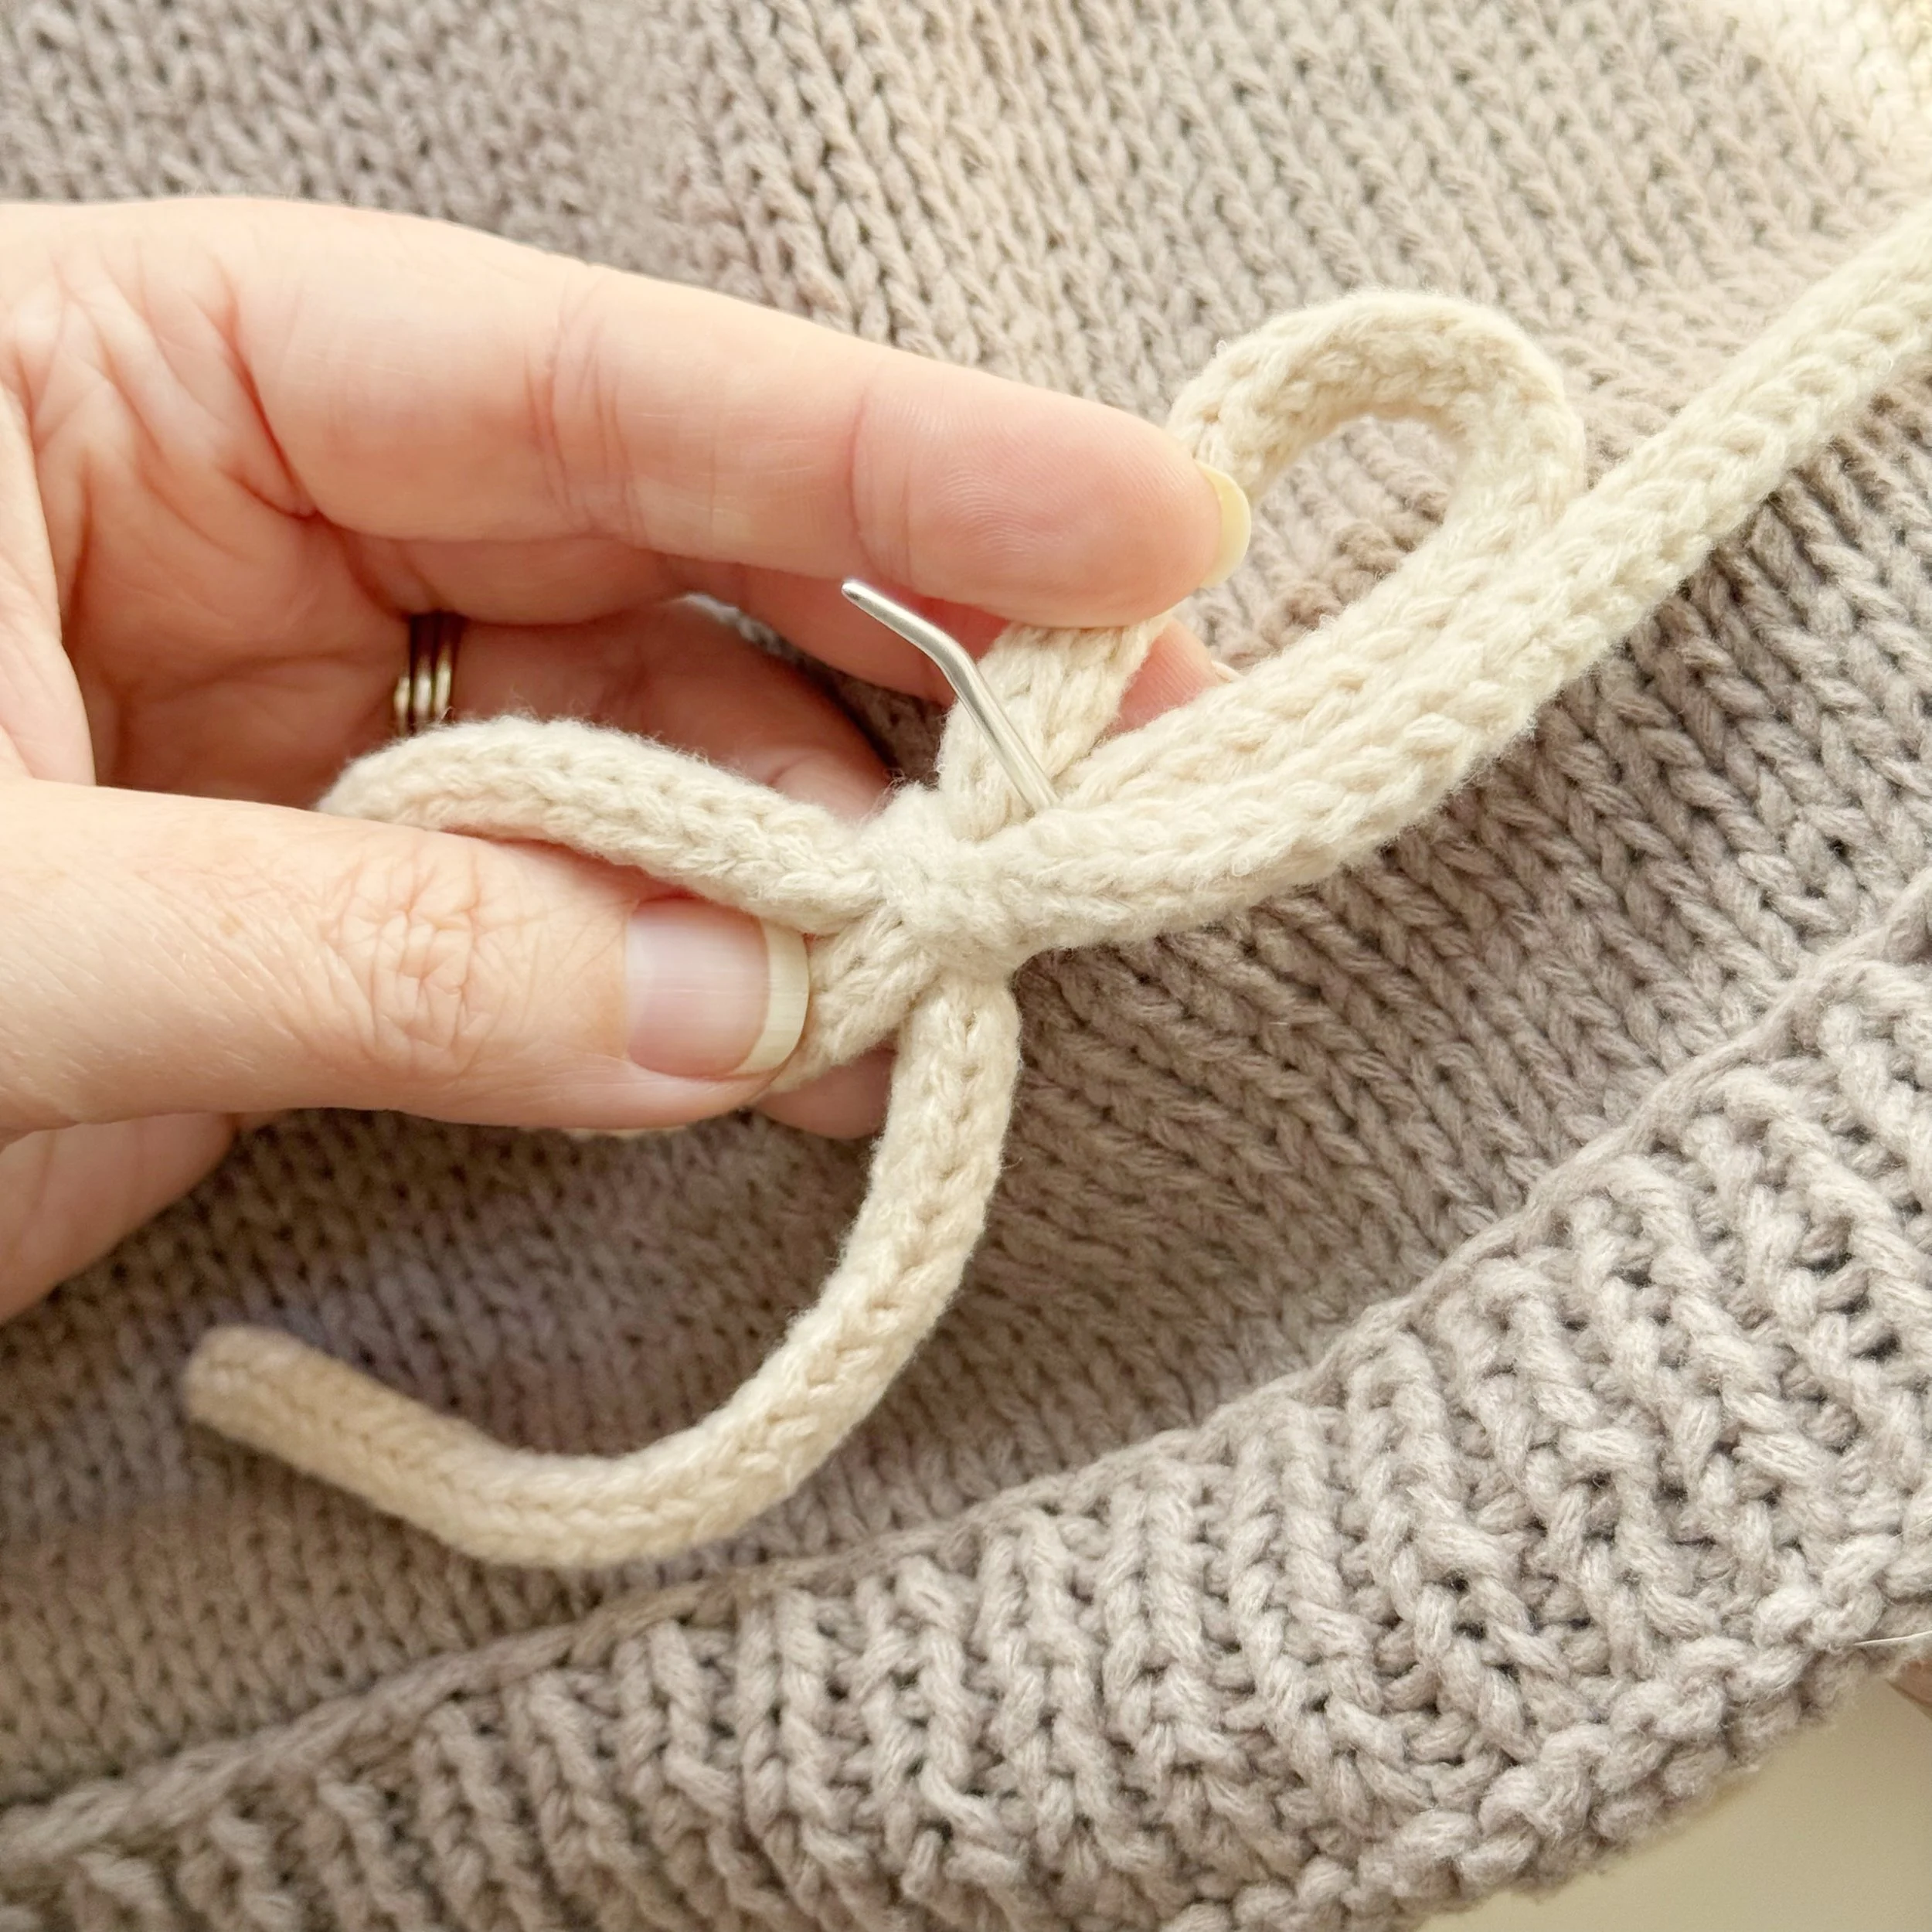
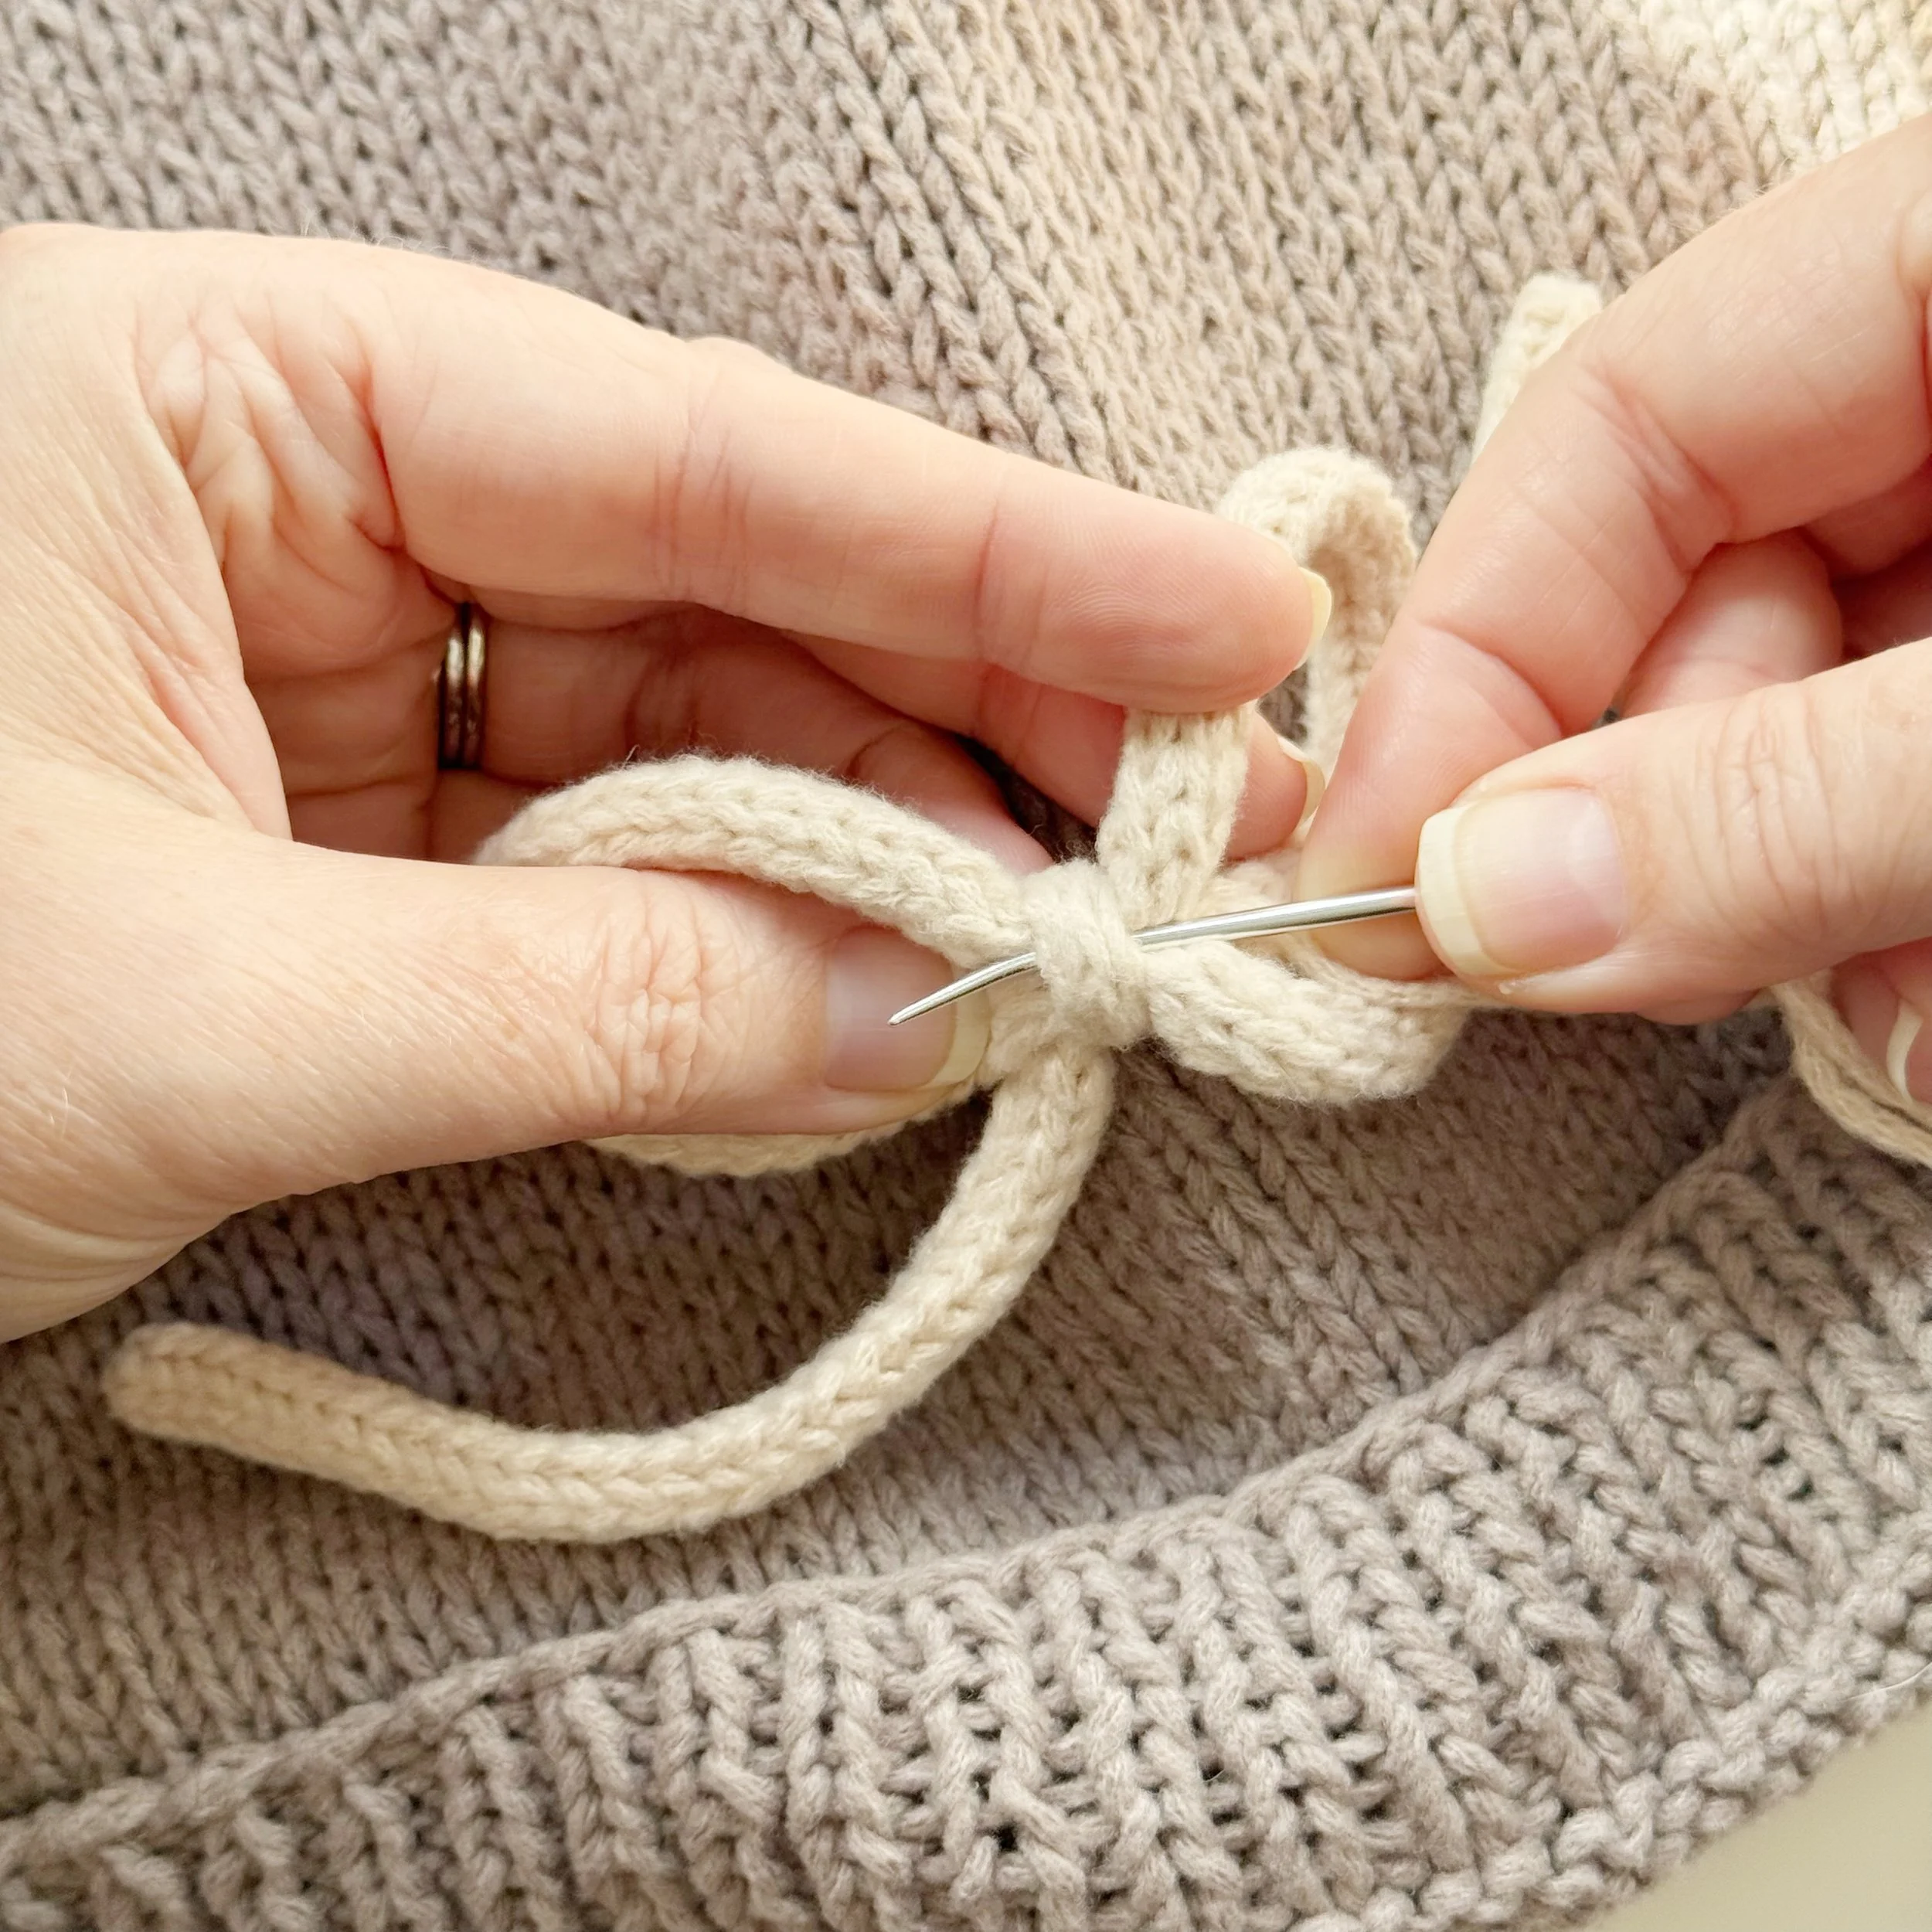
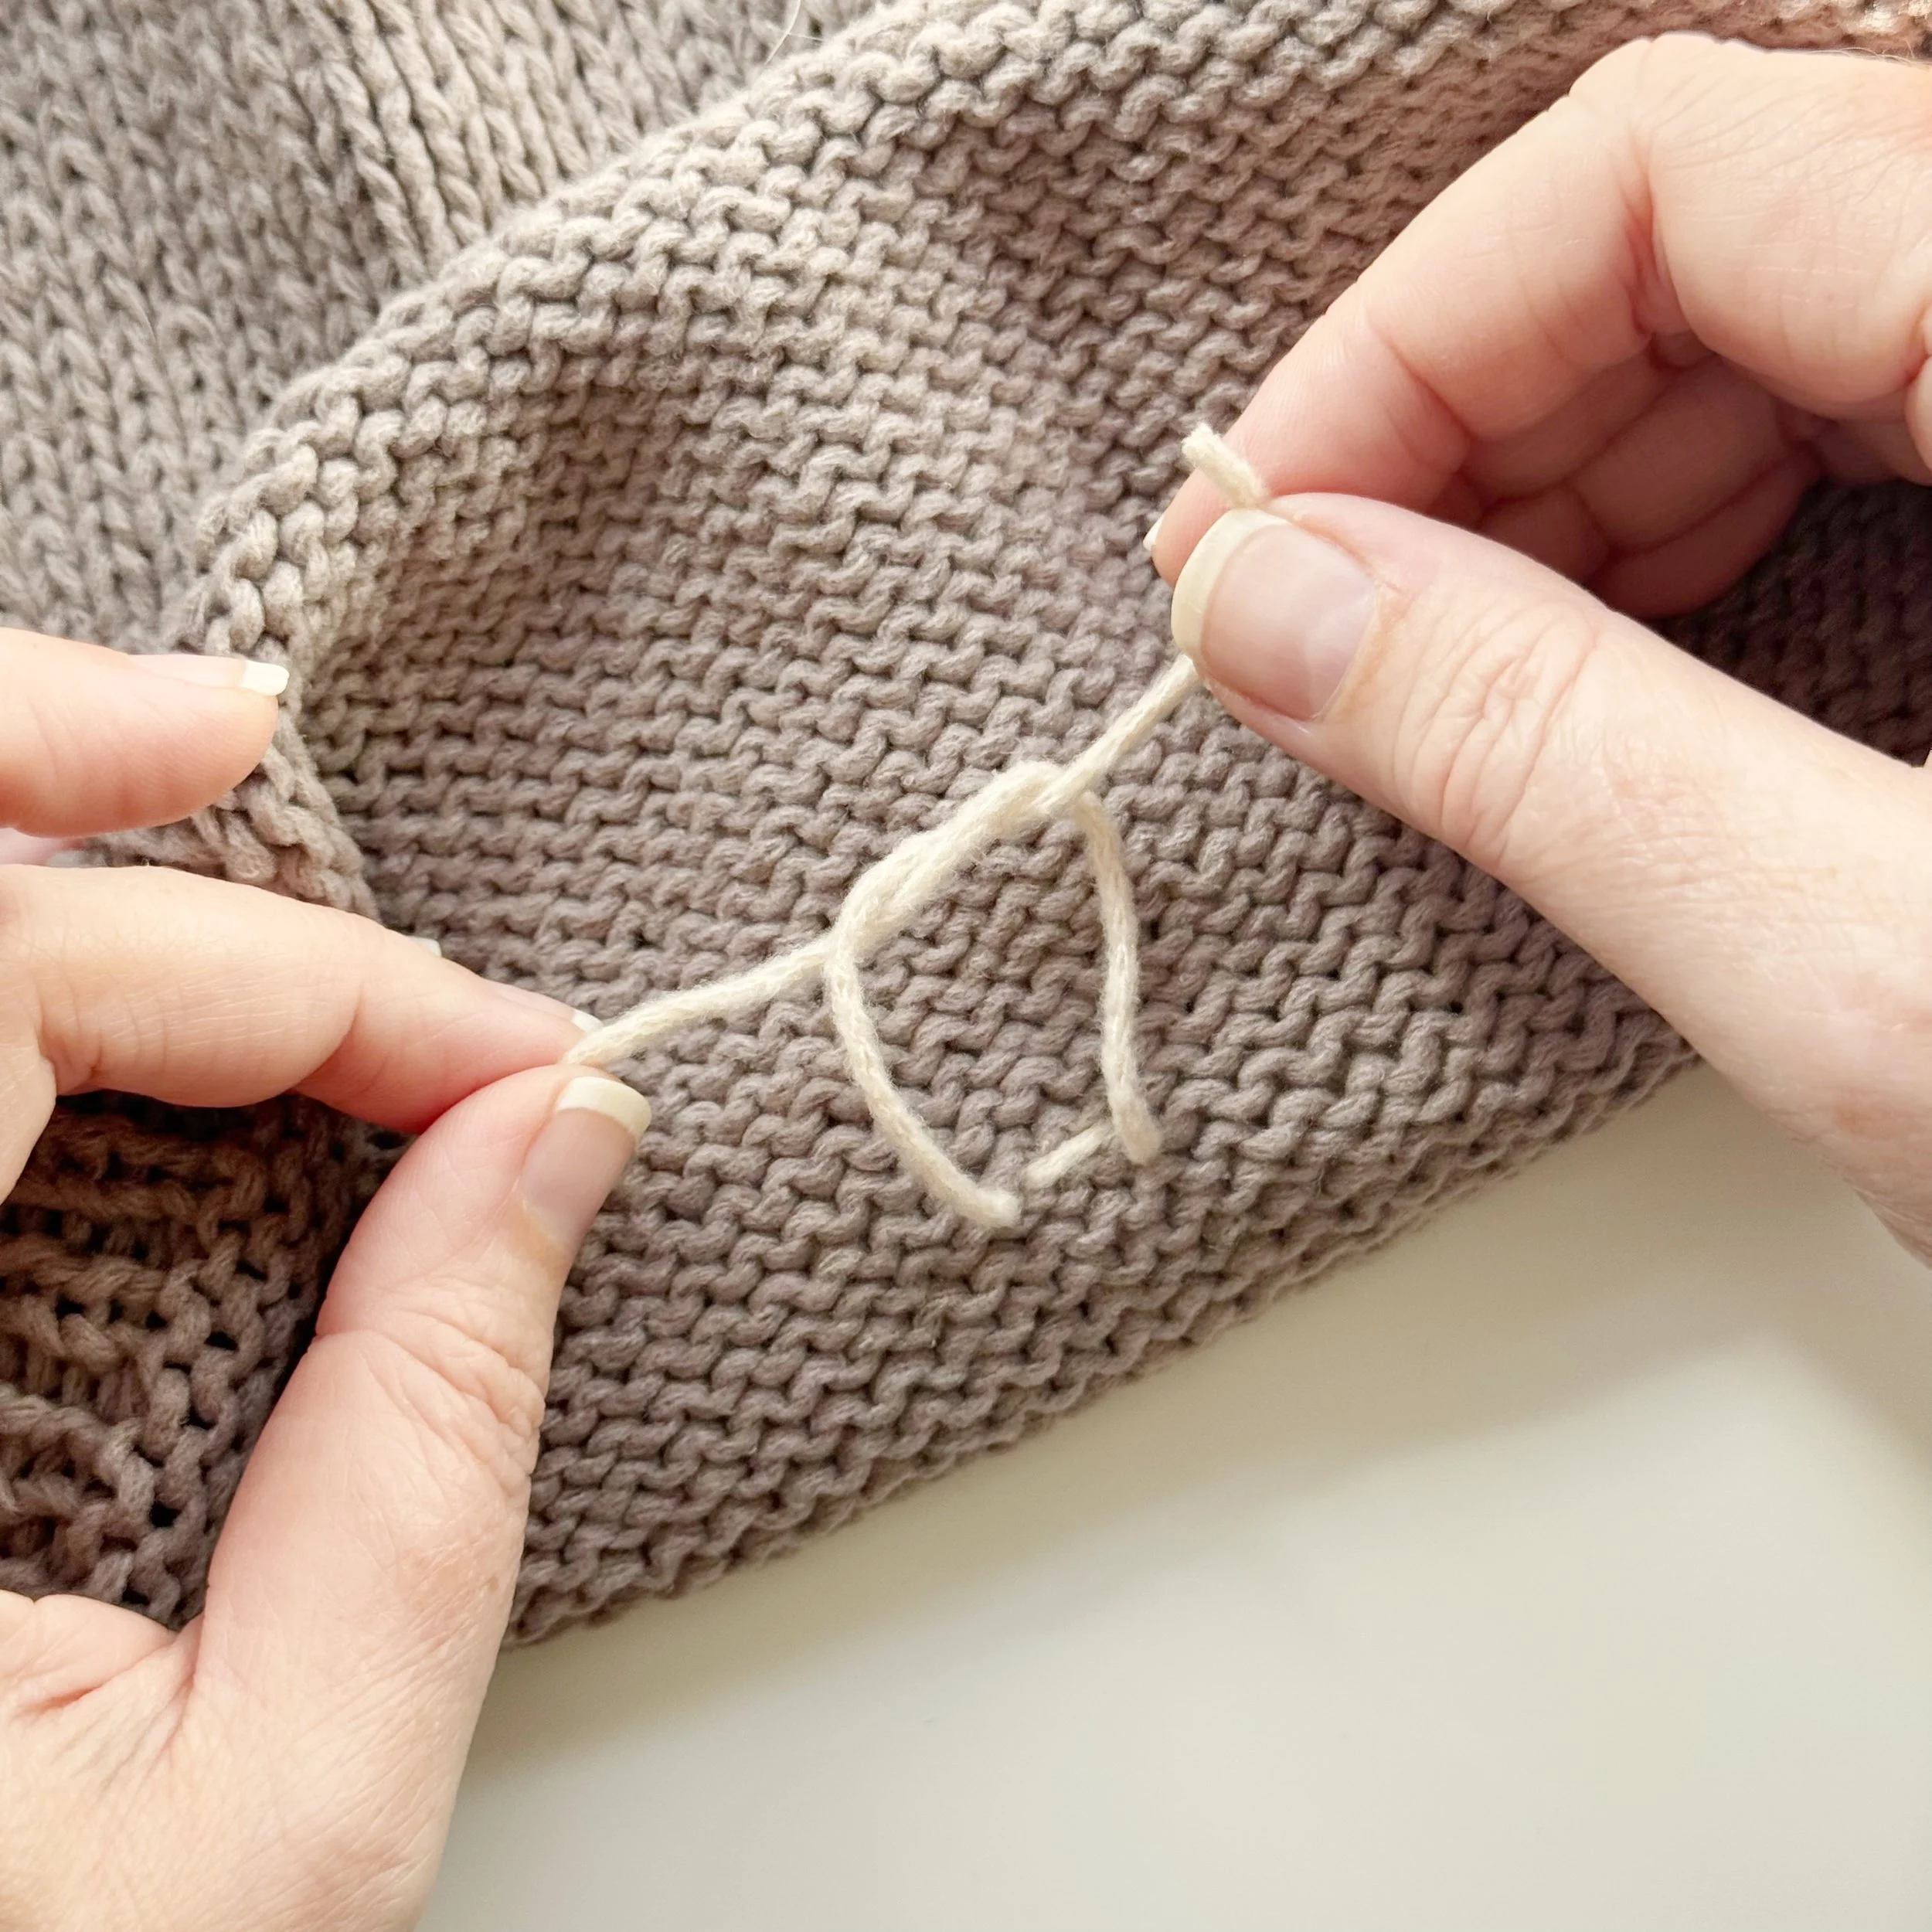
Take each piece of i-cord and form it into a bow.
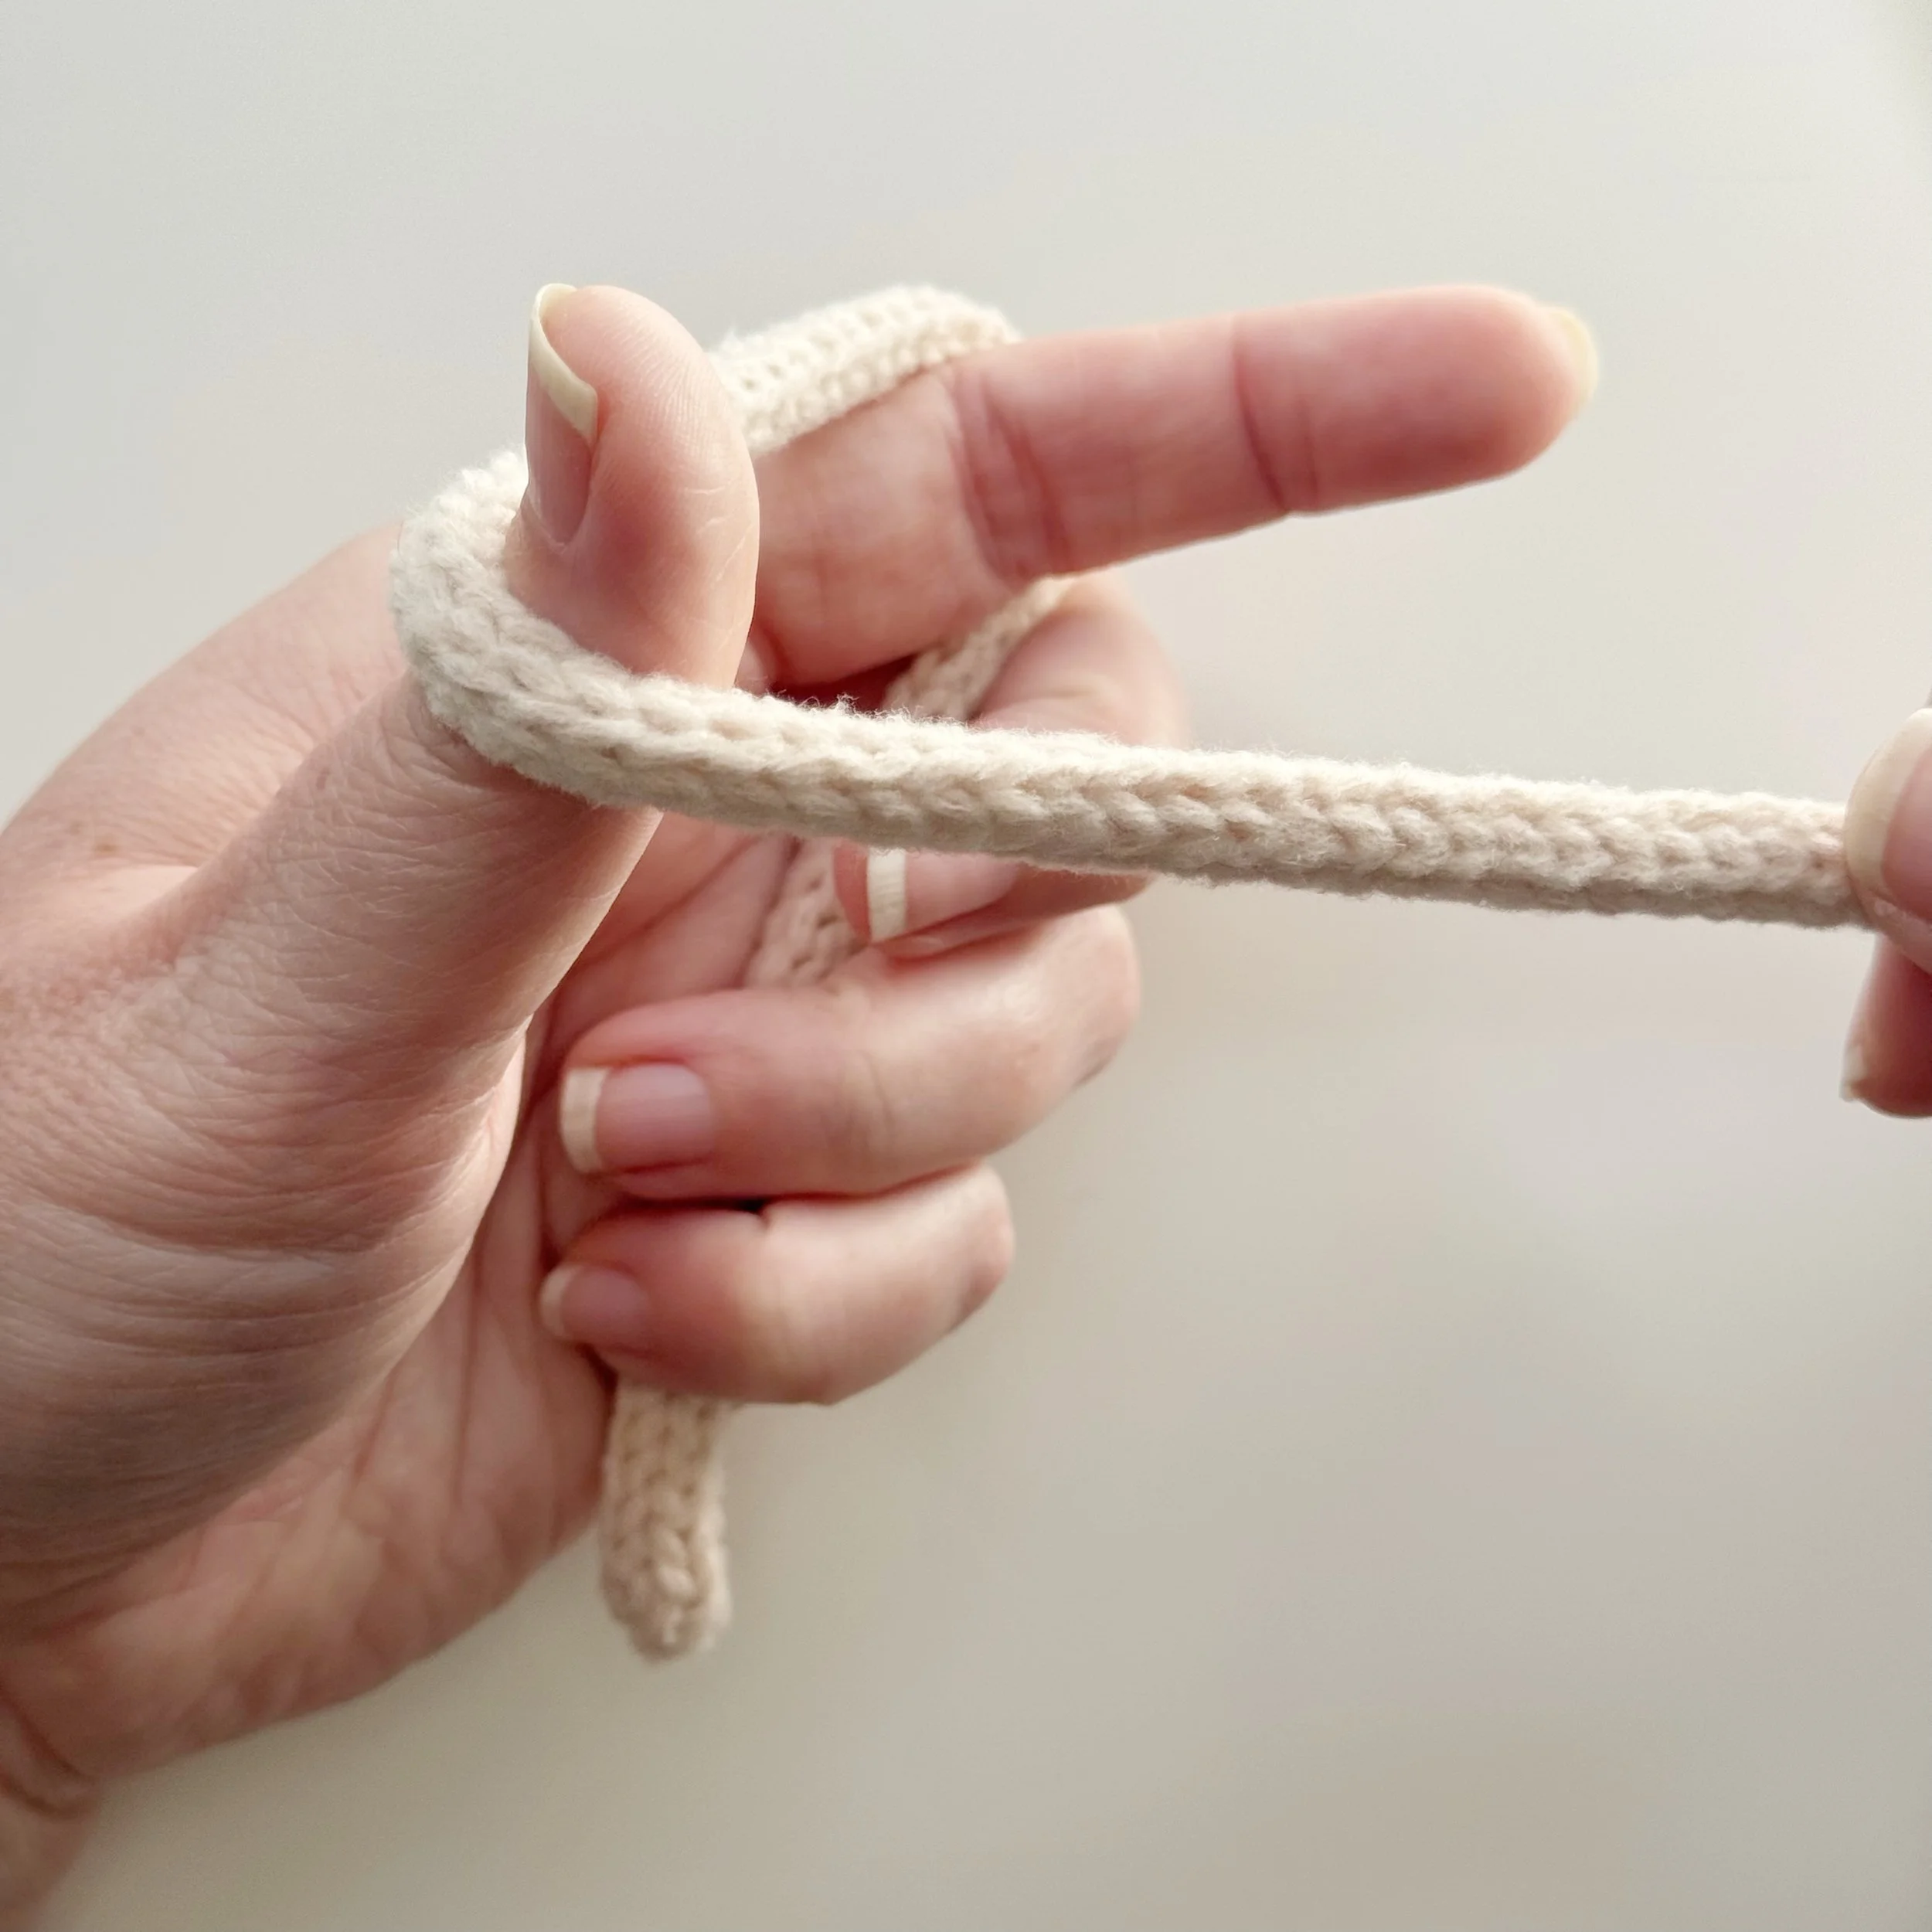
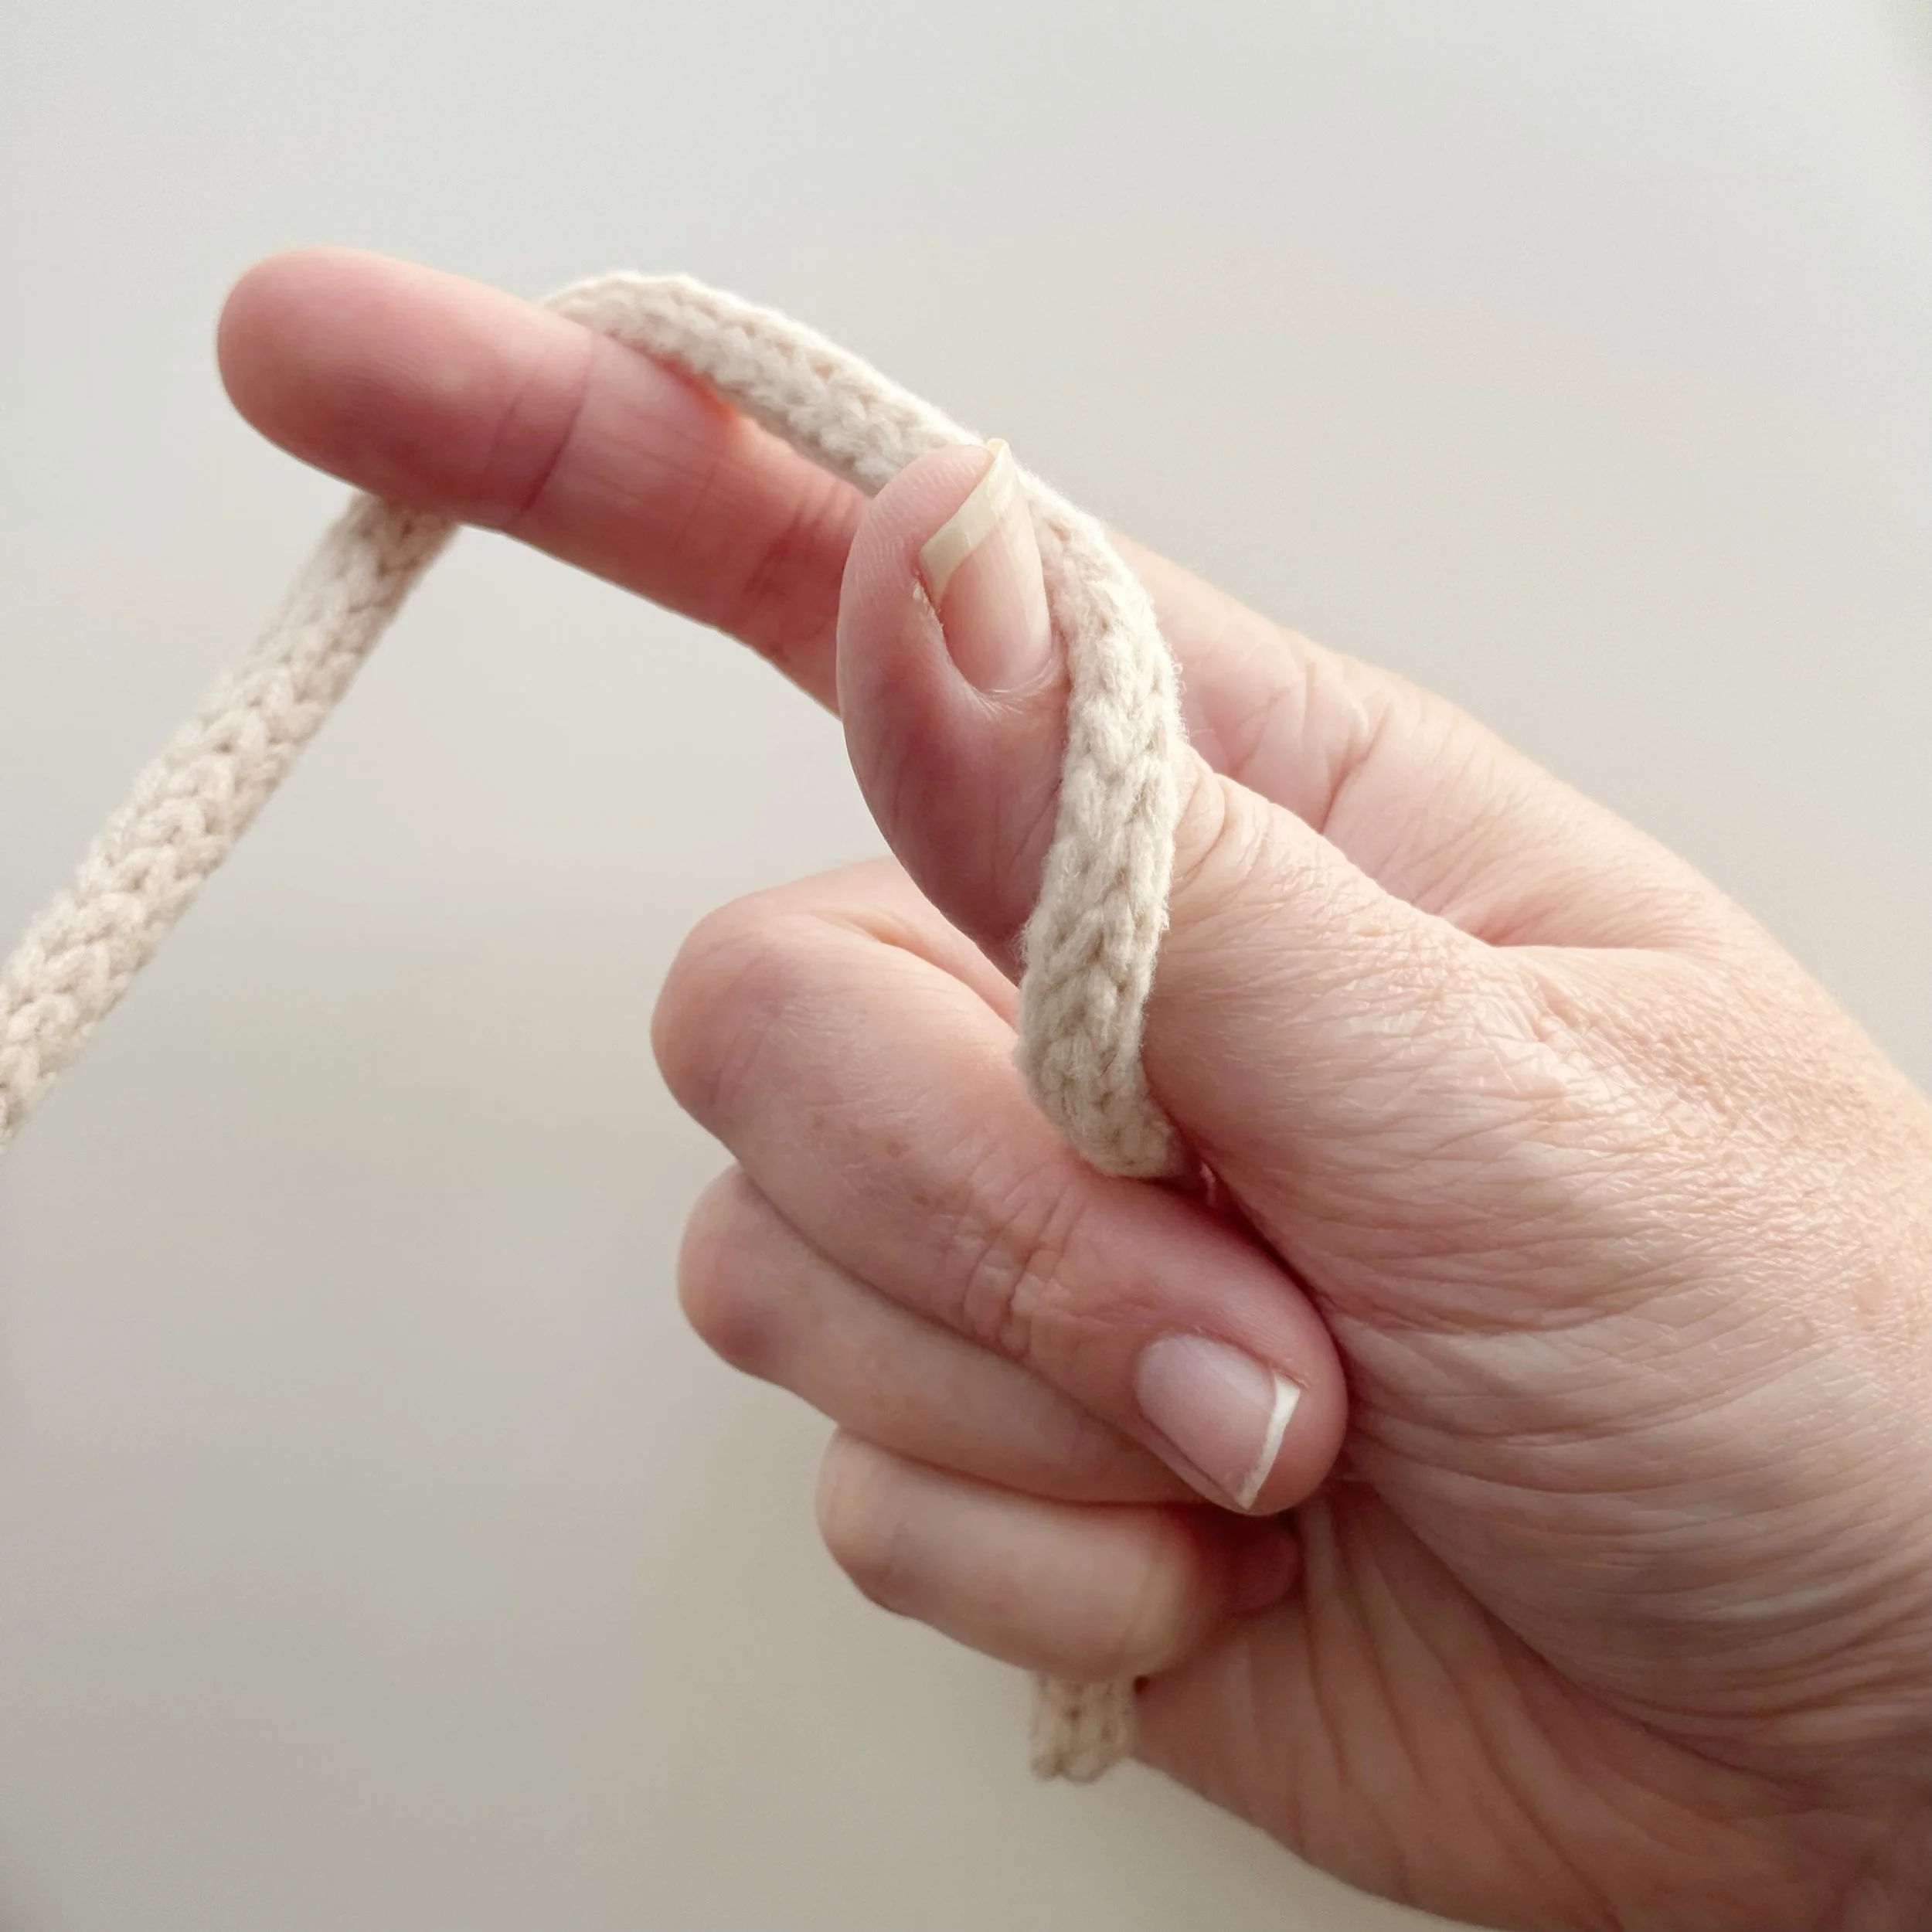
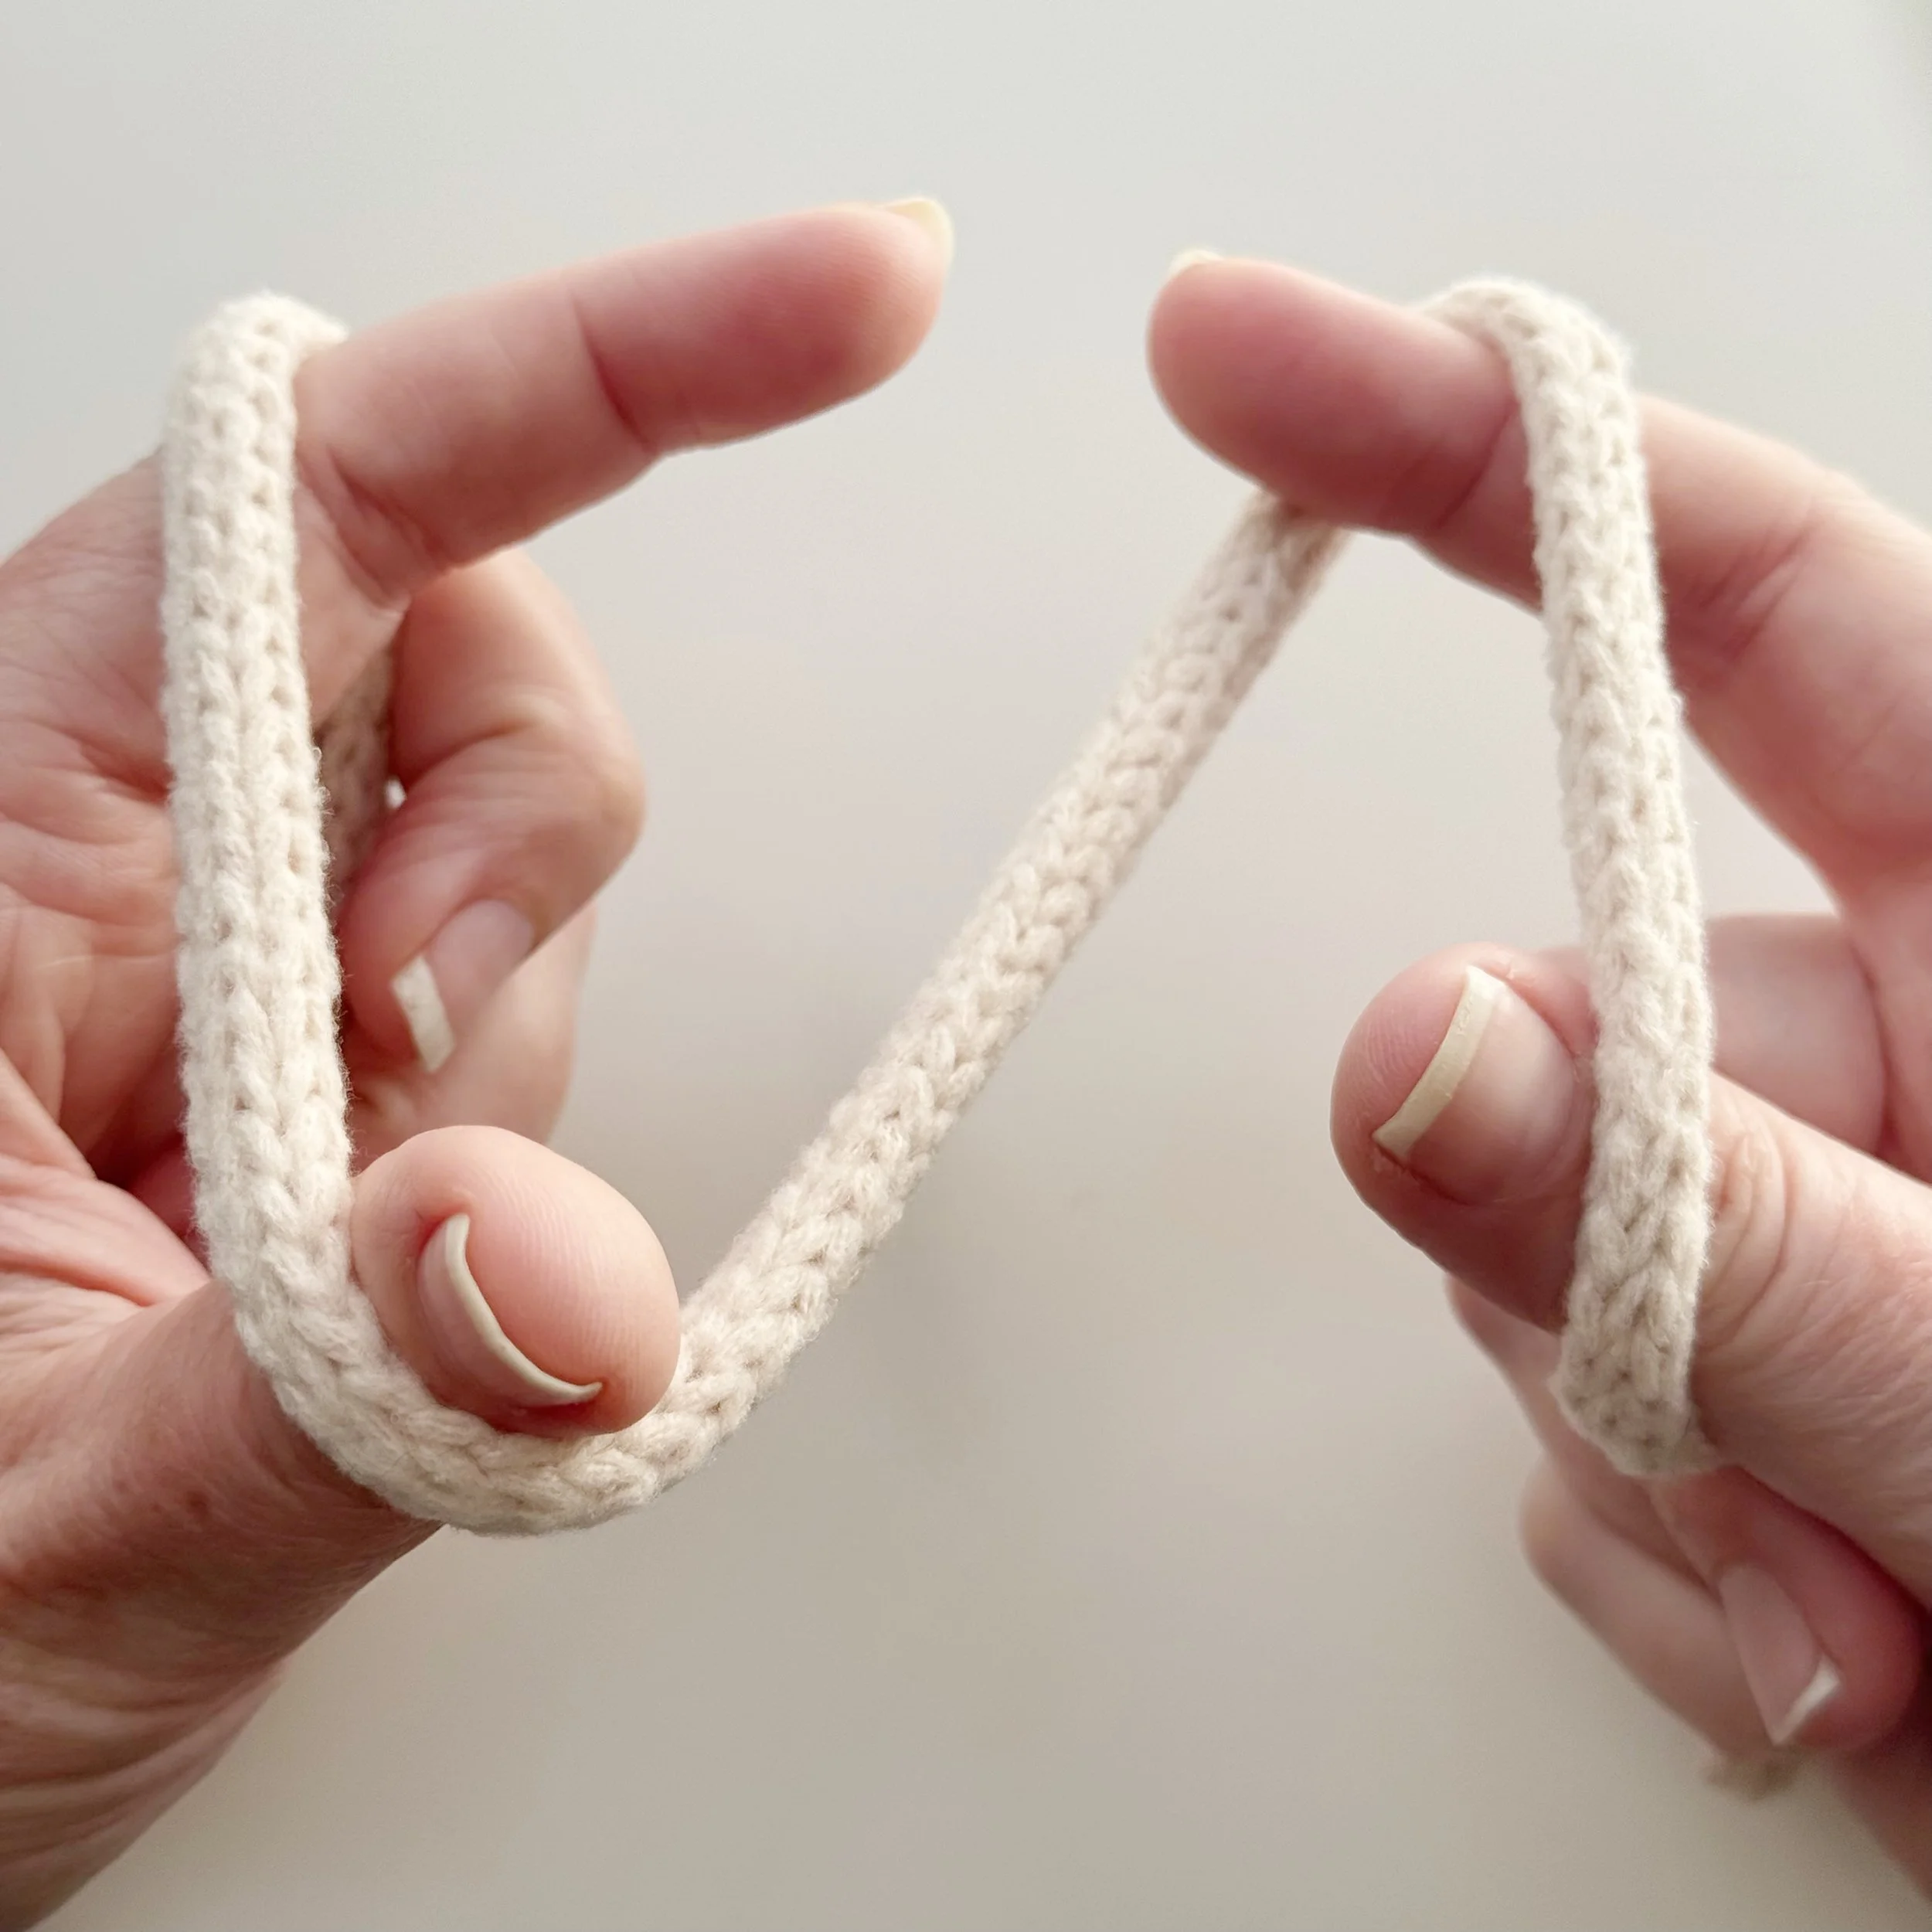
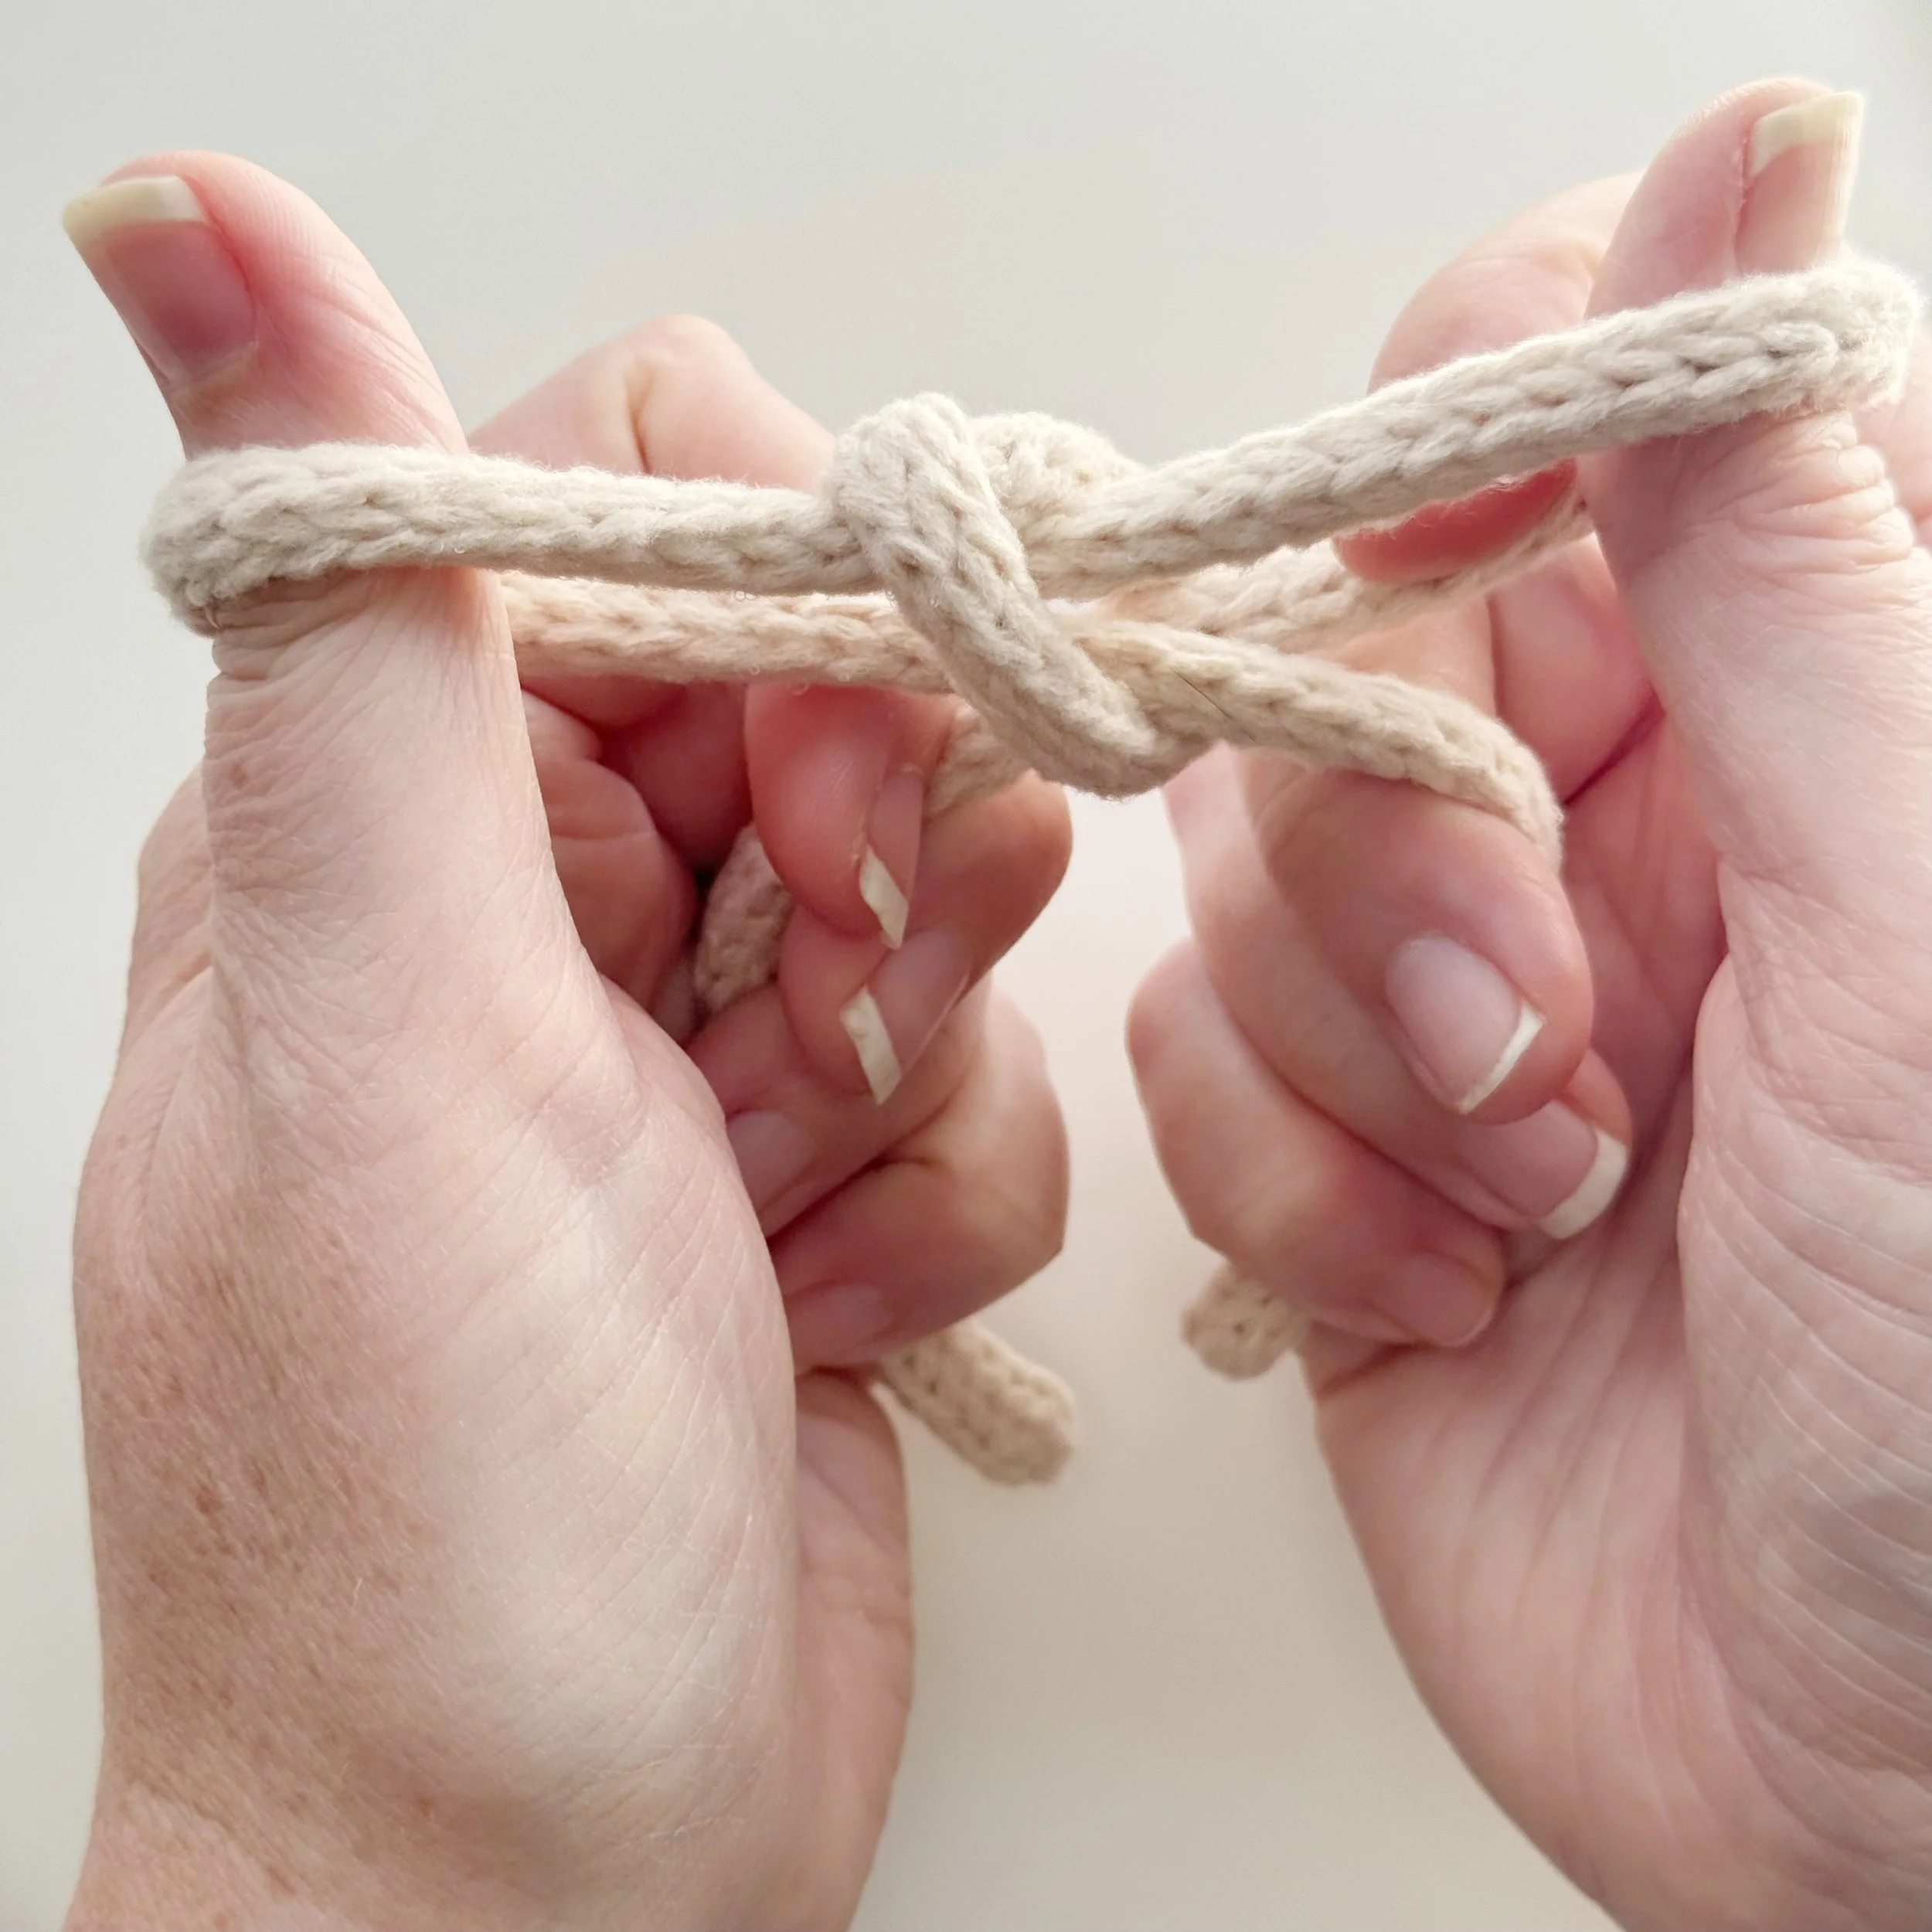
Holding one end in your left hand, wrap the i-cord around your pointer and thumb as shown above. Then holding the other end in your right hand wrap the i-cord around your pointer and thumb as shown above. Bring your hands together and grab the opposite loops of i-cord.
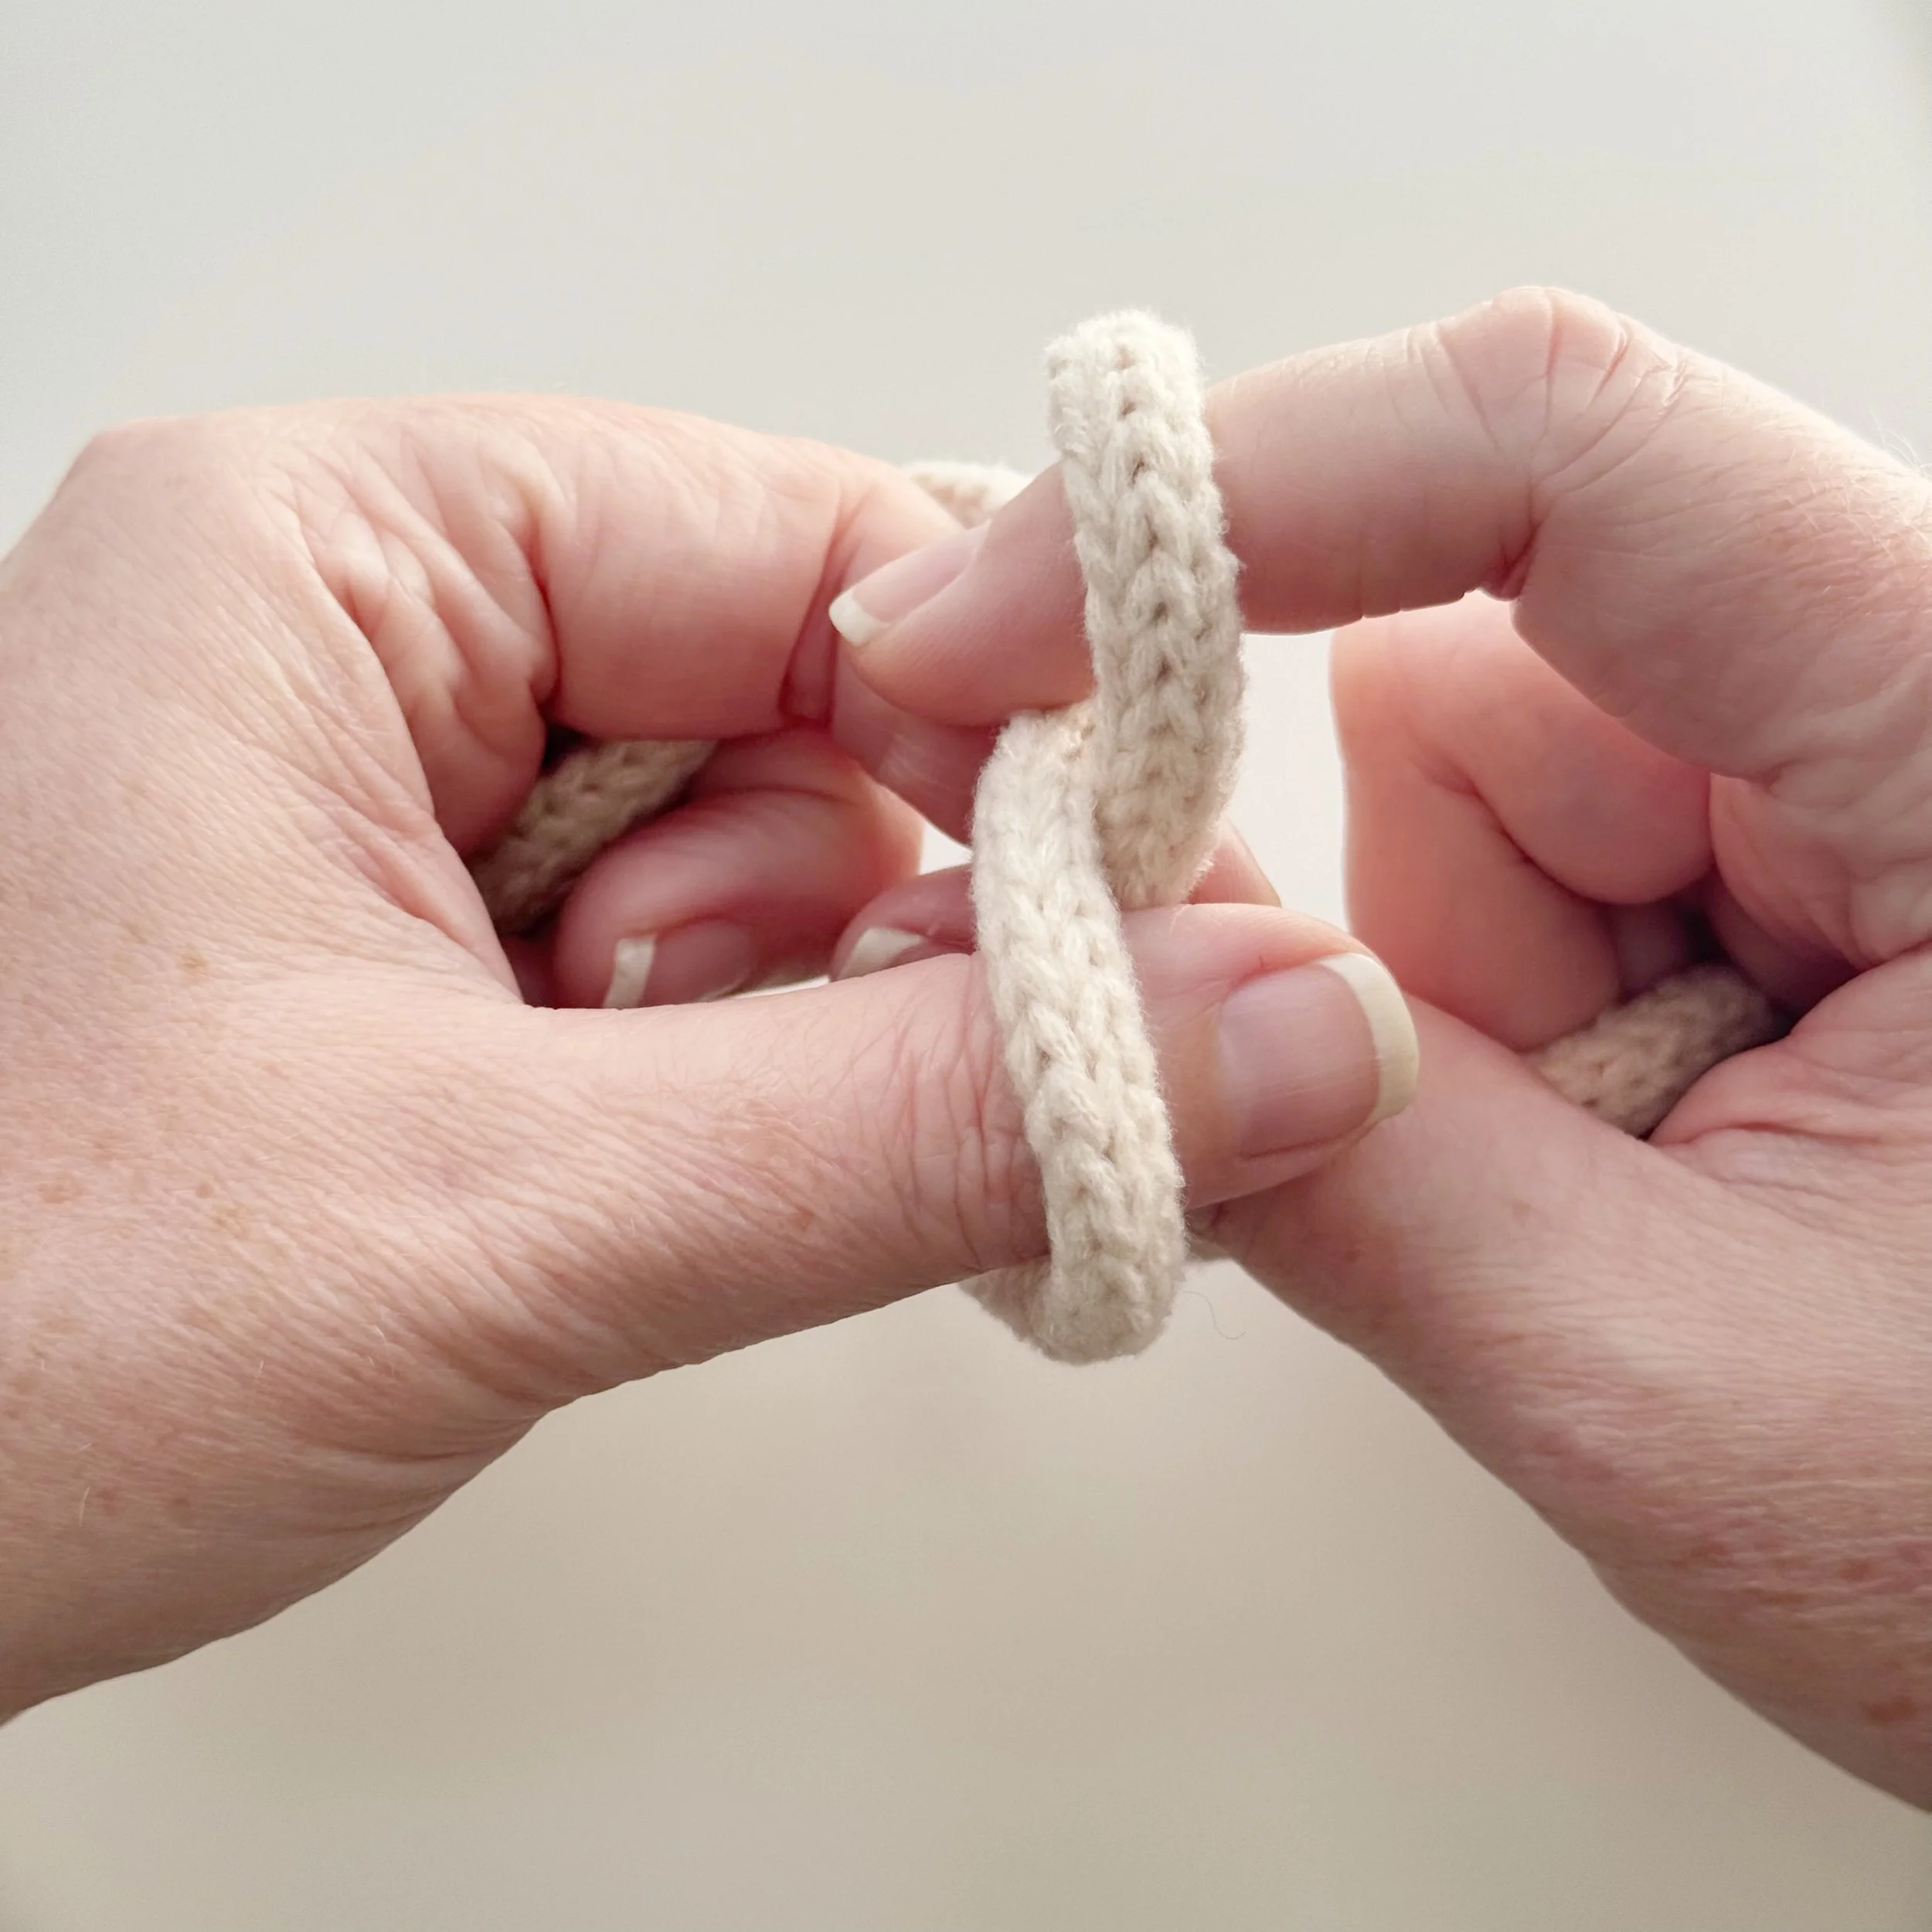
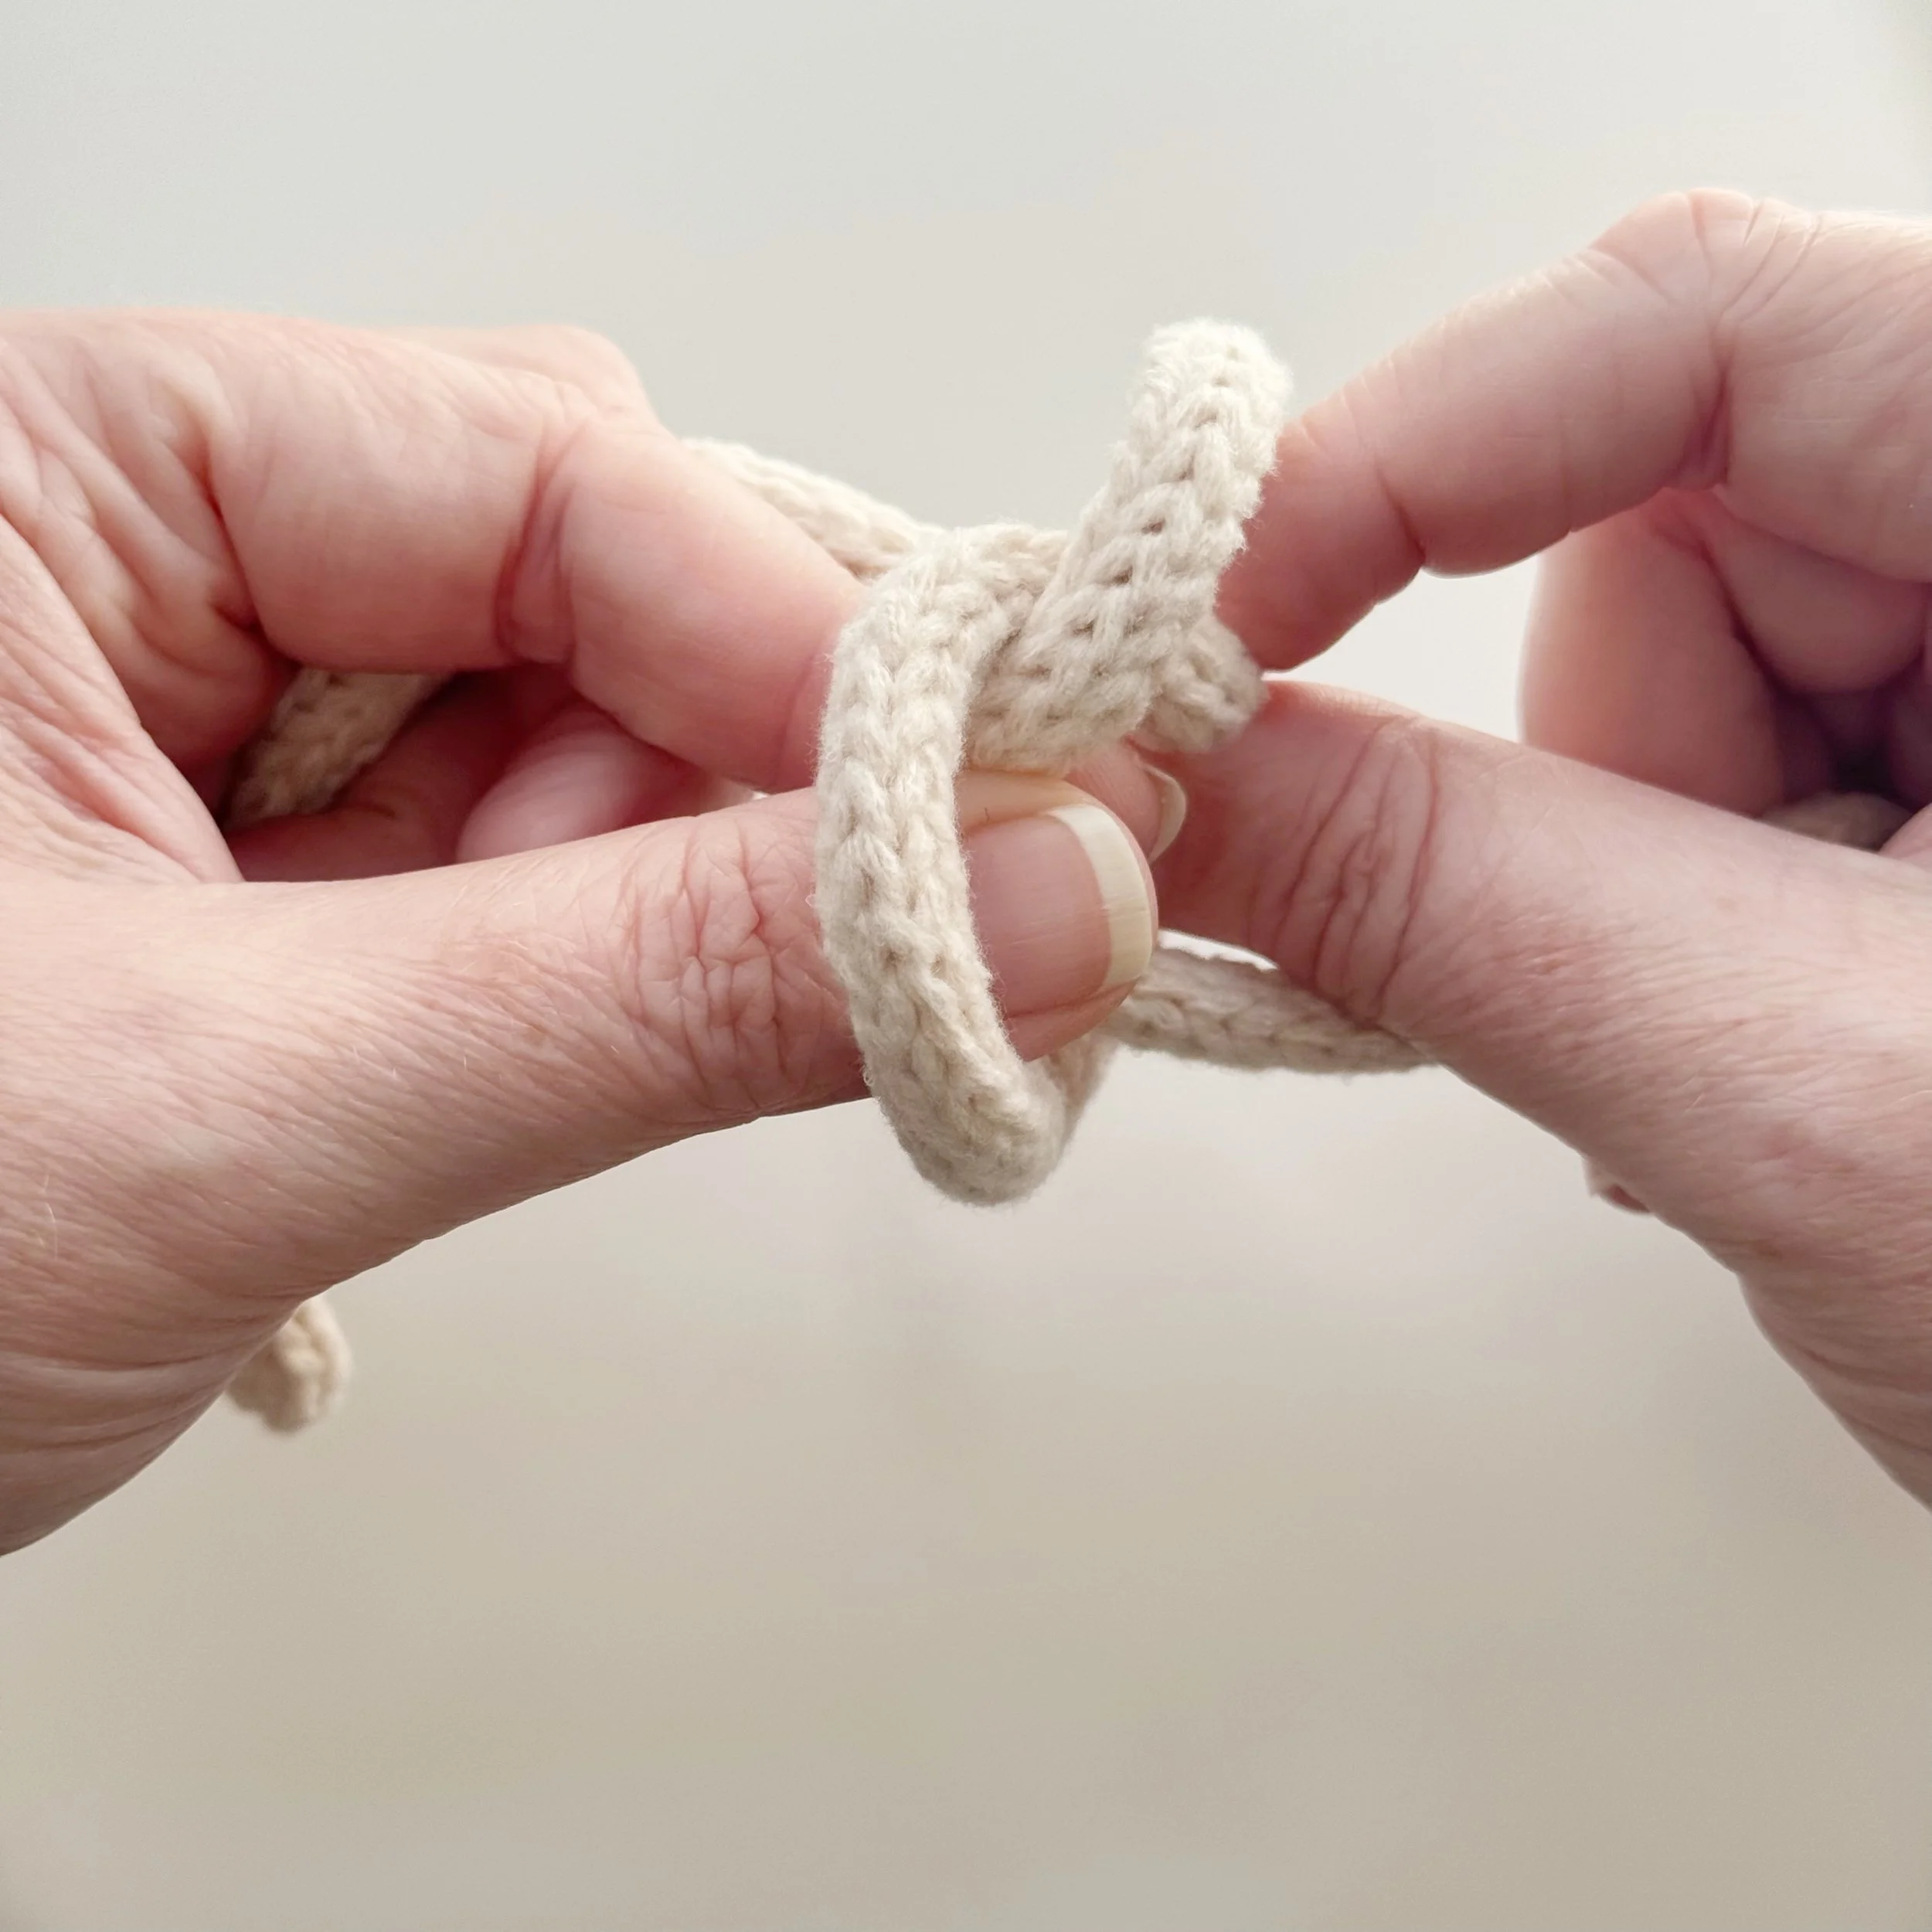
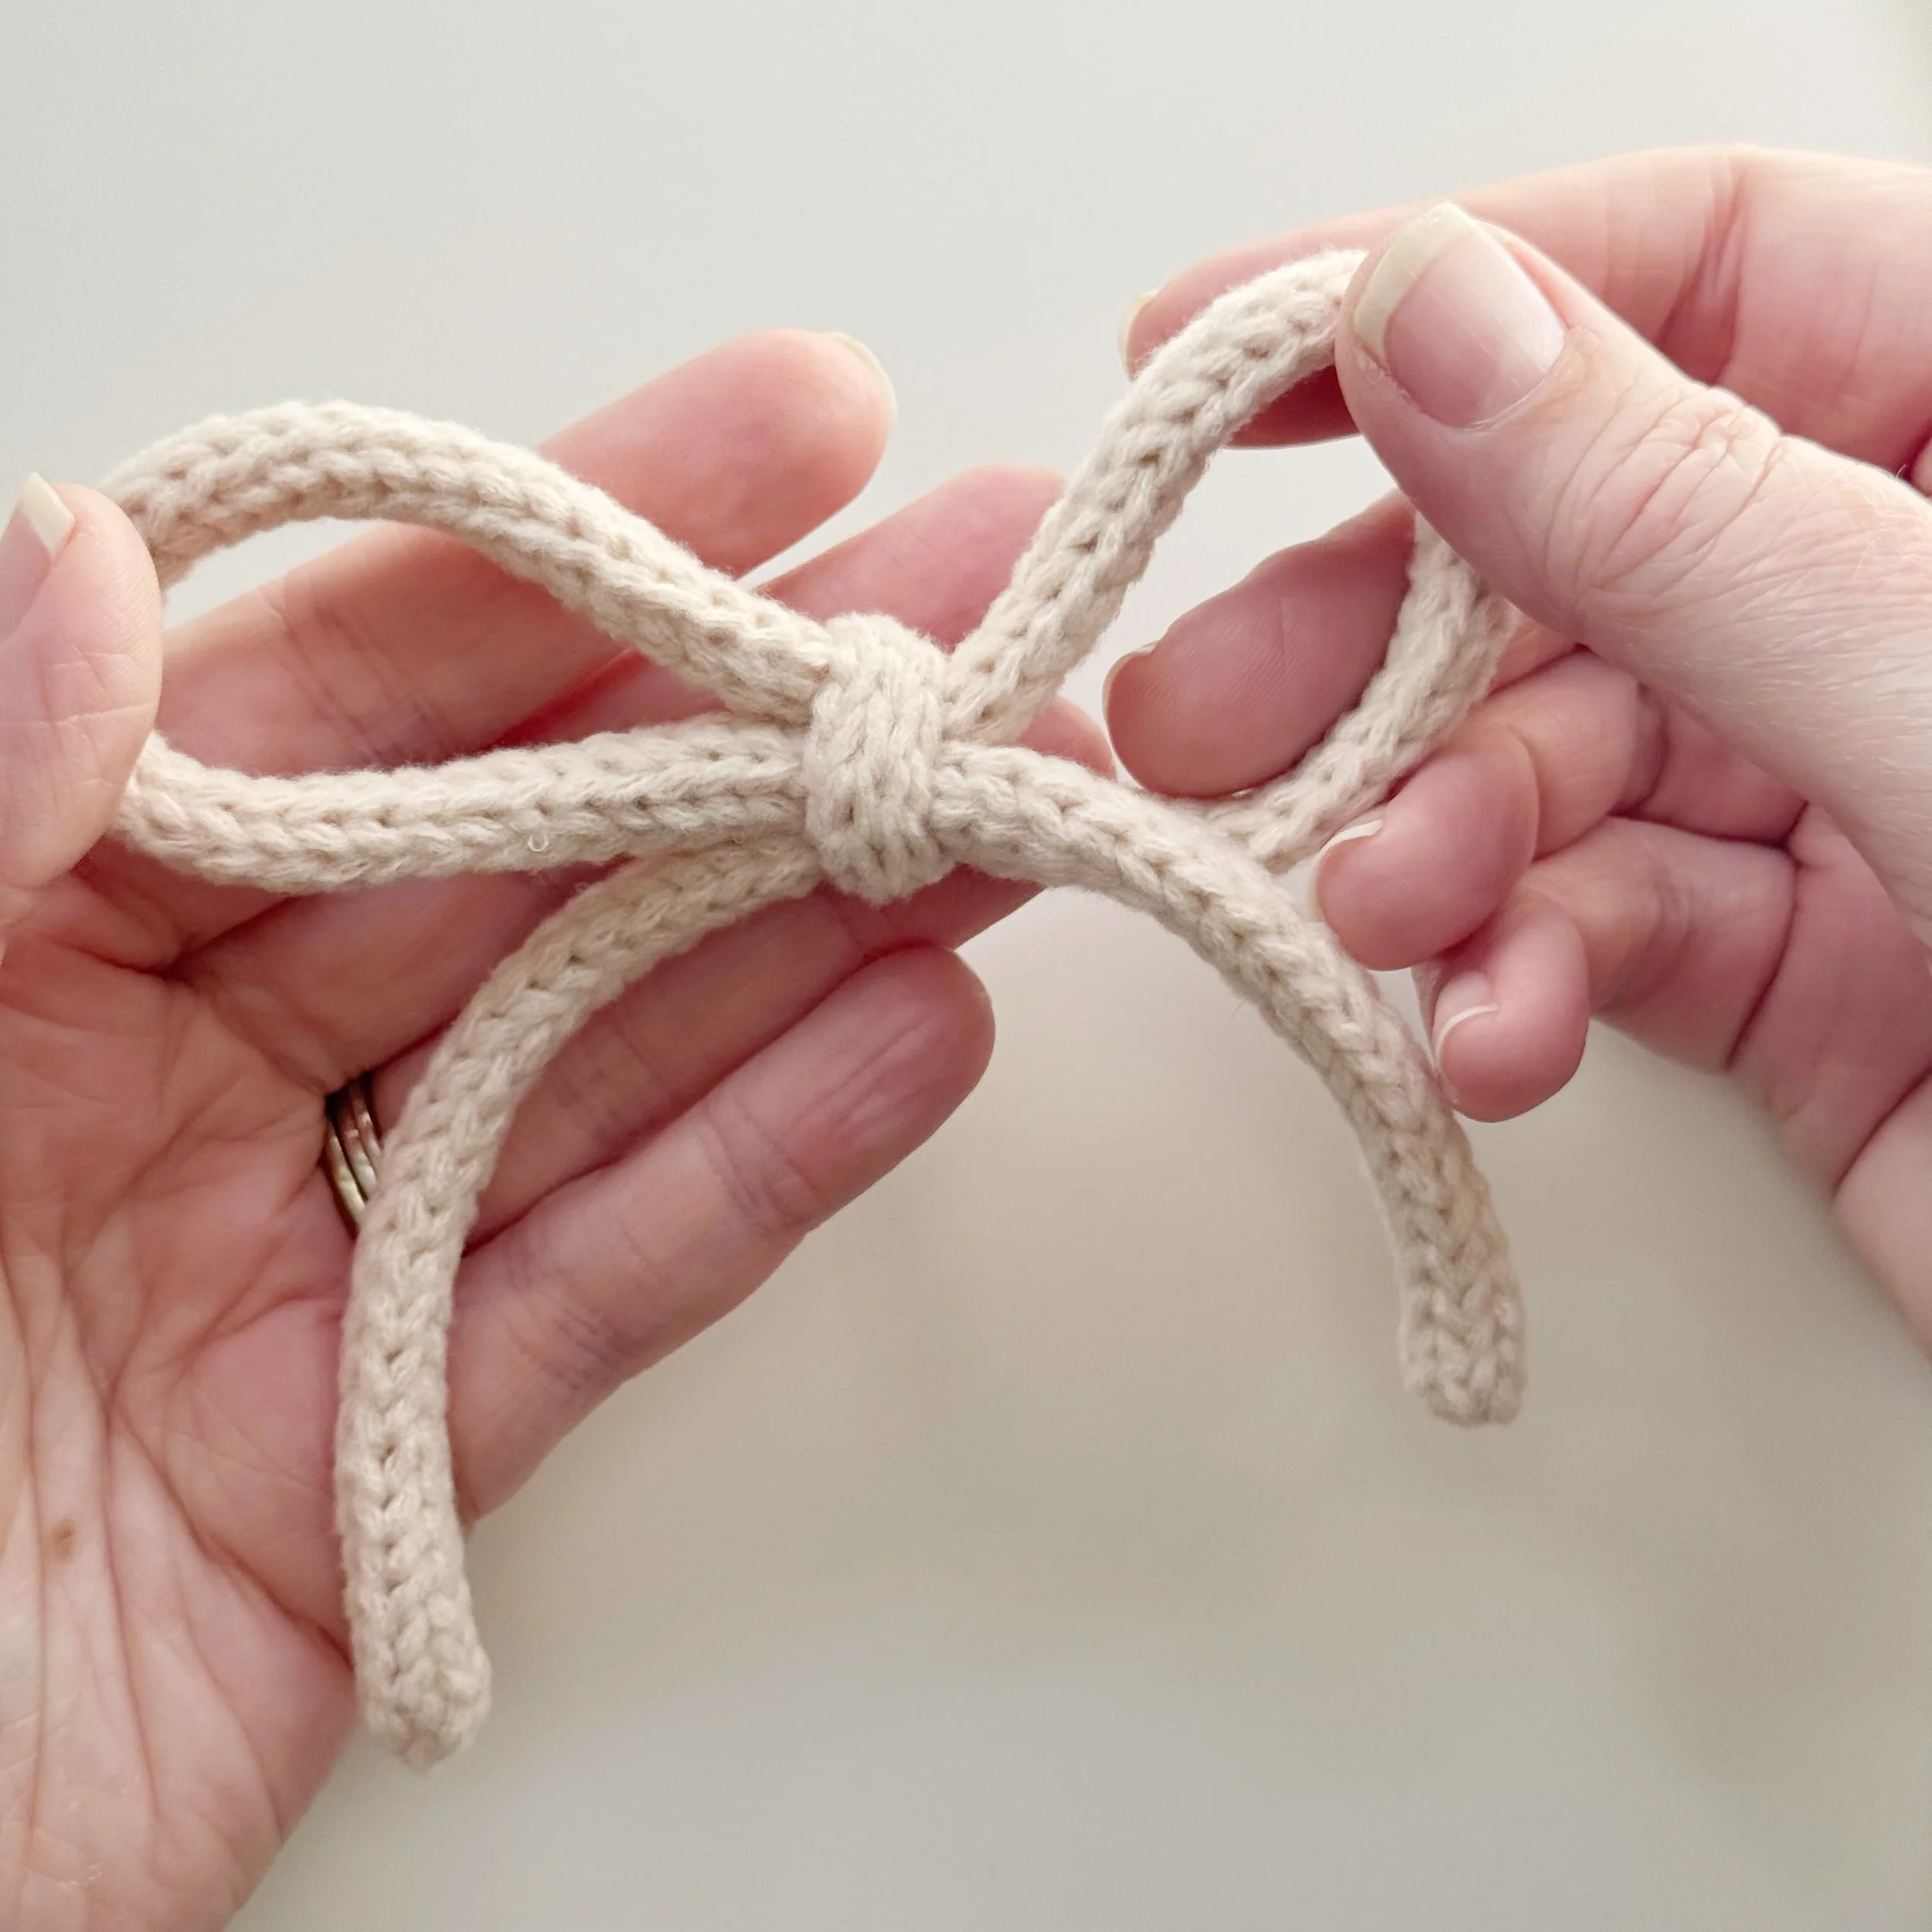
While still holding tight to the ends in each hand, pull the loops through each other to form a knot. Adjust the bow until you get the look you want and the tails are as even as possible. Pull on the loops until the knot is tight.
Repeat until you have a total of 17(17, 17, 17, 18, 18, 18, 18, 18) bows.
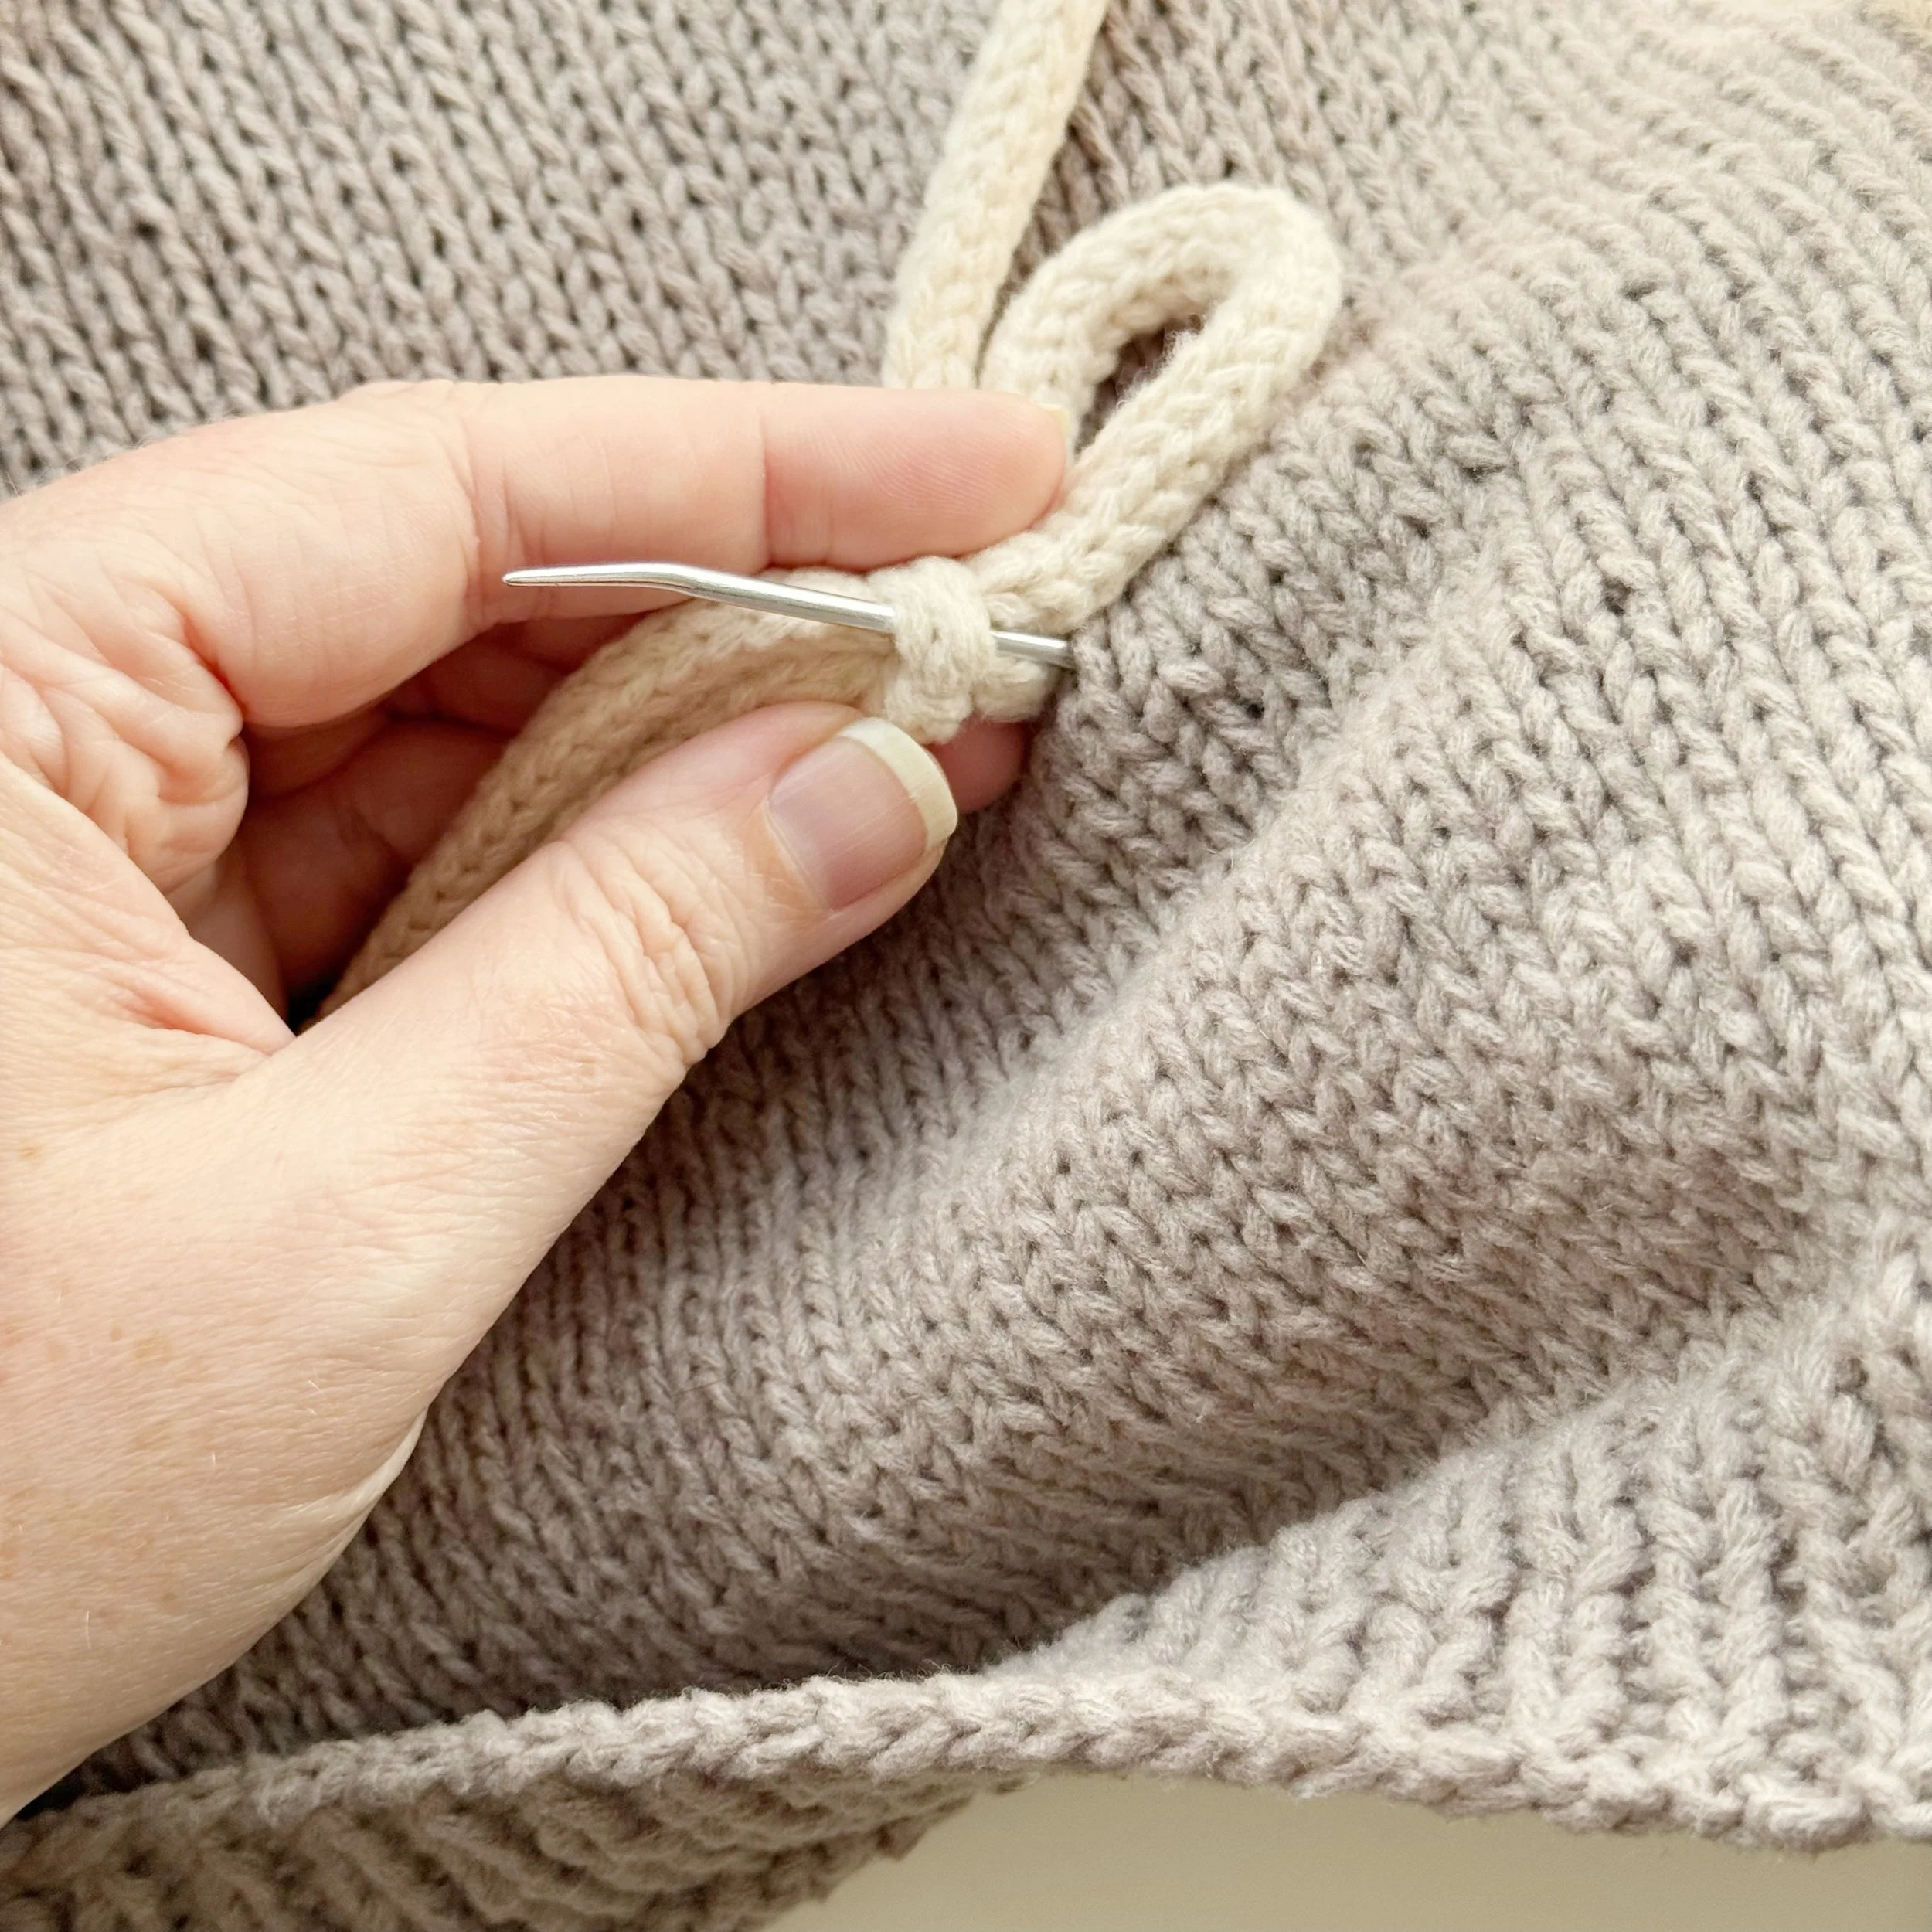
Attaching the Bows:
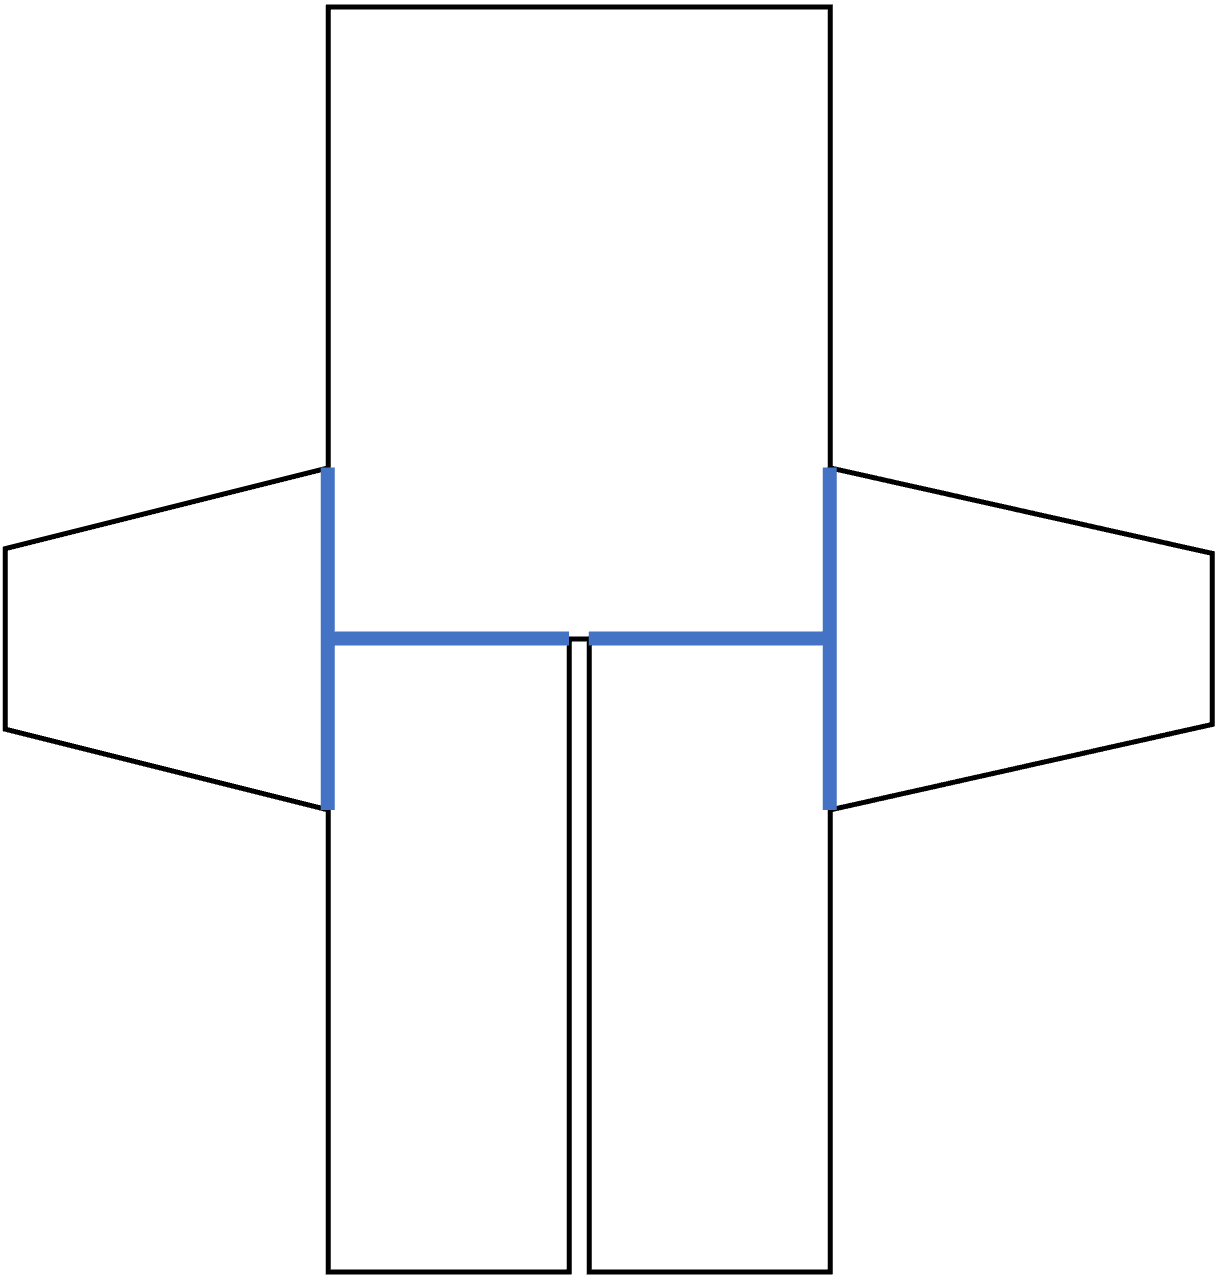
The bows are attached by tacking them into place in 5 spots.
Using a tapestry needle and a small length of Color B yarn attach each bow where indicated for your size on the panels before seaming.
To make a tack, insert the needle from the inside of the panel out, through the i-cord and then back down into the inside. Repeat at least one more time. Then tie the tails together tightly multiple times. You can cut off or weave in the tails.

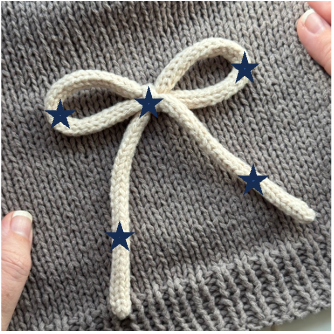
*tack where indicated by the stars
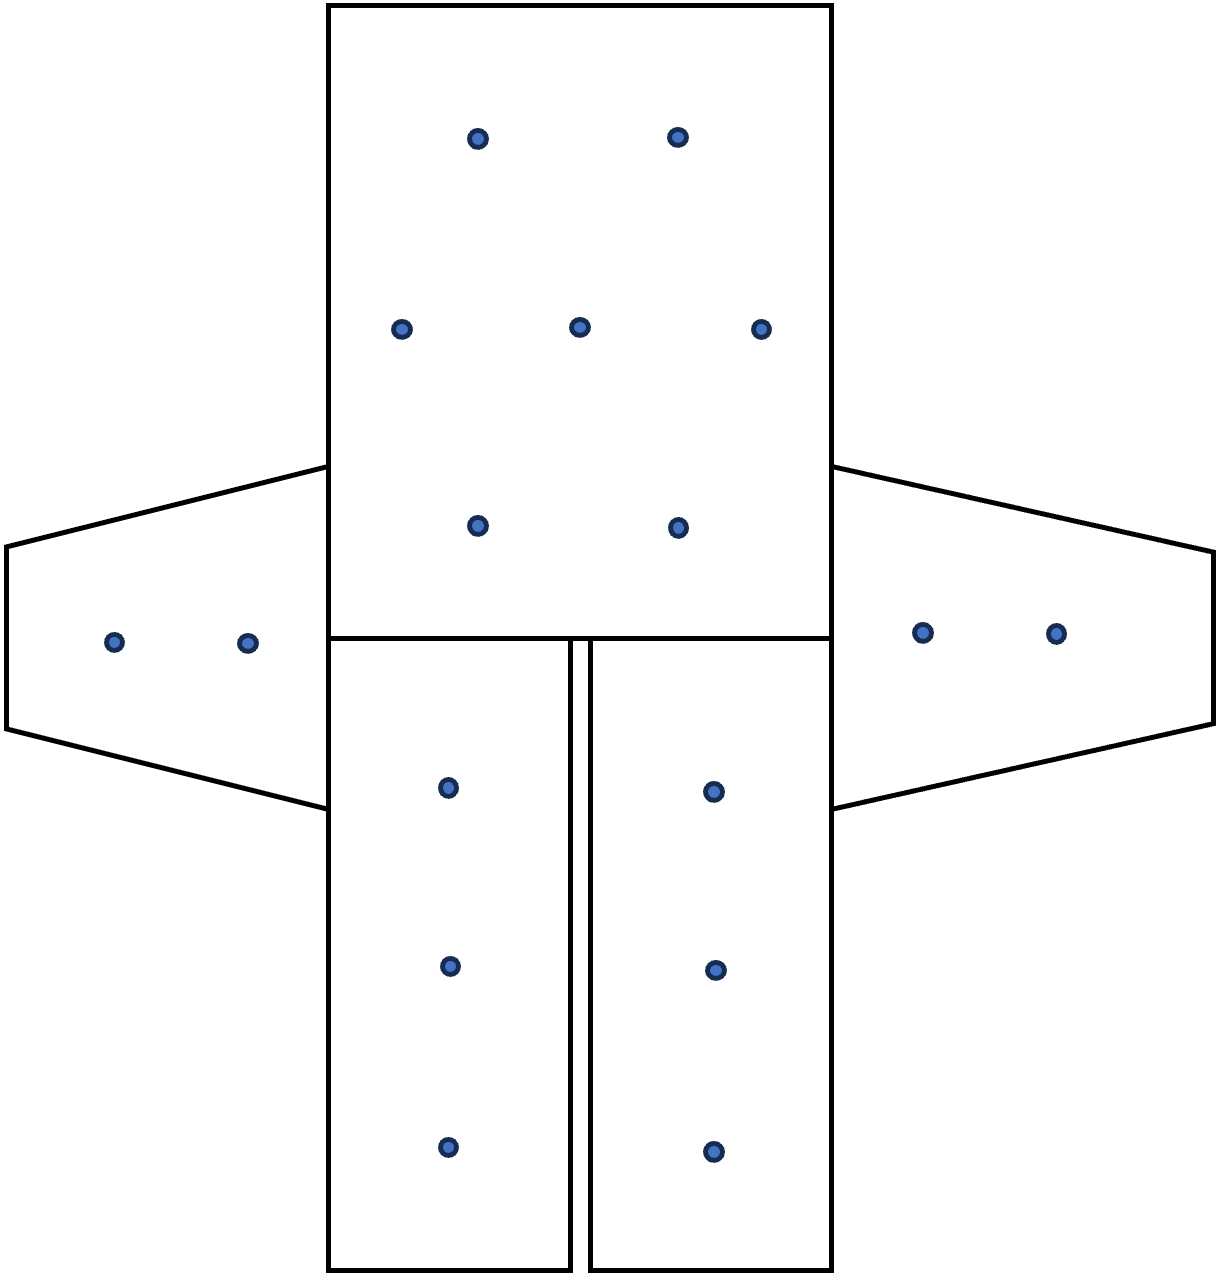
Dots indicate placement of bows for sizes XS(S, M, L)
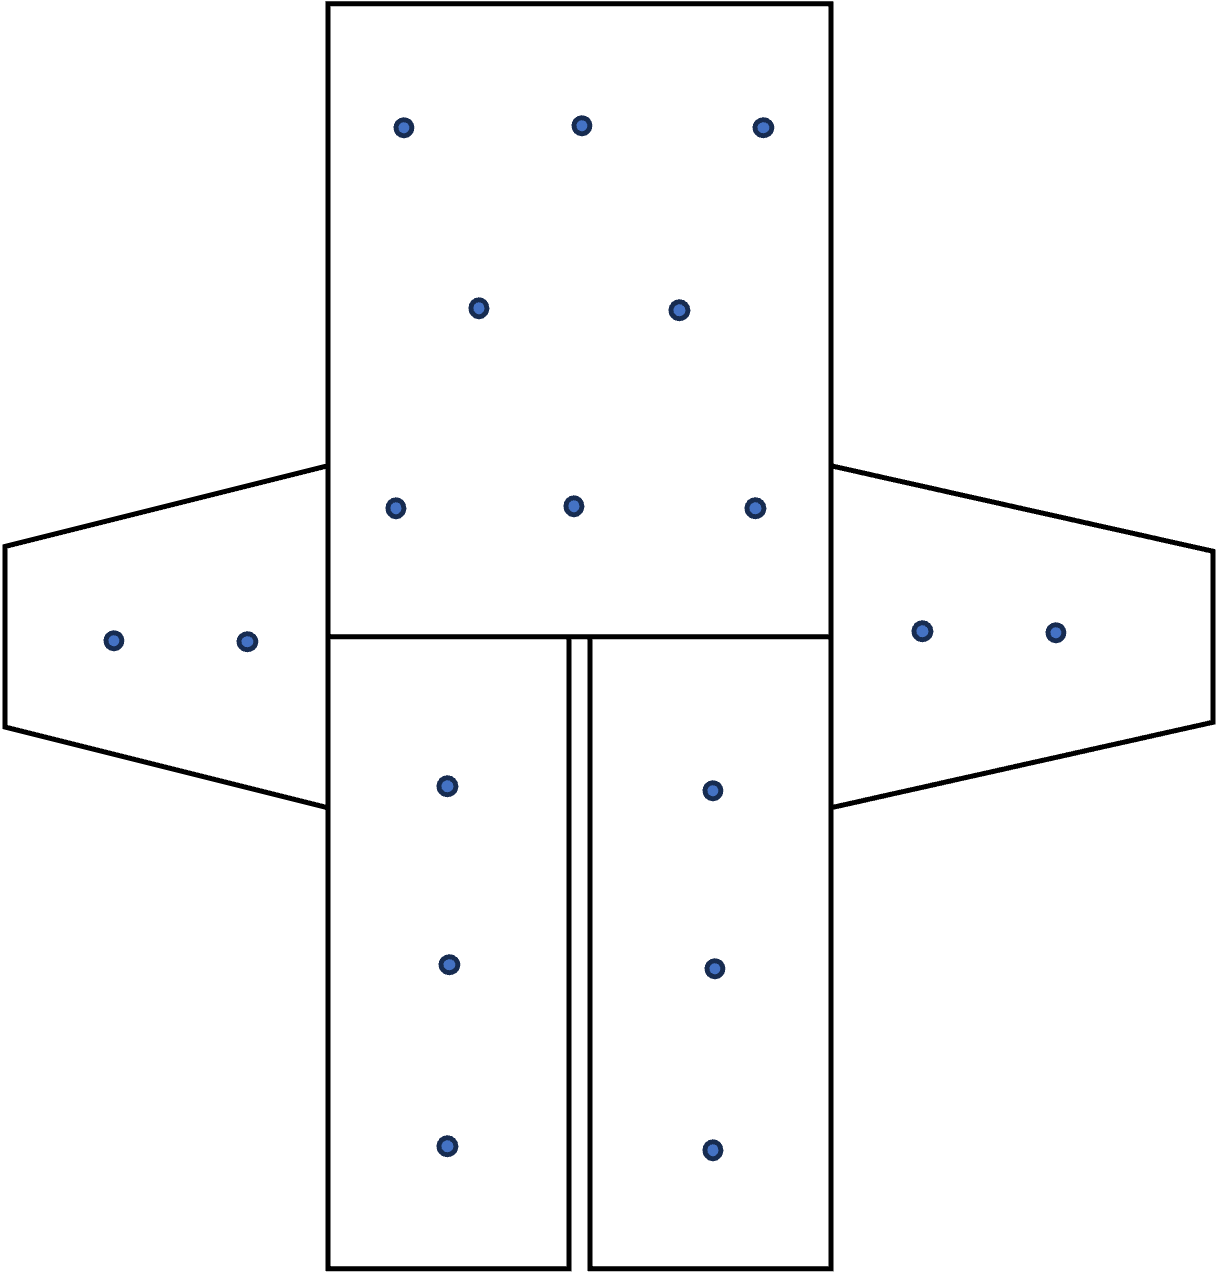
Dots indicate placement of bows for sizes XL(2X, 3X, 4X, 5X)
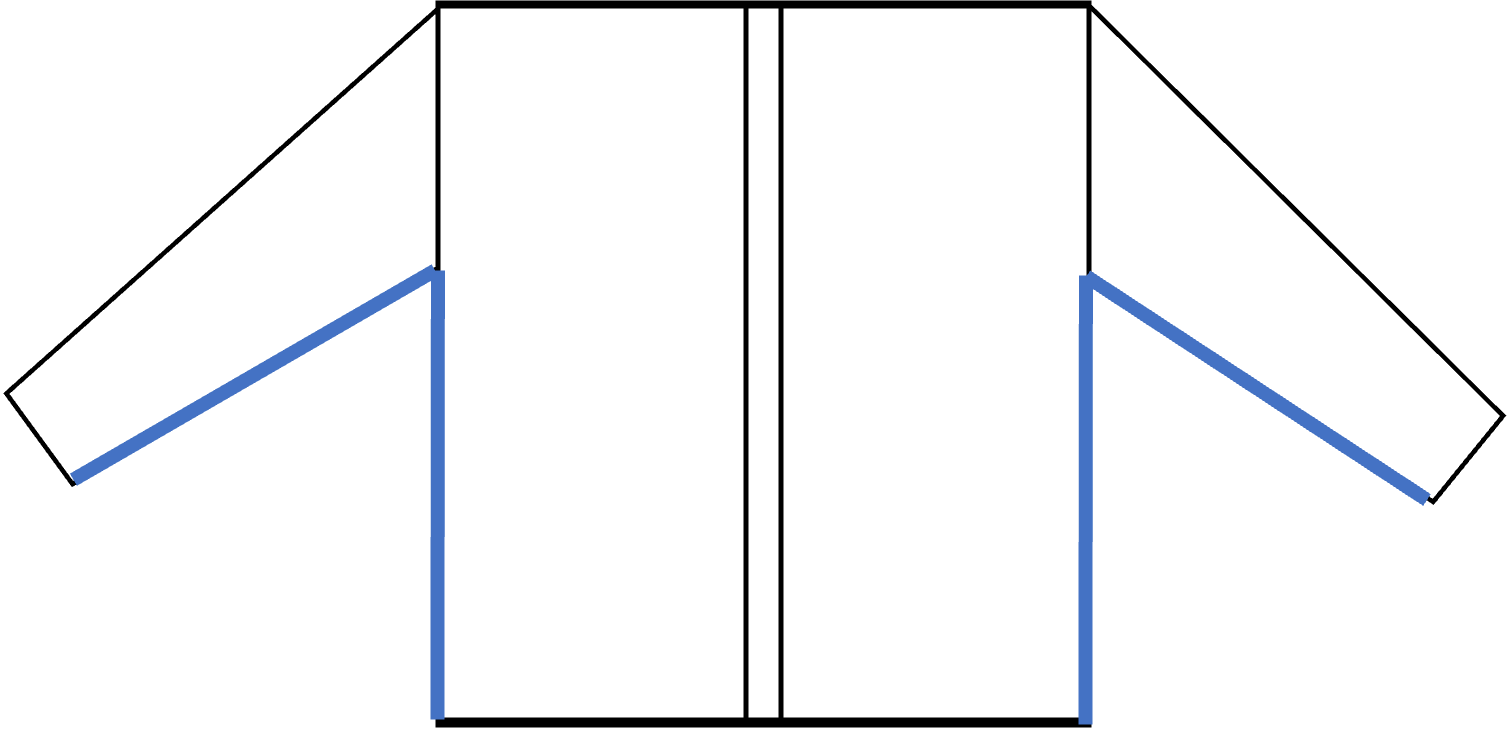
Seaming:
Lay Back Panel and two Front Panels together at the shoulders with RS facing each other. Using your preferred seaming method attach front panels to back panel. There will be 31(35, 35, 35, 39, 39, 39, 39, 39) sts unseamed in the center of the back panel.
Attach the sleeves to the sides of the cardigan, using your preferred seaming method, making sure to align the center of the sleeve with the shoulder seam. Make sure the sleeves are attached evenly from the center shoulder seam, down the sides. Using stitch markers to hold the sleeve in place is recommended.
Fold cardigan so that the back and front panels are on top of each other. Then seam the sleeves from the underarm to the cuff. Seam the sides from the underarm down to the bottom.
Collar:
With 60” 4.5mm needles, pick up stitches evenly around the front of the cardigan starting at the bottom right side with RS facing you. Make sure to pick up the same amount of sts on both sides of the cardigan.
(approx. st pick ups are 291(295, 295, 295, 299, 299, 299, 299, 299. You may have more or less depending on how many are picked up.)
Odd number of sts-ONLY
Row 1: K1, *P1, K1, repeat from * across, turn.
Row 2: P1, *K1, P1, repeat from * across, turn.
Rows 3-8: Repeat Rows 1-2.
Even number of sts-ONLY
Row 1: *K1, P1, repeat from * across, turn.
Rows 2-8: Repeat Row 1.
BO using your preferred method.
Weave in all ends and block.
Now go enjoy your cozy new Bellamy Cardigan. If you make one I’d love to see it. Make sure to tag me @meghanmakesdo on social media and use #thebellamycardigan so I can share.
As always you can find a printable PDF of this pattern in my shop, Etsy, Ravelry or in the kit from Lion Brand Yarn.
Happy Knitting,
Meghan