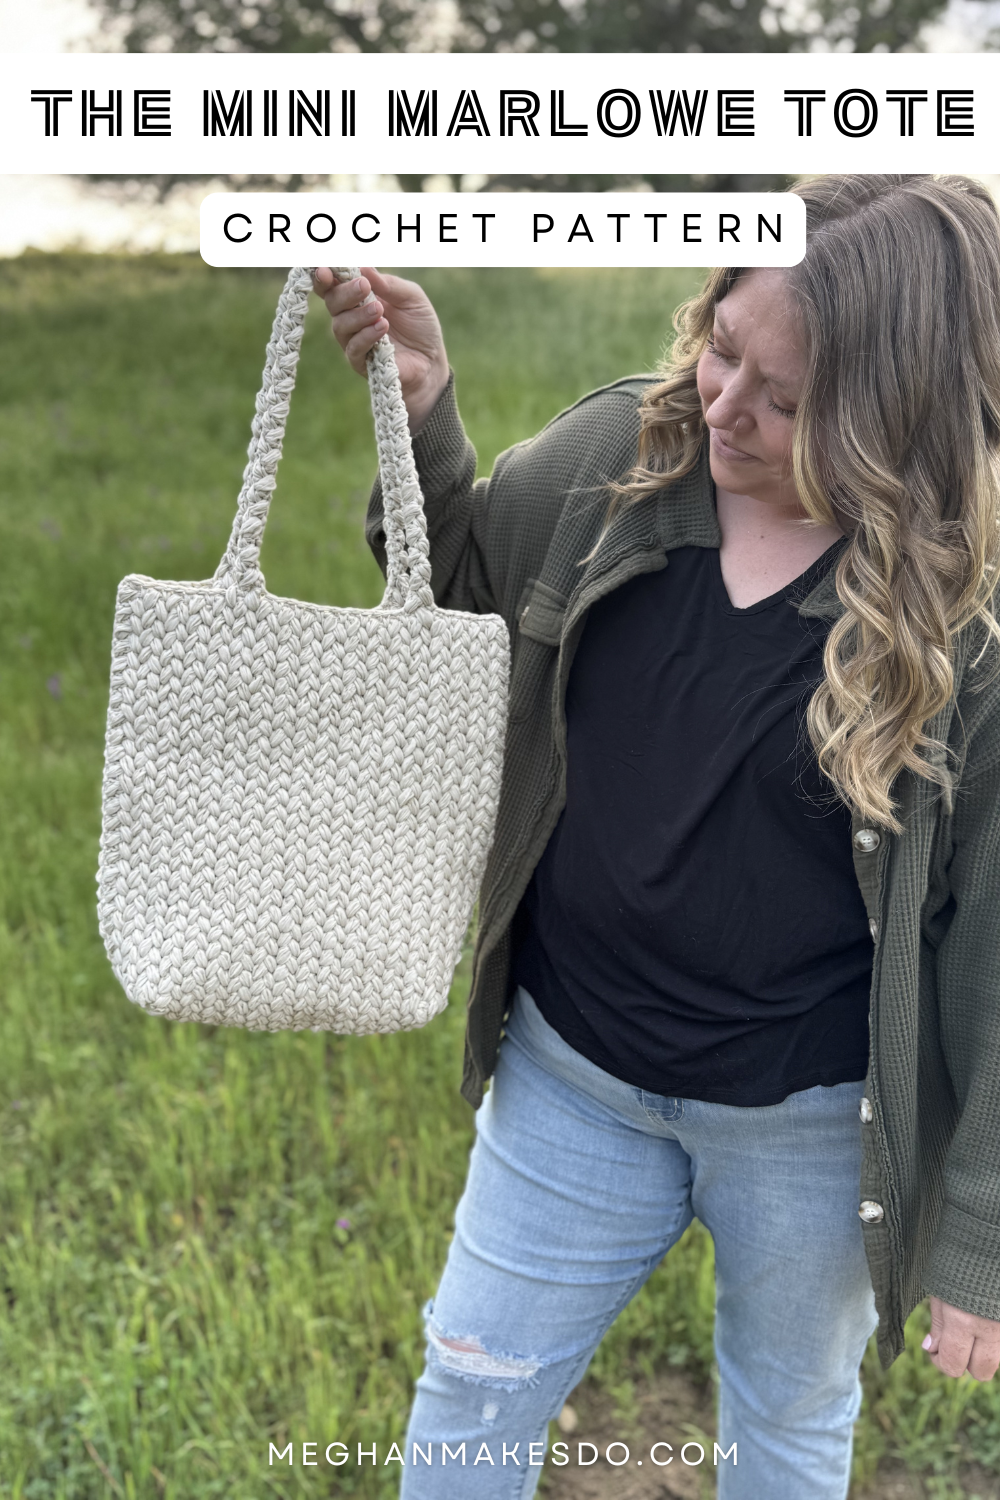
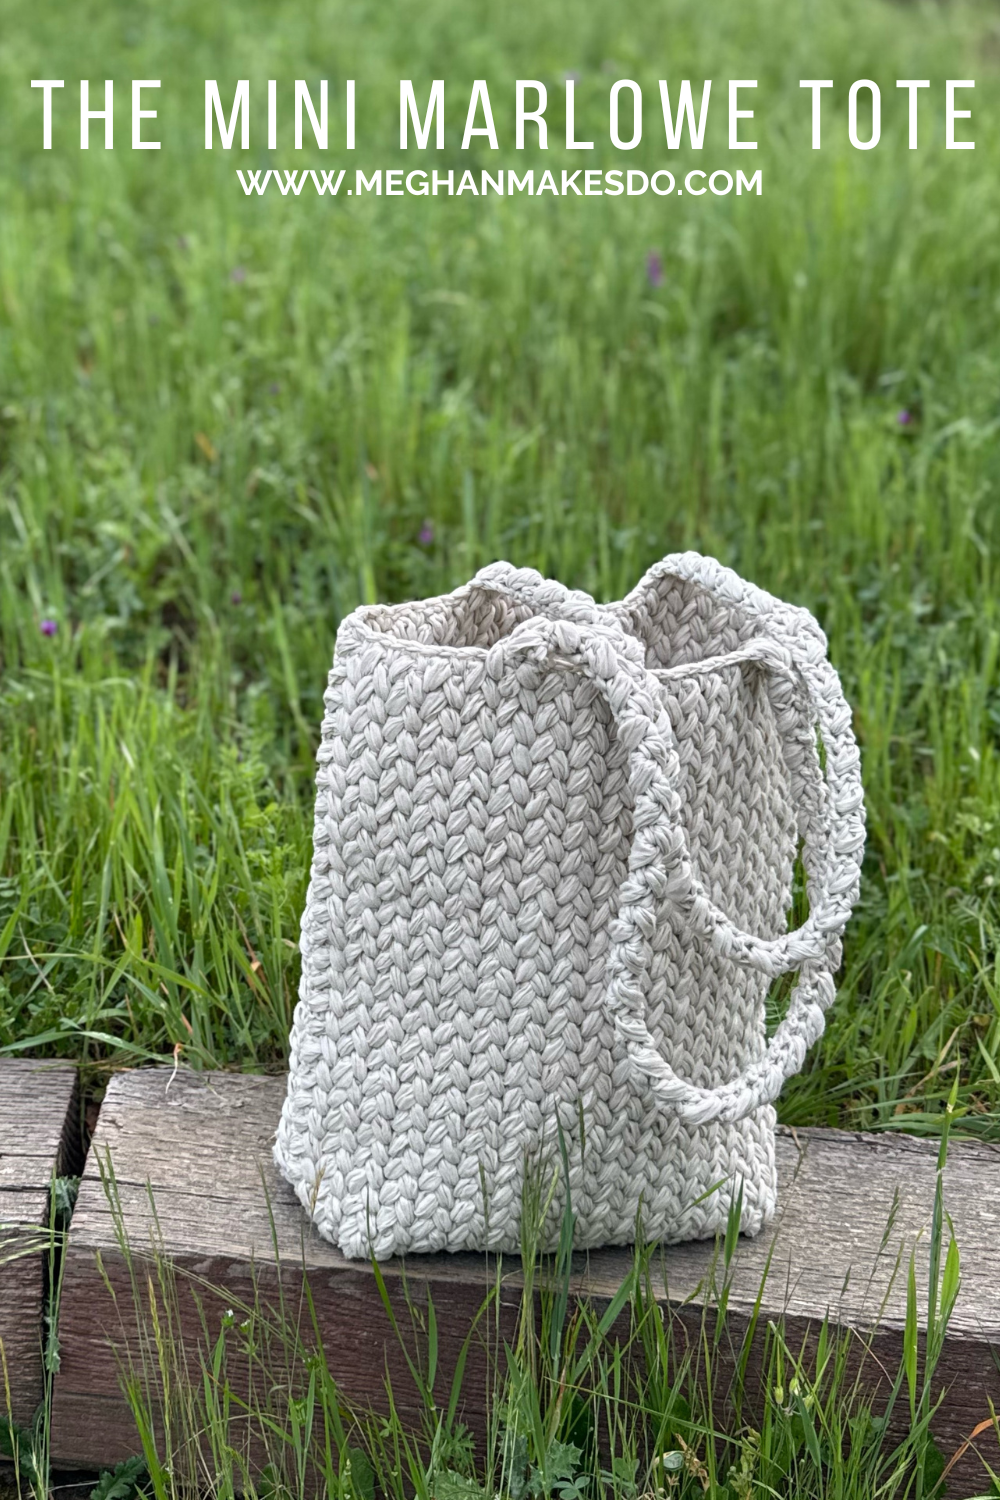
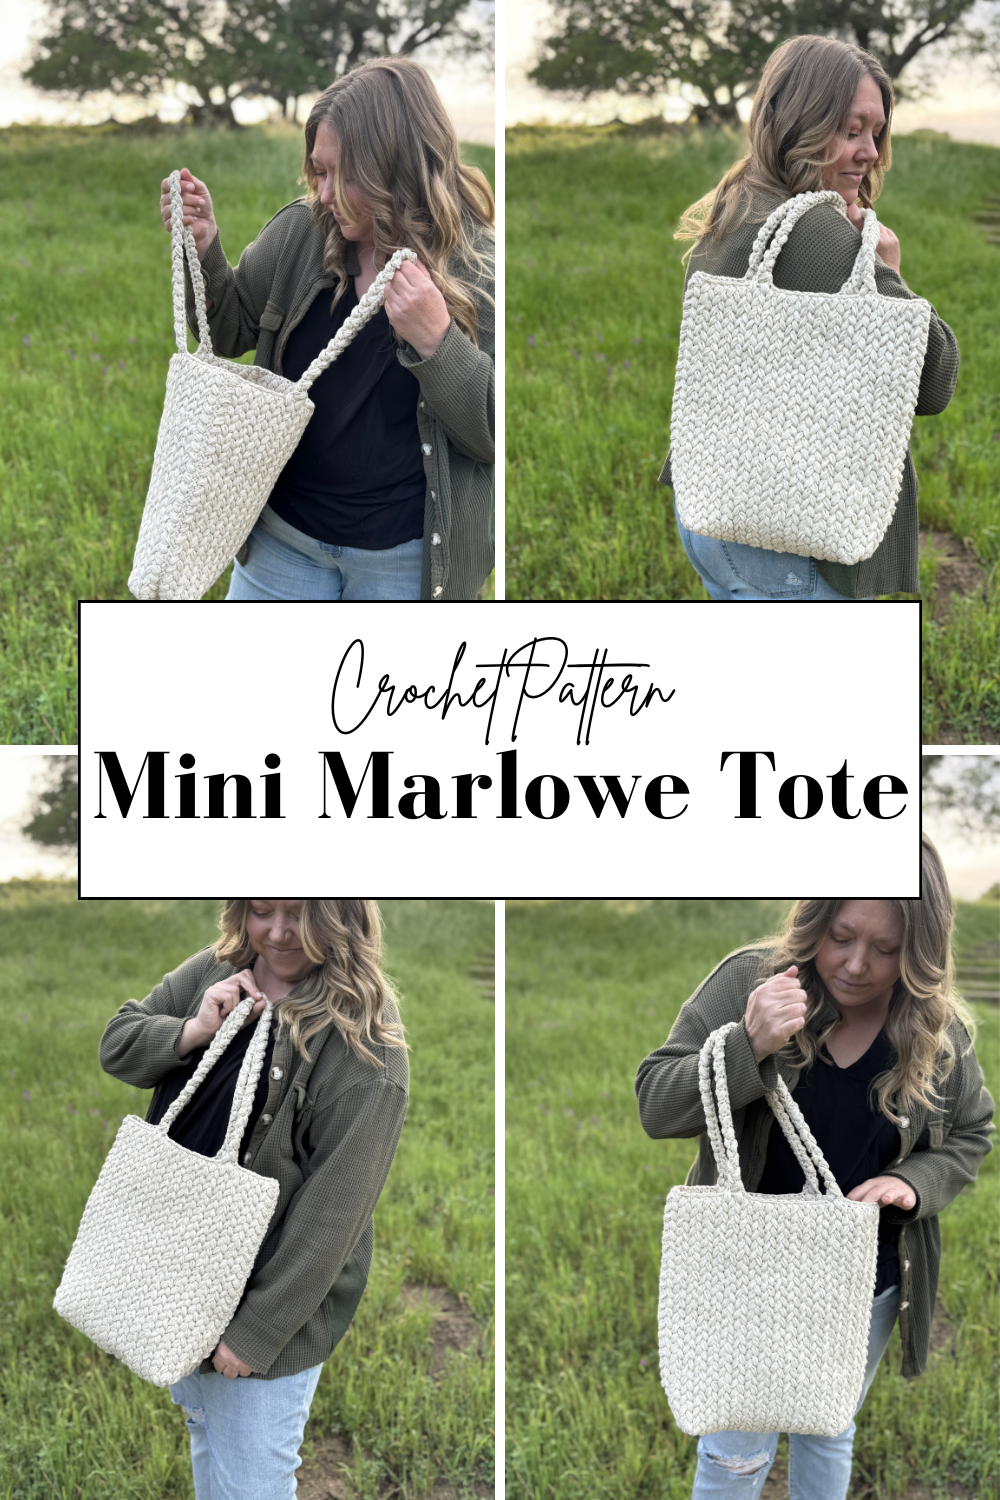
The Mini Marlowe Tote- Free Crochet Pattern
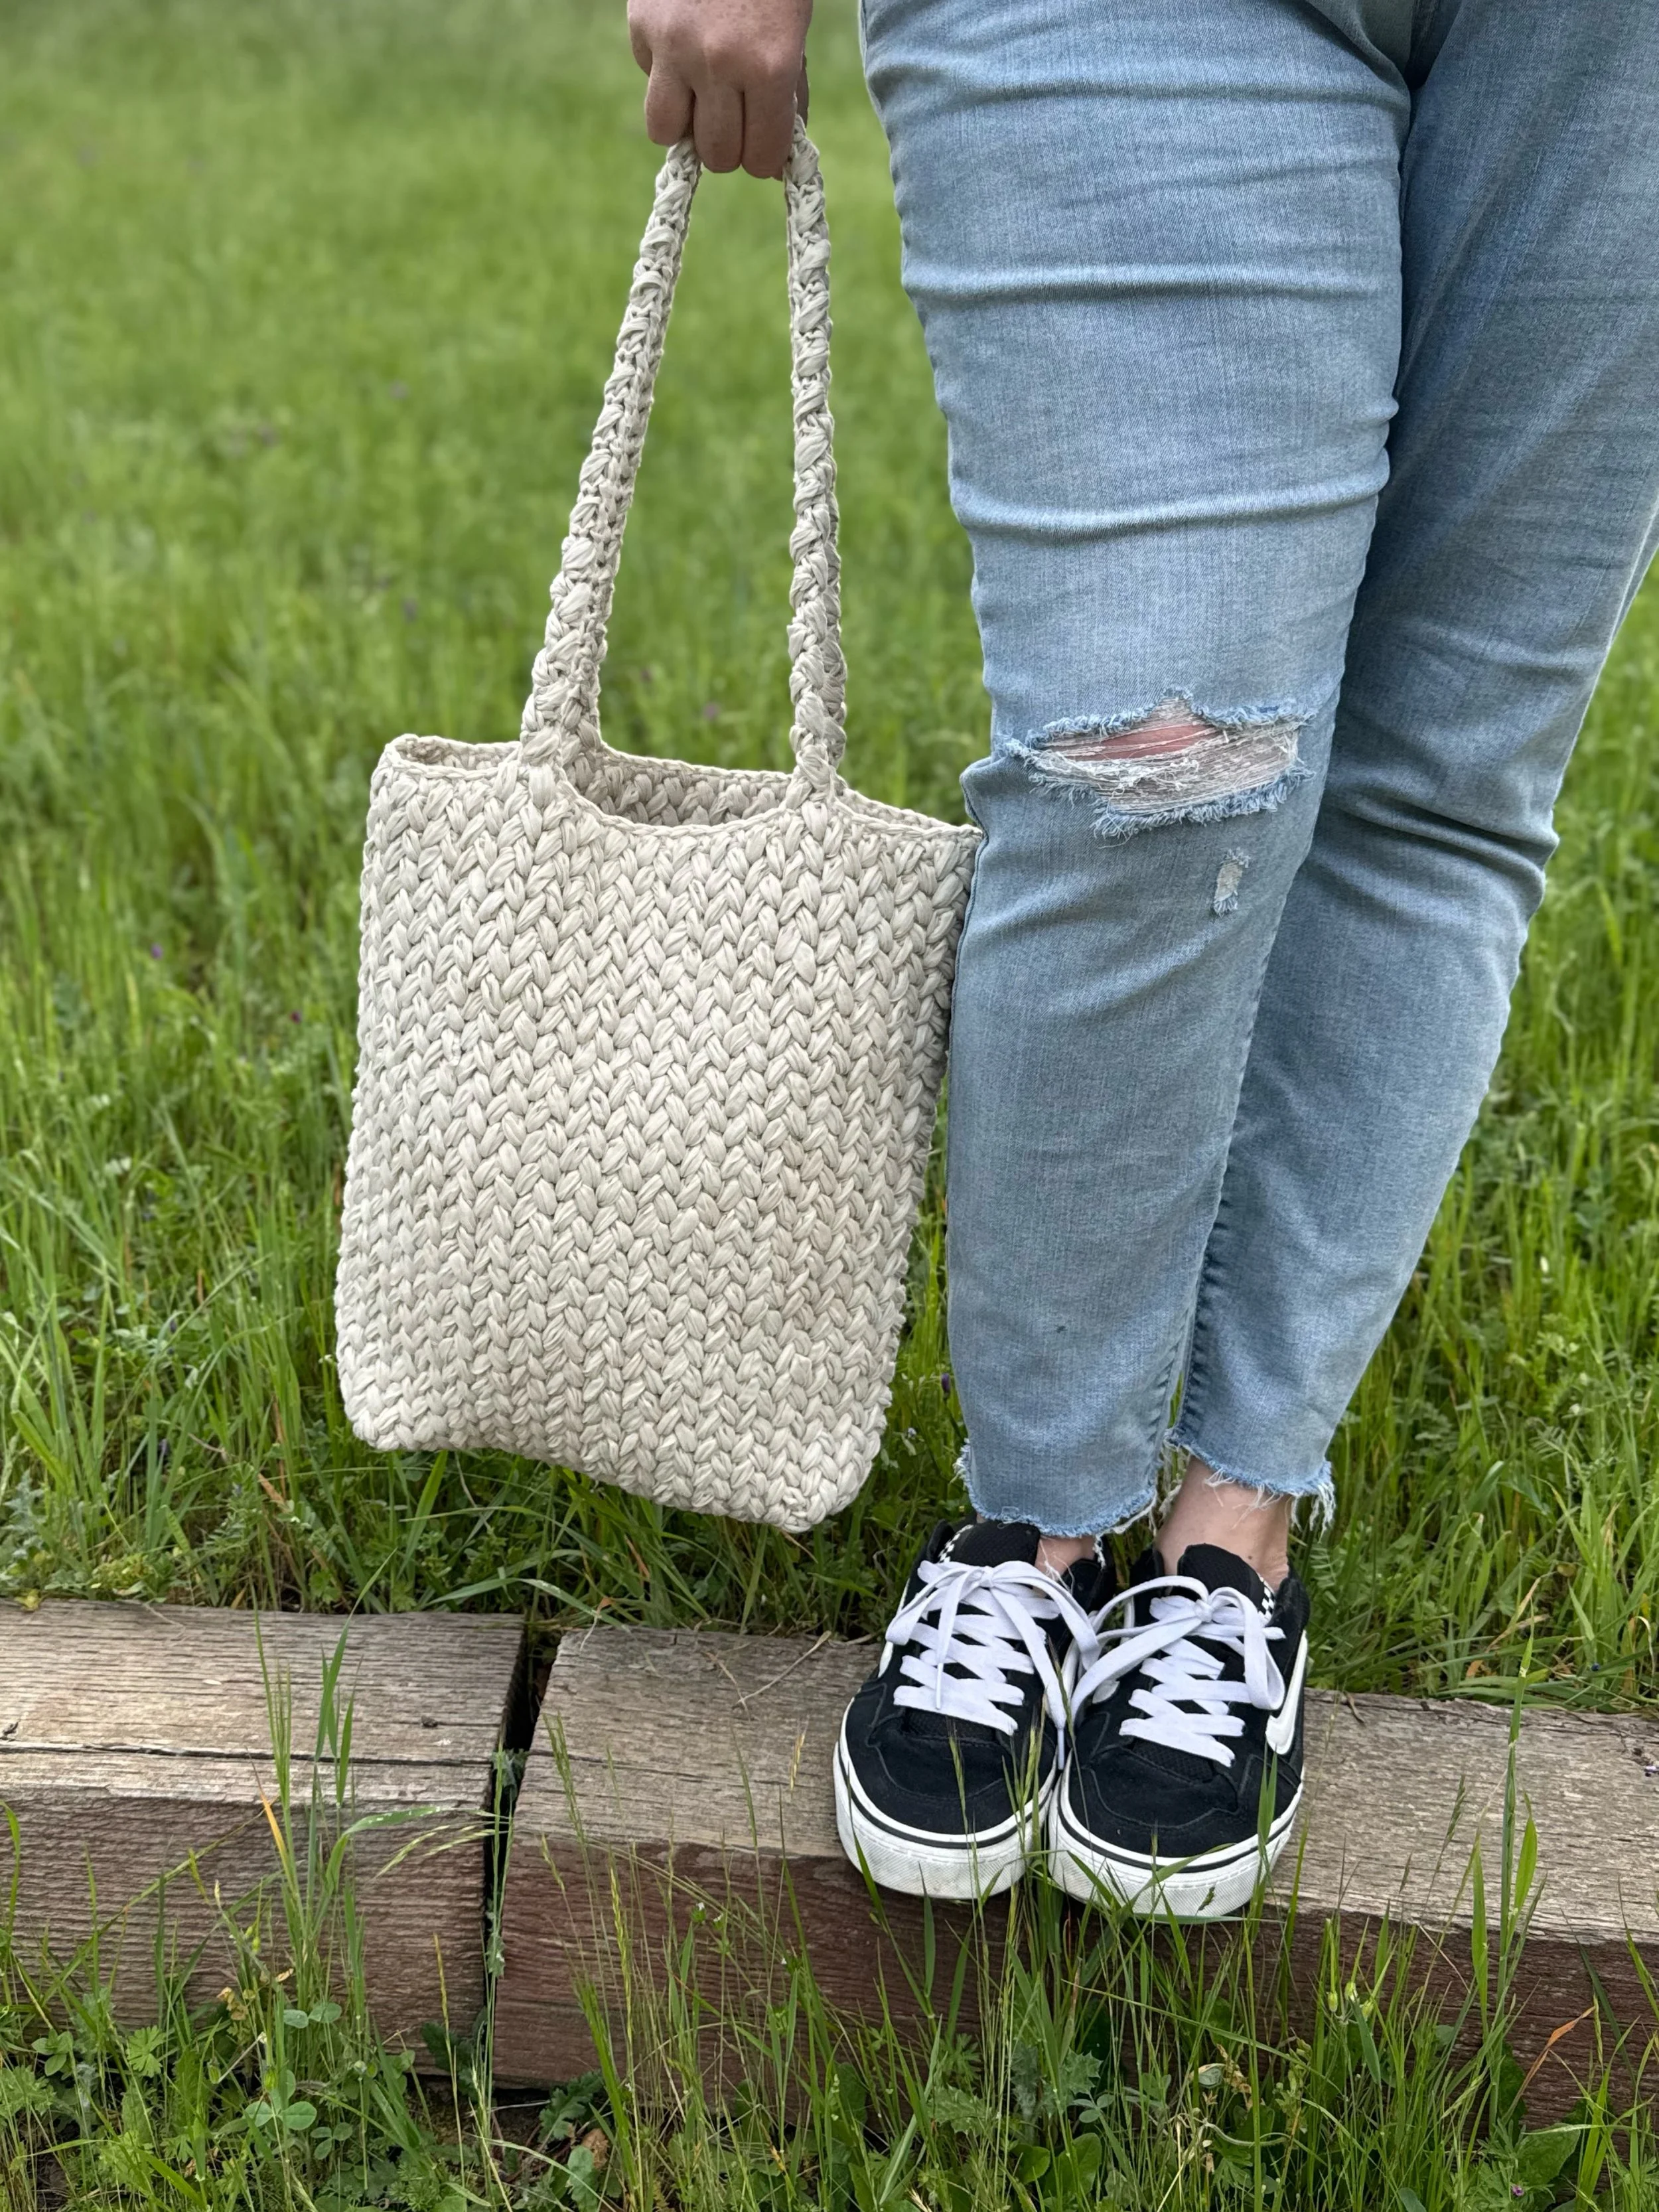
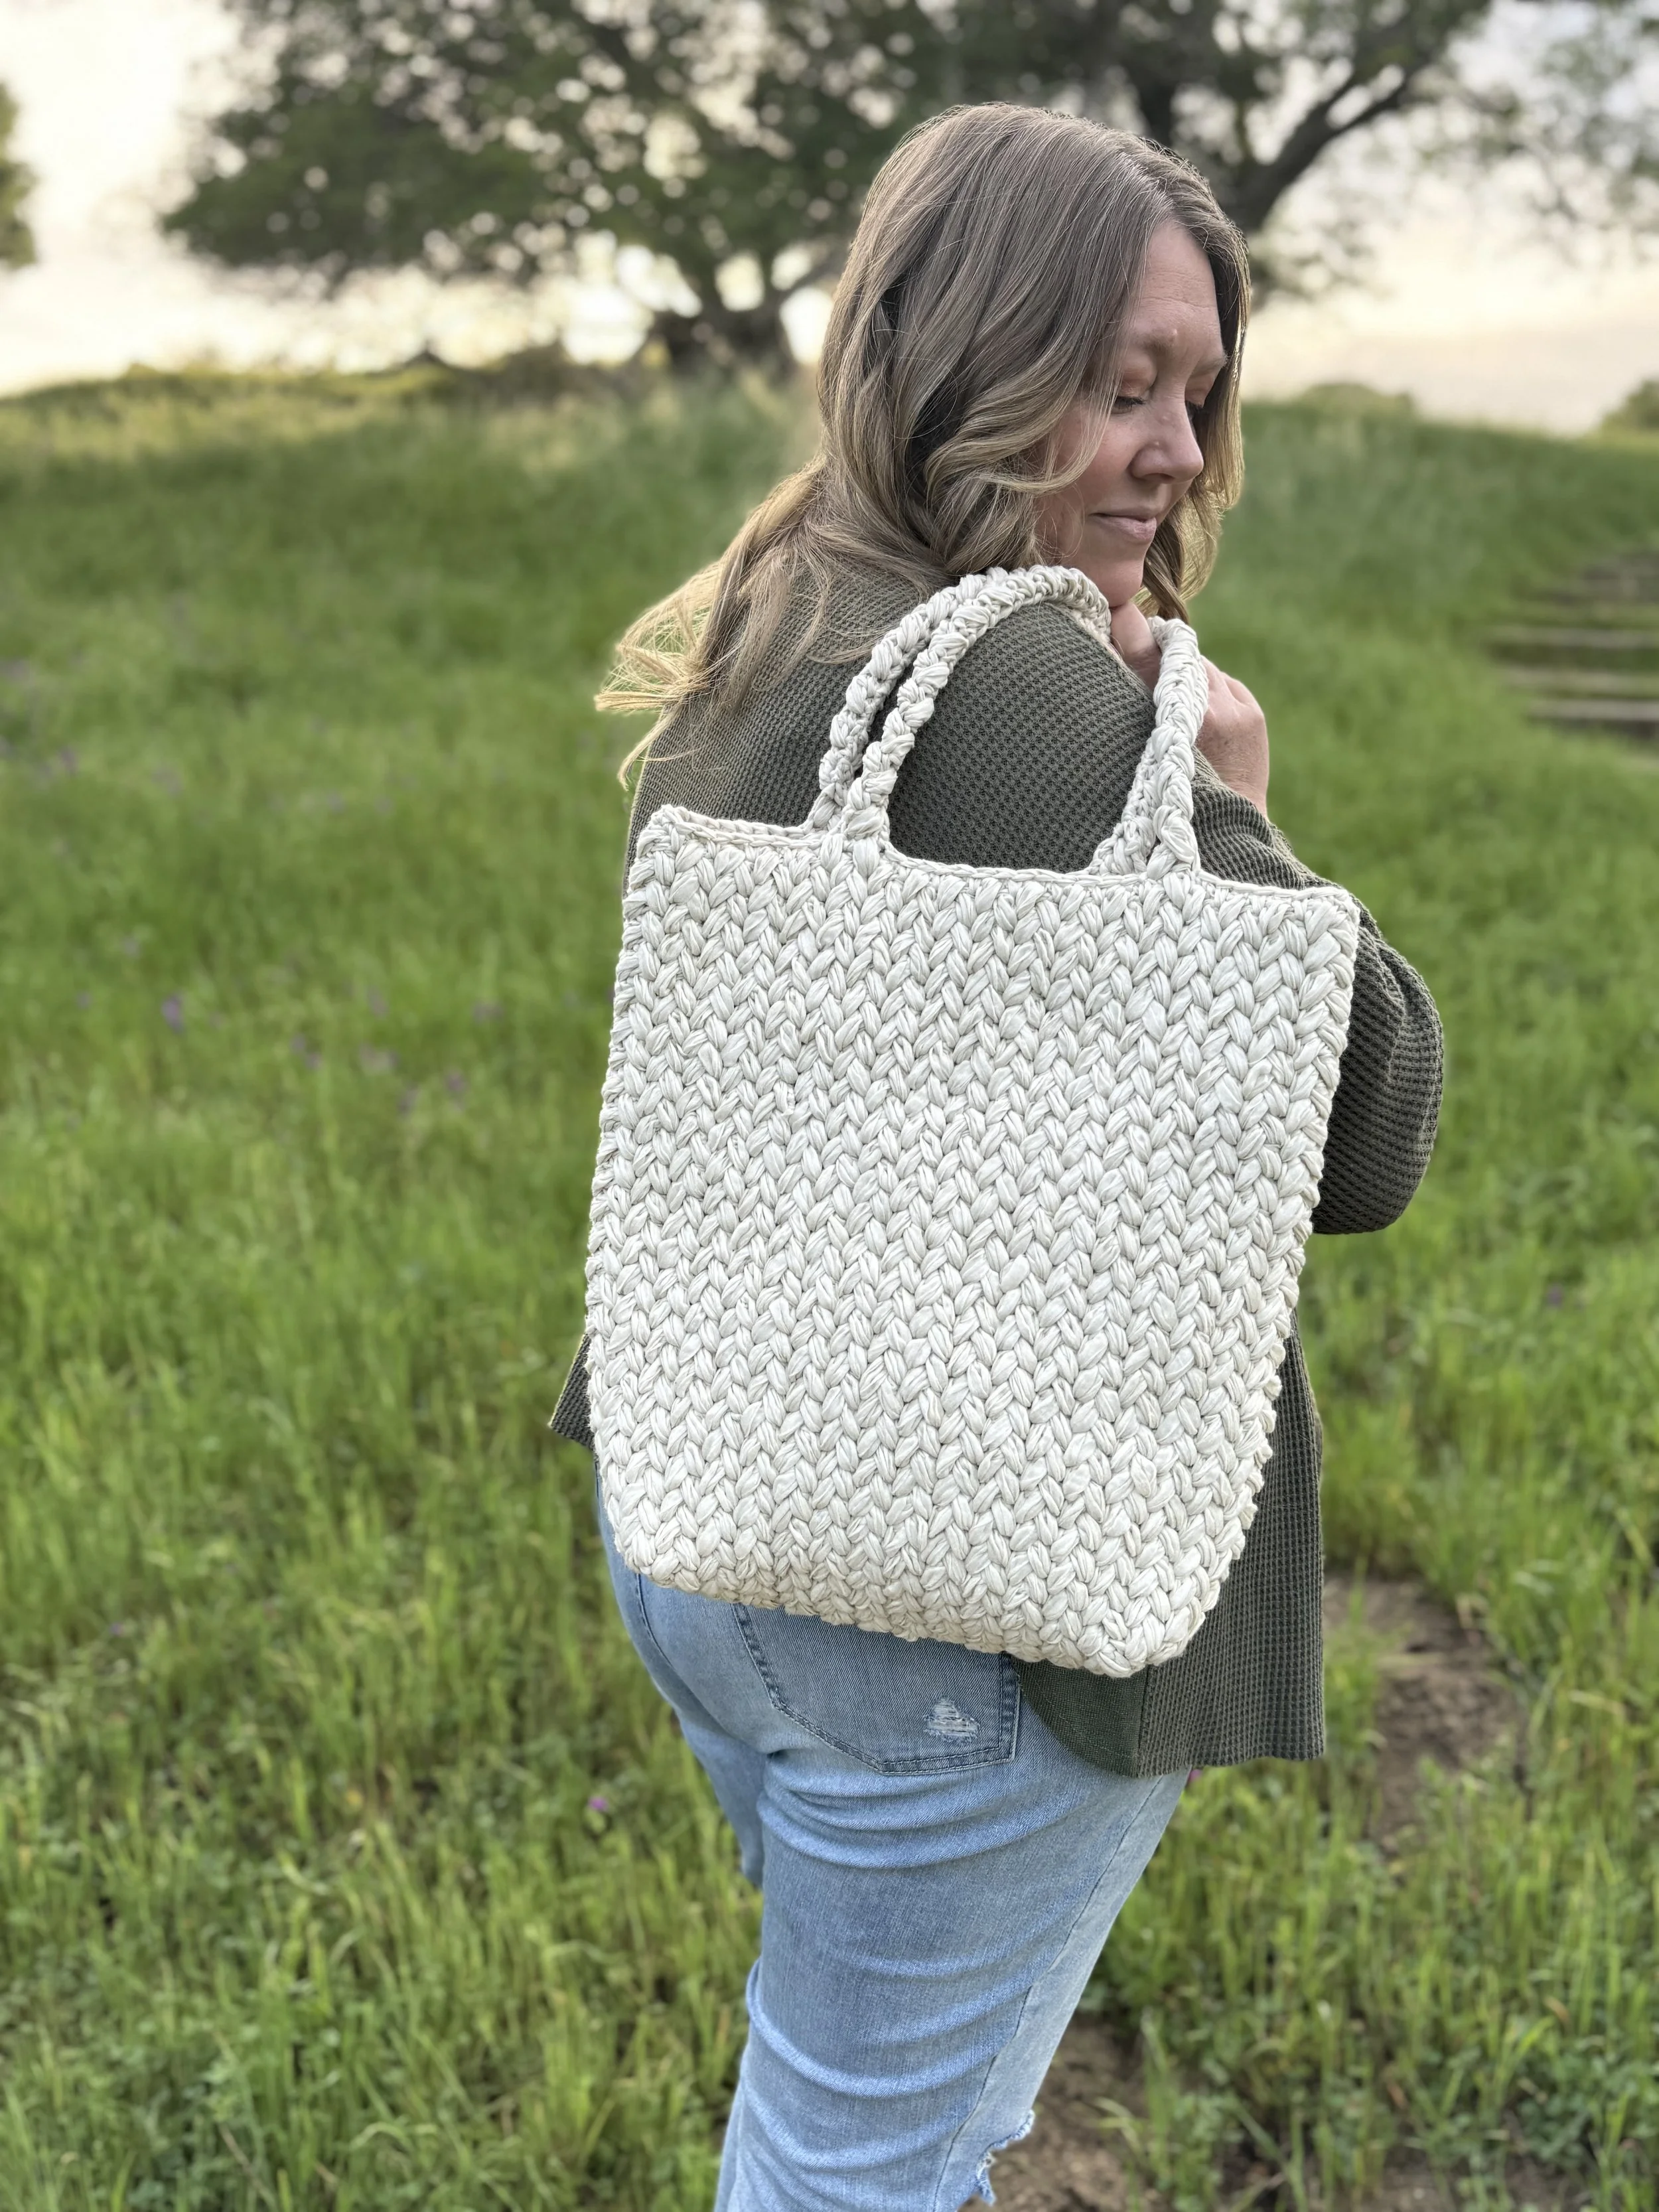
The Mini Marlowe Tote is the perfectly sized companion to the original Marlowe Tote, offering the same timeless style in a more compact, everyday-friendly design. This crochet pattern creates a sturdy yet stylish bag, ideal for carrying your essentials while still showcasing beautiful texture and structure. Whether you’re heading out for a quick errand or a casual day out, the Mini Marlowe Tote is a fun and functional make you’ll reach for again and again. Keep scrolling for the free pattern, grab a digital PDF in the shop or treat yourself to the complete kit from Lion Brand Yarn.
It’s been almost four years since I released the original Marlowe Tote crochet pattern, and in that time the number one question I get is, “How do I make it smaller?” It was asked so often I had to create a smaller version.
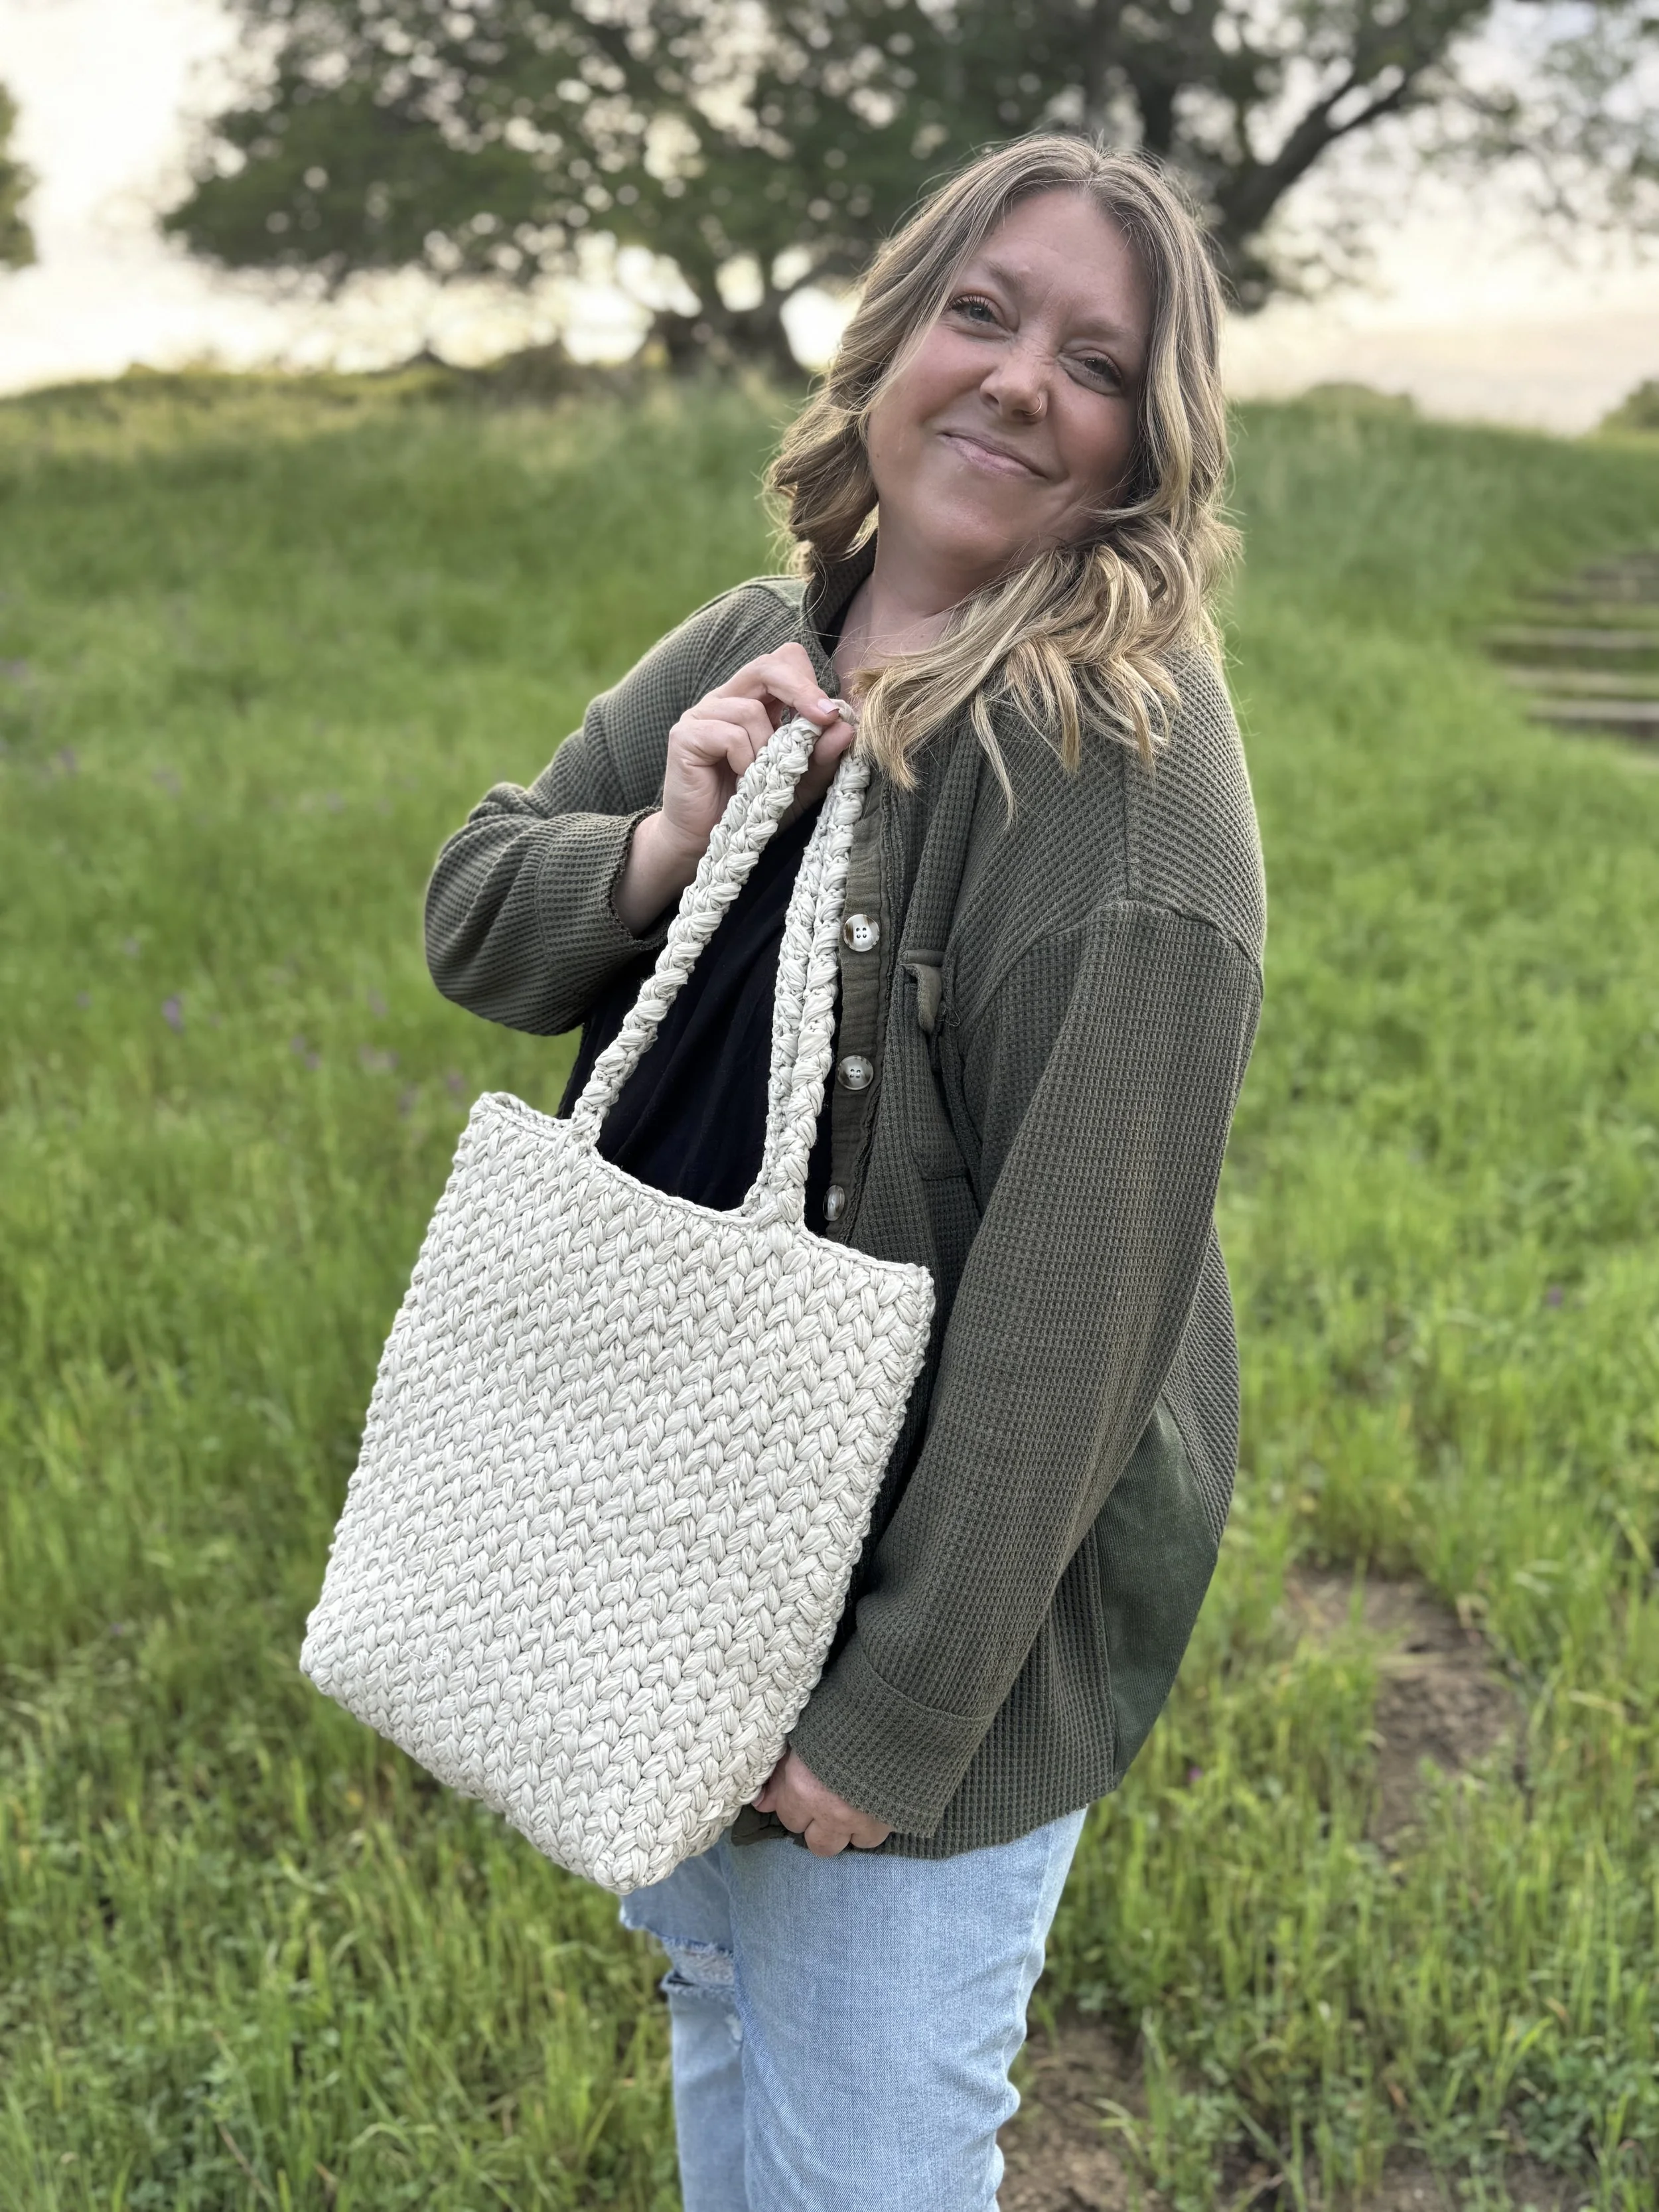
Meet the Mini Marlowe — isn’t she adorable? the original Marlowe Tote
I love a big bag, but I know it’s not for everyone. I designed the Mini Marlowe for everyday use. It still uses the same Rewind yarn and keeps the lovely textured look we all love, just in a smaller package. I preserved much of the original stitchwork and overall construction but adjusted a few details for better proportion: the corners are smaller, the straps are a bit thinner, and the final dimensions give a taller silhouette compared with the wider original tote.
***This listing is for a digital PDF crochet pattern, NOT a finished bag. ***
The Mini Marlowe Tote is the perfectly sized companion to the original Marlowe Tote, offering the same timeless style in a more compact, everyday-friendly design. This crochet pattern creates a sturdy yet stylish bag, ideal for carrying your essentials while still showcasing beautiful texture and structure. Whether you’re heading out for a quick errand or a casual day out, the Mini Marlowe Tote is a fun and functional make you’ll reach for again and again.
Pattern is written in English using US terms.
Materials:
825 yards (4 skeins) of Lion Brand Rewind Tape yarn in the color Elm or similar weight 5 yarn.
Tapestry needle
Scissors
Size:
15” wide X 15.5” high X 5” deep
Your pattern will be available to download after purchase through an emailed link. The link is good for 24hrs. If you need help with the pattern or a refreshed link please contact meghan@meghanmakesdo.com
Making Adjustments
Since one of the most asked questions on the original was how to make it smaller I wanted to also give a bit more detail and guidance on how you can adjust both Marlowe Tote patterns to get the exact size you want. I promise it's a lot easier than you may think.
The pattern is made of two identical panels which are seamed together along the sides and bottom. Each panel has a “cut out” space in the corners which are then brought together to and seamed in order to create the boxy bottom of the tote.
The very first thing you’ll want to do is check your gauge. This not only will ensure you end up with the right size tote, but also give you a bit of practice getting to know the stitch pattern. Make a small swatch in the braided puff stitch and make sure it matches the gauge listed in the pattern. Adjust your hook size until you have made a swatch that matches gauge.
Then you can do a bit of calculating and reverse engineering to figure out the size you want. The original is about 23” wide and the mini is about 15” wide. So let’s say you want a tote that is 18” wide. Using a bit of math you can figure out how many stitches you will need for the main body of the tote.
Since the gauge is 10 sts x 14 rows = 4” you can do a simple calculation to get the answer:
(size you want / gauge in inches) X gauge stitches = stitches needed to obtain that size
(18” / 4”) X 10 sts = 45
Now you know you will need 45 sts to get a tote that is 18” across. Since the pattern stitch needs to be an even number you can round up to 46.
That will be the number of stitches for the widest part of the tote, but since the design starts with a smaller section and then adds on you still have a bit more math to do.
I used two different amounts of stitches and rows for the “cut outs” on each tote. For the original I started with 9 rows for the first section and then added on 8 stitches to each side. This produced about 2” cut outs for the corners.
For the mini I started with 7 rows for the first section and added 6 stitches to each side and that produced about 1.5” cutouts for the corners.
Both options made the bag about 5” deep so I think you can choose either option to start your bag. I’d say if you are making a bag that is under 18” wide follow the corner instructions for the mini Marlowe and if you’re making a bag that is over 18” wide then follow the corner instructions for the original Marlowe.
If you feel confident, you can also made adjustments to the cut outs by making sure the height of the rows you make for the first section is equal to the width of the stitches you add.
For the example let’s go with the mini Marlowe corner instructions. That means will will be adding 6 stitches to each side of our first section and after we add those stitches we will need to have a total of 46 stitches.
Follow this formula to figure out how many stitches the first section will need:
Number of stitches needed for width — total number of stitches added after first section = number of stitches to start
46 — 12 (6 each side) = 34 sts
Now we know we can start the first section of the panel with 34 sts. Then work up 7 rows in the braided puff stitch. Next we can add 6 sts to each side using the method shown in the pattern and then continue working the braided puff stitch until we reach the height we want for our tote.
Once the desired height is reached you’ll continue to follow the pattern instructions for the last row of the panel. When it’s time to add the straps you can choose to follow the strap instructions for either tote. Again I recommend the thinner straps of the mini for totes that are 18” wide or less and the thicker straps of the original for totes that are wider than 18.”
When it comes to placement you’ll want to make sure they are proportionate to the overall width of the tote. For the original the straps were placed about 6.5” in from the edges and for the mini they were placed about 4” in from the edges. Wherever you decide to place them is fine as long as you like it and you are attaching the yarn into a stitch that makes sense when following the instructions. You can also adjust the overall length of the straps too. Make them longer to create a cross body style or shorter for more of a handheld tote.
I do recommend working through one of the patterns completely first, before making too many adjustments. That way you’ll know all the ins and outs of the design and making adjustments will make a lot more sense.
I hope that helps you feel confident to create the tote bag in any size you’d like.
If the previous section felt overwhelming, don’t worry. I’ve also made a full video tutorial for the mini Marlowe and there still a full video tutorial for the original as well. That way you can see exactly how the tote is constructed and see the stitches in action. Make sure to check it out below.
The Mini Marlowe Tote Crochet Pattern
Materials:
825 yards (4 skeins) of Lion Brand Rewind Tape yarn in the color Elm or similar weight 5 yarn.
Tapestry needle
Scissors
Abbreviations:
ch(s)- chain(s)
st(s)- stitch(es)
sk- skip
sc- single crochet
fsc- foundation single crochet
fch- foundation chain
puff- *yo, insert hook into indicated stitch, yo, draw up a loop, repeat from * 3 times (7 loops on hook), yo and draw through all loops.
WS- wrong side
RS- right side
Notes:
1.Tote is made of two panels worked bottom up.
2.Panels are made using the braided puff stitch. The panels consist of an initial bottom section, stitches are then added for the main section and finally straps are added on just before seaming.
Size:
15” wide X 15.5” high X 5” deep
Gauge:
10 sts and 14 rows in braided puff stitch= 4” square
Pattern:
Main Panel: (make 2)
Ch 27
Row 1: sc in 2nd ch from hook and in each ch across, ch 1, turn. (26)
Row 2: sc in 1st st, puff st in next st 2 rows below, *ch 1, sk 1, puff st in next st 2 rows below, repeat from * until 2 sts remain, ch 1, sk 1, sc in last st, ch 1, turn. (26)
Row 3: sc in 1st st, puff st in 1st st 2 rows below, *ch 1, sk 1, puff st in next sc st 2 rows below, repeat from * until 3 sts remain, ch 1, sc in last st, ch 1, turn. (26)
Rows 4-7: repeat Row 3.
Do not ch 1, and turn at the end of Row 7.
We will now be adding stitches to both sides in order to make the cut out corners.
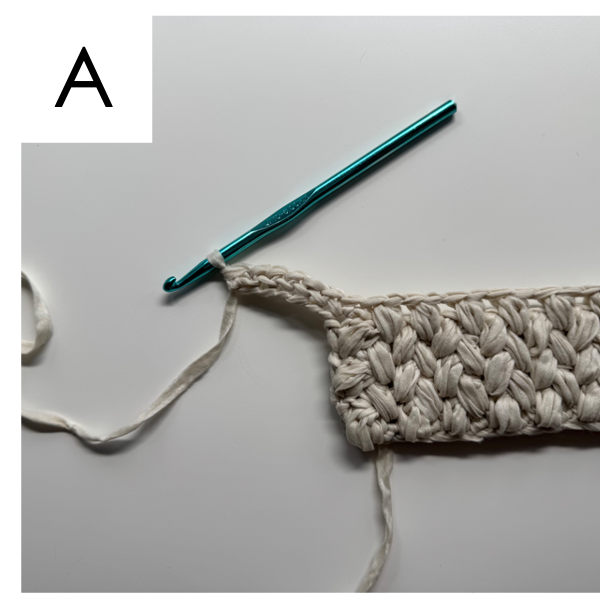
Fsc 6 directly off the last st of Row 7, ch 1, turn. (fig. A)
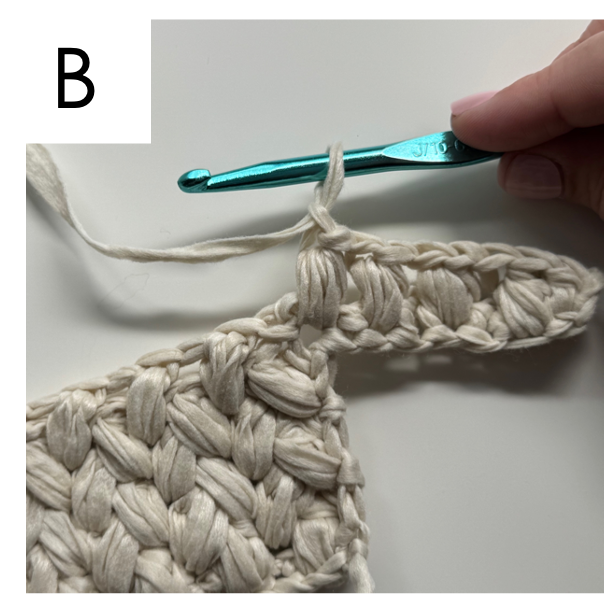
Row 8: sc in 1st st, puff st in fch st 2 rows below, *ch 1, sk 1, puff st in next fch st 2 rows below, repeat from * once more, ch 1, puff st into the 1st sc st of the main panel 2 rows below, **ch 1, sk 1, puff st in next st 2 rows below, repeat from ** until 3 sts remain. (fig. B)
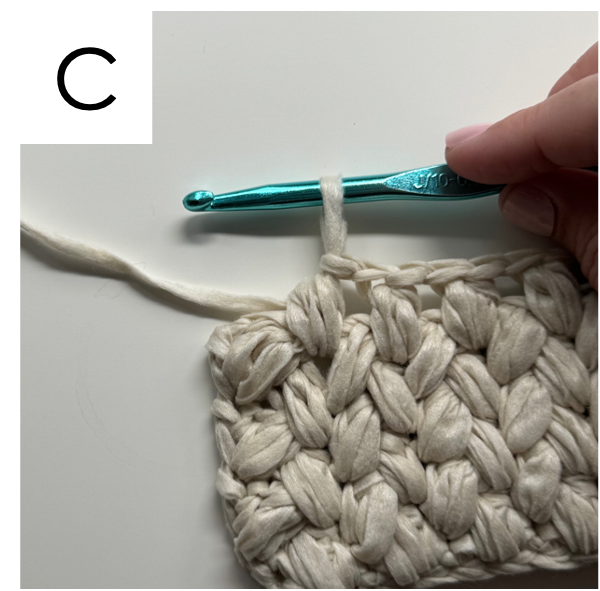
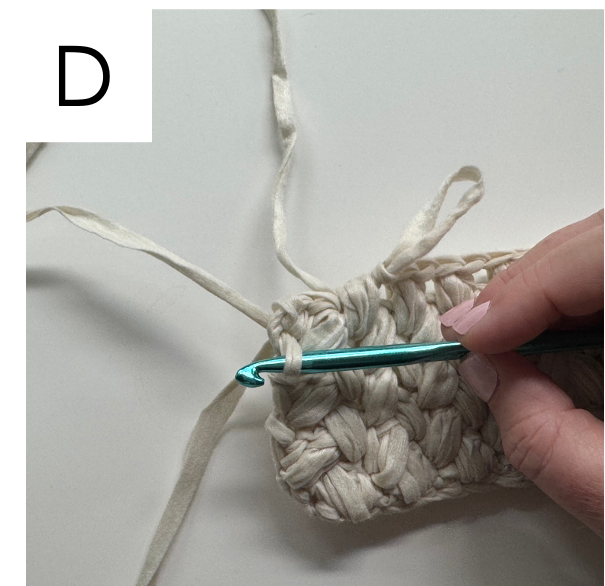
Take hook out of current st, leaving a tall loop (fig. C), then insert hook into the last st 2 rows below and attach either another skein of yarn or the end tail of your current skein and ch 1 (fig. D).
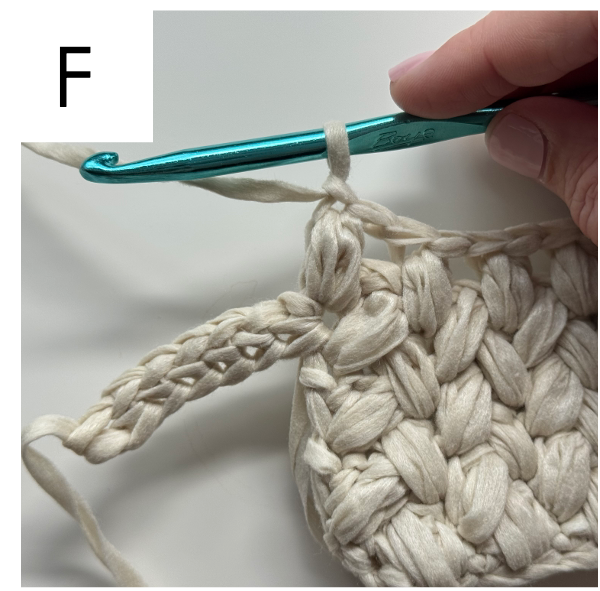
Make 6 fsc stitches and fasten off (fig. E). Insert hook back into working stitch and make next puff st into the same stitch you made your first fsc st (fig. F), *ch 1, sk 1, puff st in next fch, repeat from * until 2 sts remain, ch 1, sk1, sc in last fsc, ch 1, turn. (38)

Rows 9-54: sc in 1st st, puff st in 1st st 2 rows below, *ch 1, sk 1, puff st in next st 2 rows below, repeat from * until 3 sts remain, ch1, sc in last st, ch 1, turn. (38)
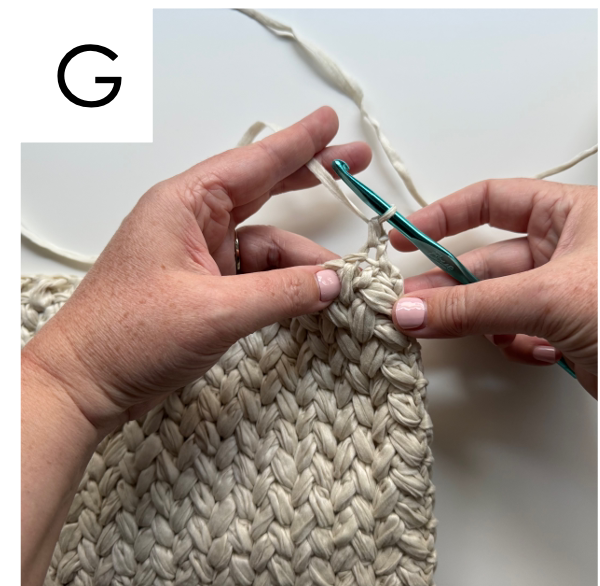
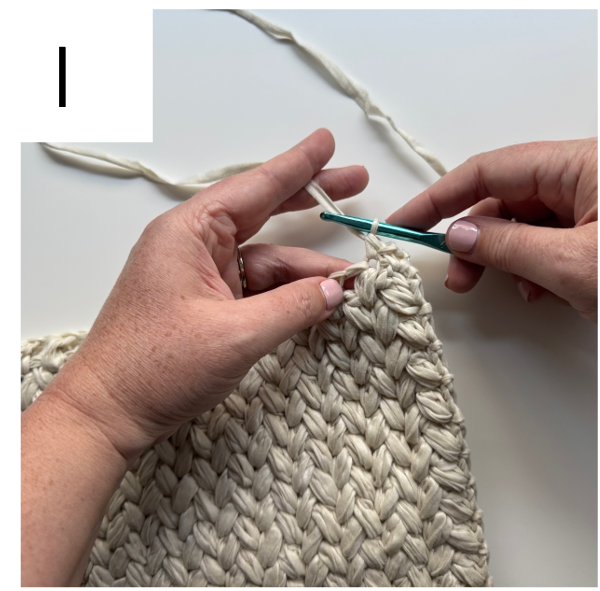
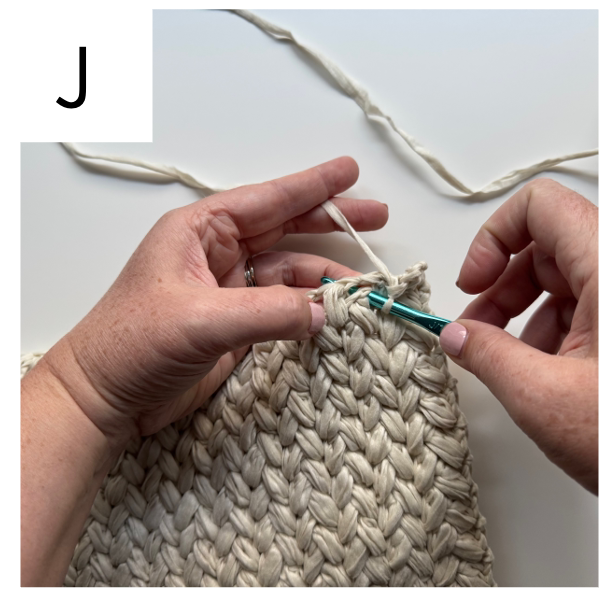
Row 55(RS): sc in 1st st (fig. G), sc in 1st st 2 rows below (fig. H), *sc in ch 1 st (fig. I), sc in next st 2 rows below (fig. J), repeat from * across until 3 sts remain, sc in ch 1 st, sc in last st. (38)
Fasten off leaving a long tail for seaming.

Strap
With RS facing up, attach yarn to top of 10th st from the right side of panel, ch 1.
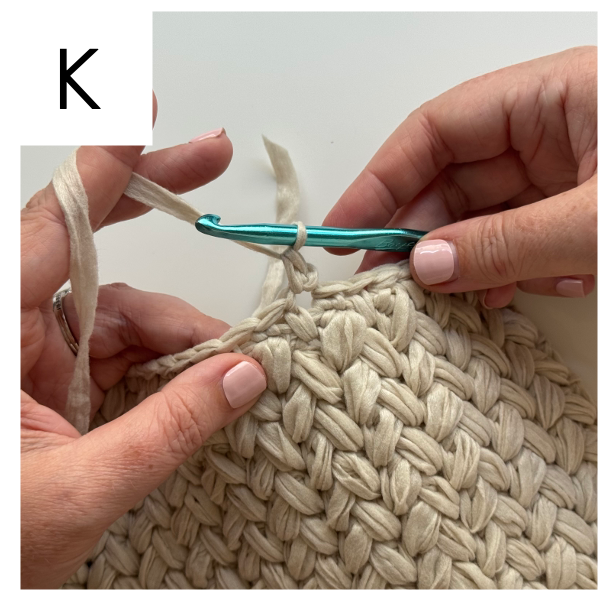
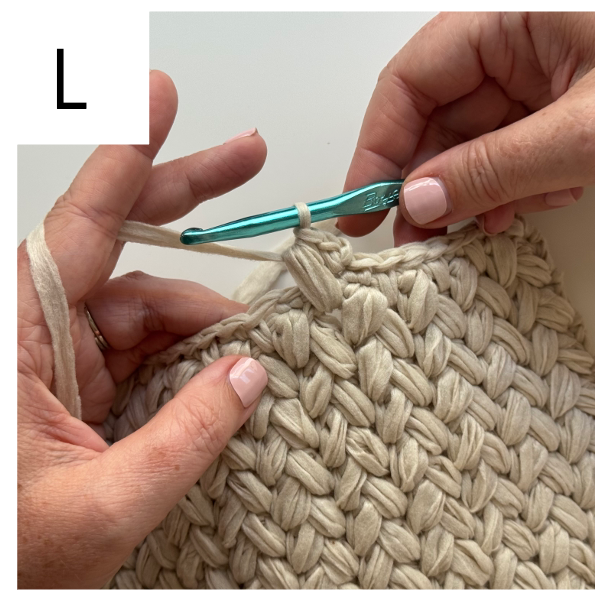
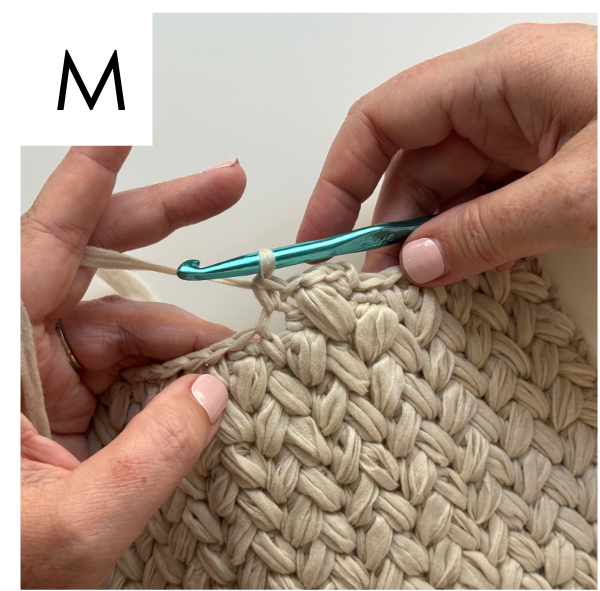
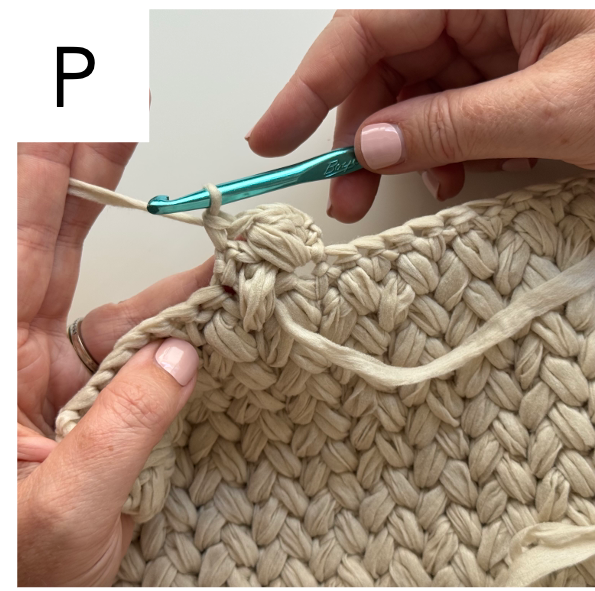
Row 1: sc in same st as join (fig. K), puff st in same st 2 rows below (fig. L) (working around the sc stitches of Row 55), ch 1, sk 1, sc in top of next st (fig. M), ch 1, turn. (6)
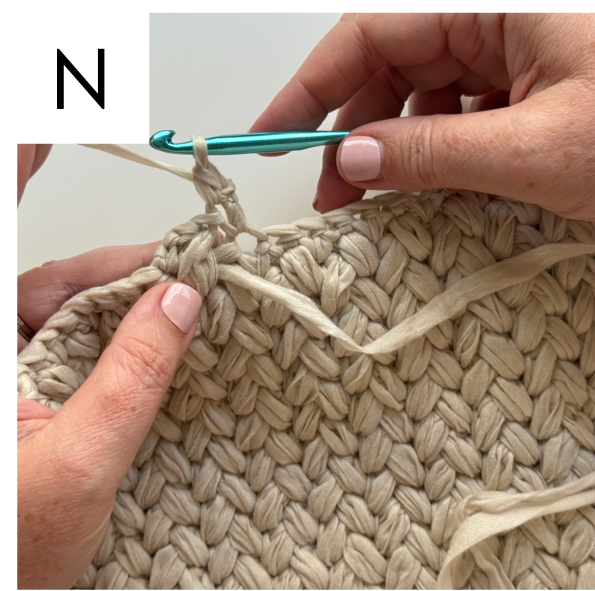
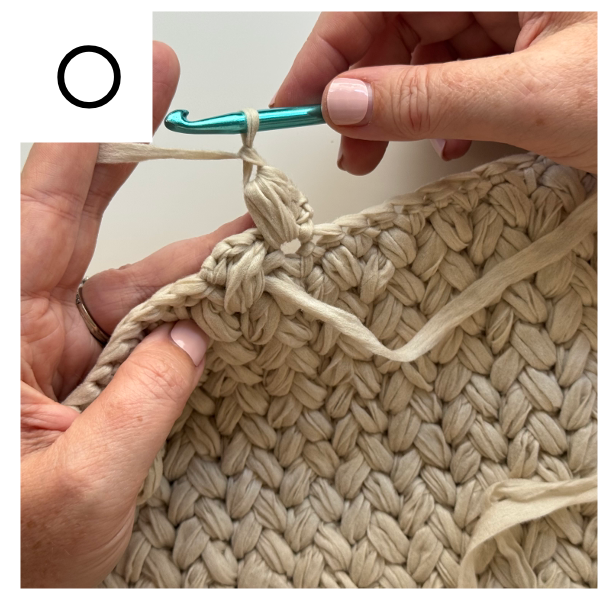
Rows 2-60: sc in 1st st, puff st in 1st st 2 rows below, ch 1, sk 1, sc in last st, ch 1, turn. (6) (fig. N-P)
Fasten off leaving a long tail (at least 2 yards) for seaming.
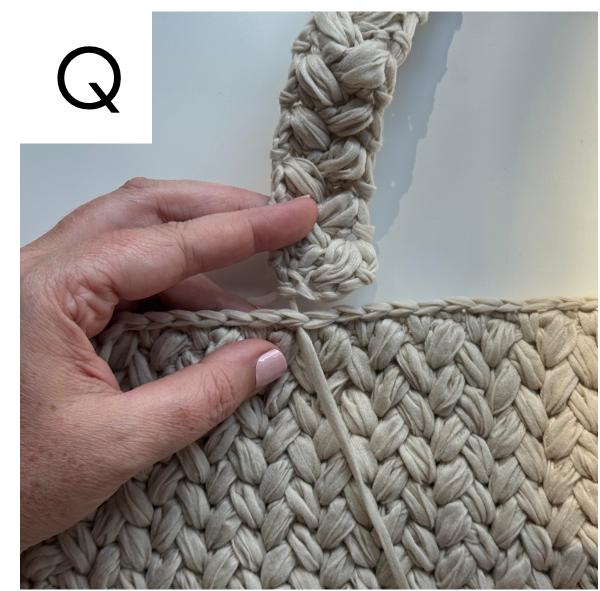
Without twisting the strap, bring the end down towards the top of the panel lining up the last st of the row with the 10th st from the edge of the main panel.
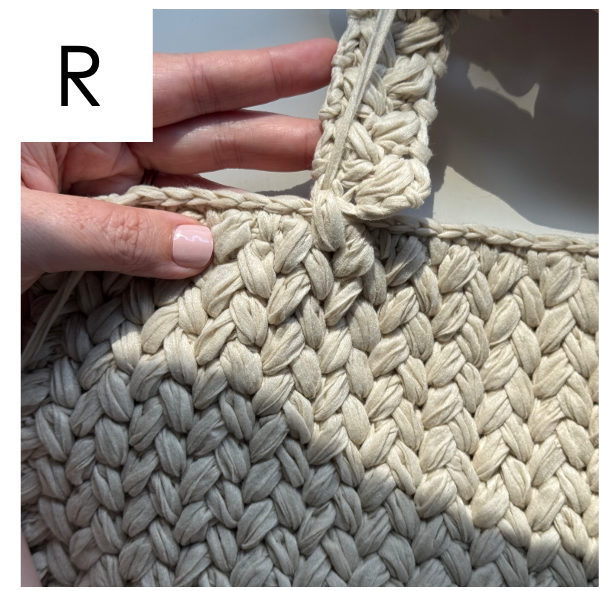
Using a tapestry needle, we will be attaching the strap to the top panel by creating two faux puff stitches. Attach the last st of the strap and the 10th stitch together (fig. Q) . Then insert your needle through the 10th st 2 rows below on the main panel and through the last st of the strap. Using a whip stitch keep threading the yarn around those two stitches to create the first faux puff stitch making sure to whip stitch around at least 6 times. (fig. R)
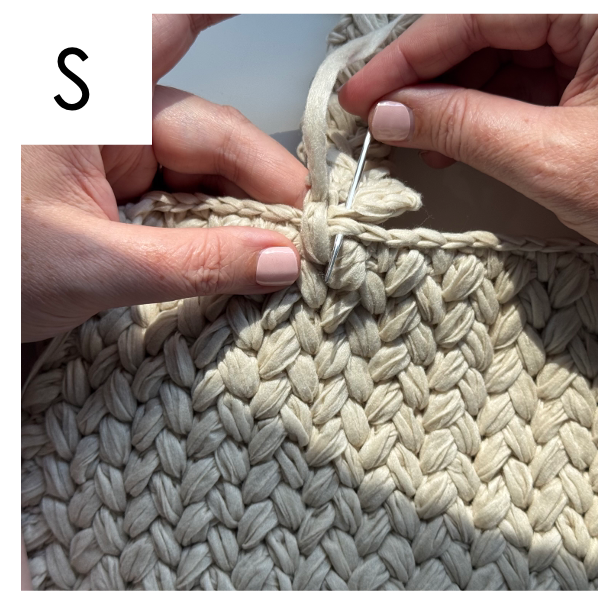
Next insert your needle through the next sts of the main panel and strap and attach with one whip stitch (fig. S)
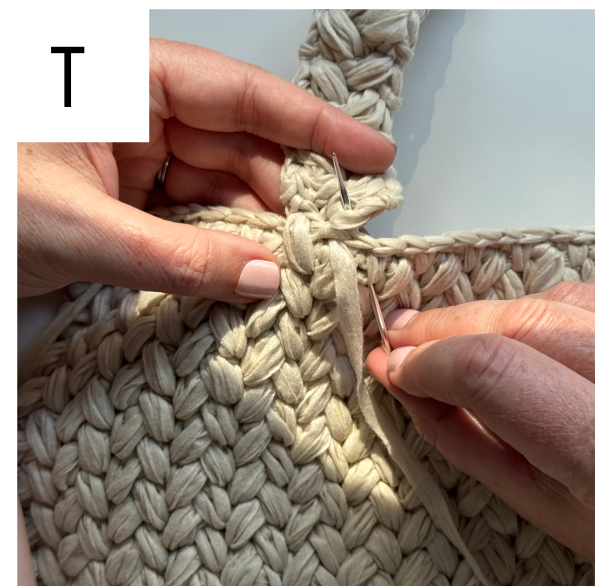
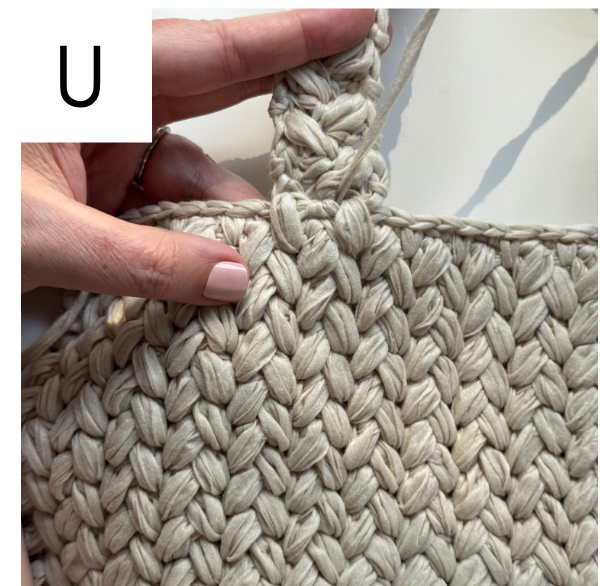
Then make another faux puff stitch using the whip stitch method through the next stitch on the strap and the next st 2 rows below on the main panel. (fig. T-U)
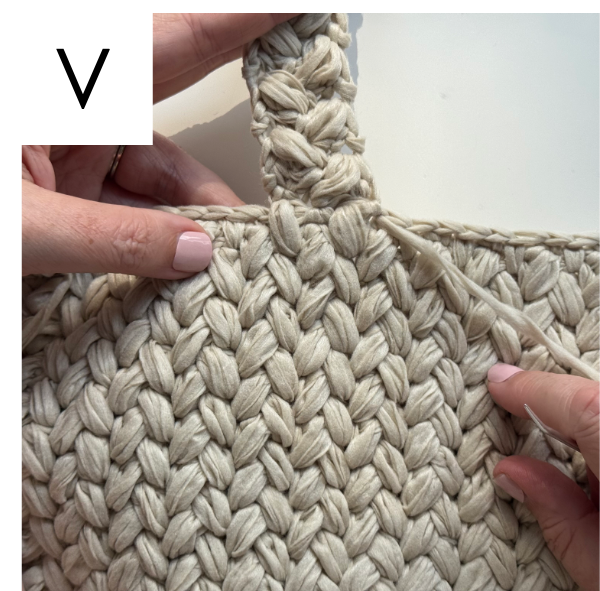
Lastly, whip stitch the last st of the strap and the next stitch of the main panel together. (fig. V)
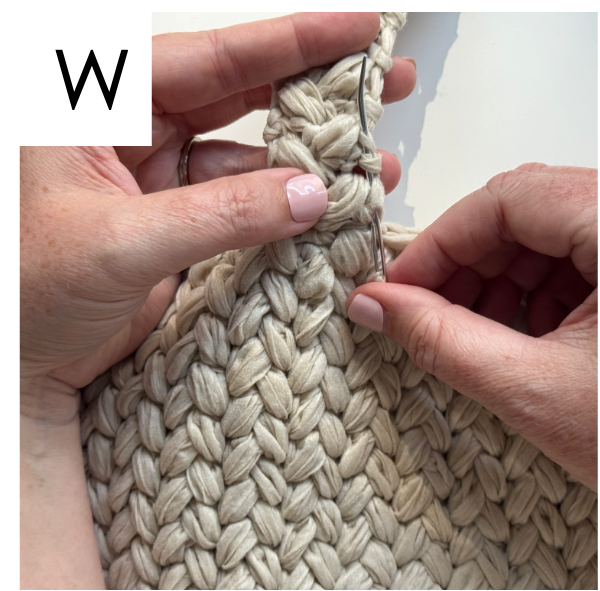
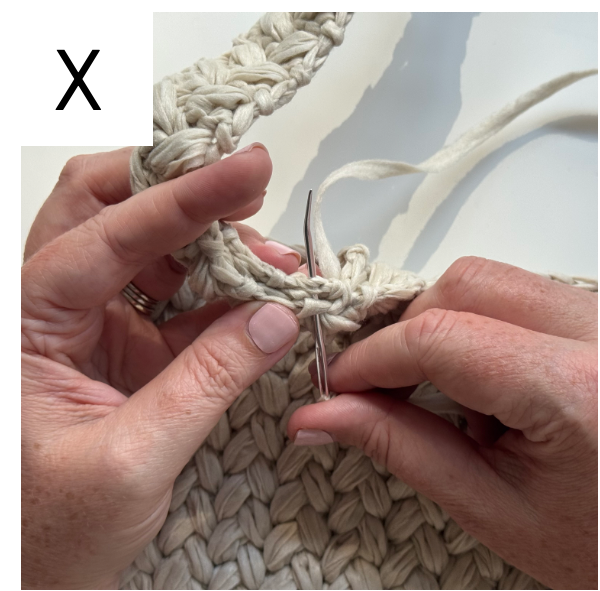
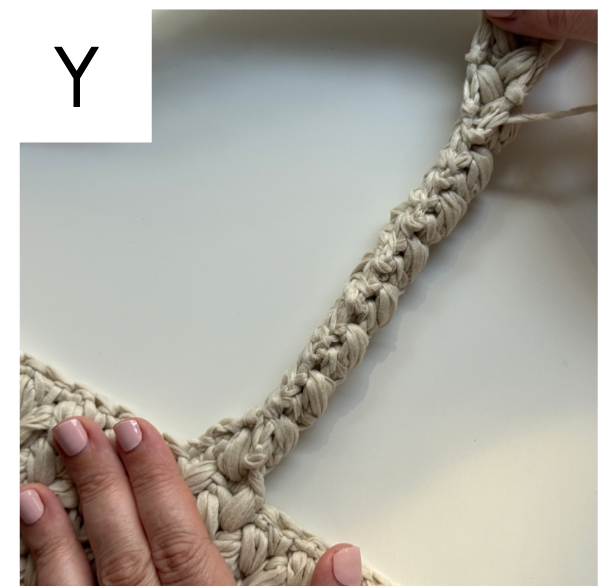
Thread the yarn up the side of the strap about an inch (fig. W). Then fold the strap edges together towards the WS of the panel (fig. X) and whip stitch the edges together all the way around leaving about an inch of strap undone on either end. (fig. Y)
Weave in all ends, except for the long tails left on each panel for seaming.
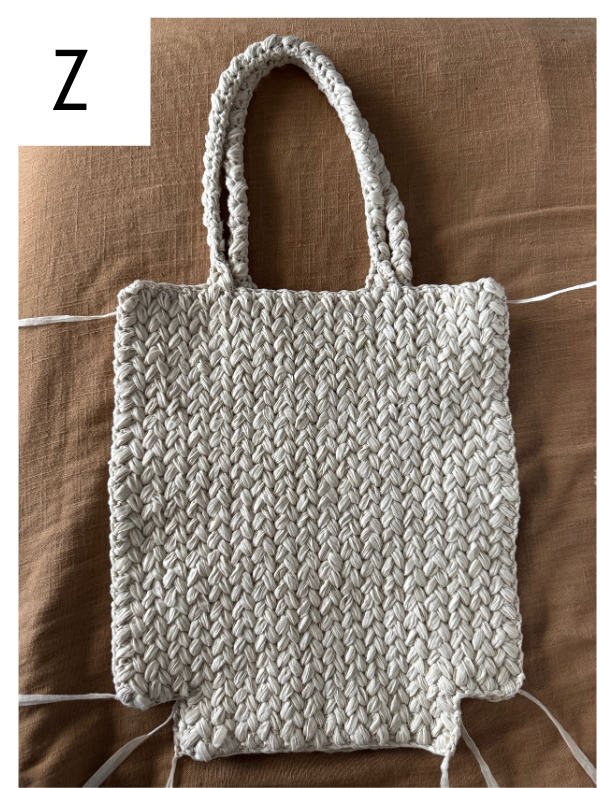
Seaming
Place both panels together with RS facing each other. Then using the whip stitch, seam the sides and the bottom of the bag together. (fig. Z)
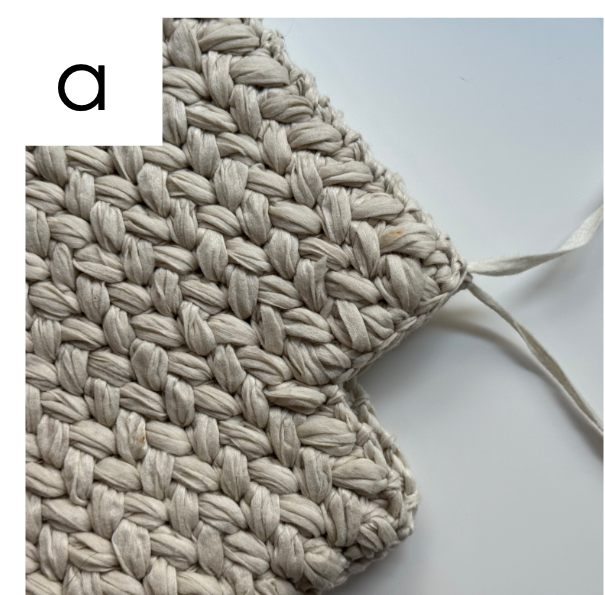
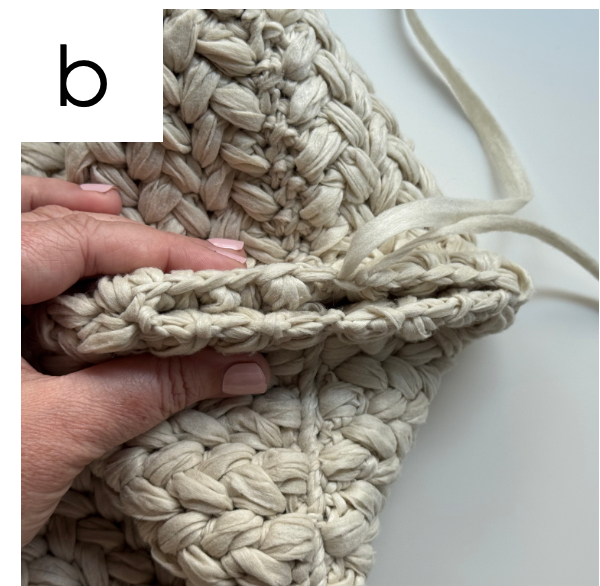
Open up each corner and align the side and bottom seams together. Seam the corners closed. (fig. a-b)
Fasten off and weave in all remaining ends.
Turn bag RS out and enjoy!
If you make a Mini Marlowe I’d love to see it. Make sure to tag me @meghanmakesdo on social media and use #theminimarlowetote so I can share.
As always you can find a digital PDF of this pattern in my shop, Etsy and Ravelry or grab a complete kit from Lion Brand Yarn.
Happy Crocheting,
Meghan