The Freya Cardigan Knitting Pattern - Part 5
The Freya knit cardigan pattern features lacy details, inclusive sizing and lightweight yarn. The long sleeves and button front make it perfect for cool summer nights. Find Part 5 below or grab the PDF pattern in my shop.

Your dream of a lightweight lacy cardigan has come true! I’m beyond thrilled to be bringing you The Freya Cardigan knitting pattern. This design has been rolling around in my head for far too long and I couldn’t wait to get it ready for you. I had been wanting a beautiful open work cardigan with a button front for a long time and knew that I just had to bring it to life. Cardigans are one of my favorite things to create and I had never done one with a button front before. When sitting down to figure out my design for the Freya, I knew it would be the perfect design to add buttons too. It’s lightweight and airy which makes it great for wearing from Spring to Fall. The lace details make this design great for those wanting a bit of a challenge, while also being easy enough to remember for those days you just want to relax and knit.
The Freya is the sister design to The Farren Cardigan crochet pattern. I love when I can translate the same design into knit and crochet. While the Farren and Freya are sisters, they are definitely not twins. The overall lace design is very similar, but each one is clearly unique to its craft.
Due to the lace details in these designs, the patterns are fairly lengthy. So in order to make it easier to follow I’ll be breaking The Freya down into separate blog posts for each section. I will also be running a Make Along for both The Freya and Farren starting June 8th and running through July 13th. It’s a great way to complete a project in a timely manner, plus enter to win some fabulous prizes.
The Make Along will be available for Free here on the blog, but you also have the options of purchasing the PDF pattern now in my shop or grabbing the complete kit from Lion Brand Yarn which includes all the yarn you’ll need in the color of your choice as well as a digital copy of the pattern. It’s the perfect option for those who want to get a little head start.

I’m thrilled to be bringing you the Farren and Freya Cardigan Make Along this summer. I’ve already purchased more yarn and I’ll be making another Freya Cardigan right along with you. Comment below if you’ll be joining in and then make sure to share your progress along the way over on Instagram and TikTok using #freyaandfarrenmal in order to enter to win some of the amazing prizes.
The Freya Cardigan Knitting Pattern
Materials:
1060-1942 yards of Lion Brand 100% Superwash Merino (shown in Marmalade)
24”-30” circular knitting needles US size 6 (4.00mm)
7/8” buttons (5 for sizes XS-XL, 6 for sizes 2X-5X)
Tapestry needle
Scissors
Tape measure
Locking stitch markers
Gauge:
21 sts and 33 rows in stockinette = 4” square
Abbreviations:
CO- cast on
BO- bind off
st(s)- stitch(es)
yo- yarn over
K- knit
P- purl
K2tog- knit two together
Ssk- slip slip knit
S2k1psso- slip 2 knit 1 pass slipped stitches over
M1L- make one left
M1R- make one right
K2tbl- knit 2 together through the back loop
k1fb- knit one front and back
sl1wyif- slip one with yarn in front
sl1wyib- slip one with yarn in back
RS- right side
WS- wrong side
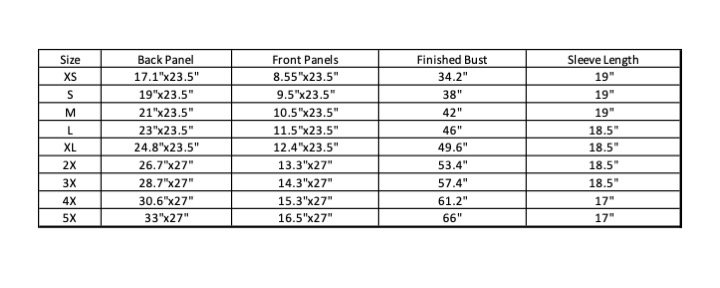
Size:
XS: fits bust 28-30” (approx. 1060 yards) 4 skeins
S: fits bust 32-34” (approx. 1155 yards) 4 skeins
M: fits bust 36-38” (approx. 1237 yards) 5 skeins
L: fits bust 40-42” (approx. 1344 yards) 5 skeins
XL: fits bust 44-46” (approx. 1398 yards) 5 skeins
2X: fits bust 48-50” (approx. 1668 yards) 6 skeins
3X: fits bust 52-54” (approx. 1746 yards) 6 skeins
4X: fits bust 56-58” (approx. 1872 yards) 7 skeins
5X: fits bust 60-62” (approx. 1942 yards) 7 skeins
Notes:
1.Pattern is worked in five pieces (back panel, two front panels and two sleeves) worked bottom up and then seamed together. The front and back panels are seamed at the shoulders and then sleeves are sewn in place. Underarms and sides are then seamed to complete the cardigan. The button placard is the added directly to the front edges of the cardigan using an applied double knit.
2. Pattern is made with 5-7” of positive ease.
3. Model is wearing a size 2X and is 5’9”
4.Pattern is worked using circular needles, but knitted flat.

Seaming:
Lay Back Panel and two Front Panels together at the shoulders with RS facing each other. Using your preferred seaming method attach front panels to back panel.


Attach the sleeves to the sides of the cardigan, using your preferred seaming method, making sure to align the center of the sleeve with the shoulder seam. Make sure the sleeves are attached evenly from the center shoulder seam, down the sides. Using stitch markers to hold the sleeve in place is recommended.
Fold cardigan so that the back and front panels are on top of each other. Then seam the sleeves from the underarm to the cuff. Seam the sides from the underarm down to the bottom.


Video Tutorial for Button Band:
I’ve made a video that you can follow along with while making the button band on your Freya. It can be a bit tricky when you first get started, but once you figure out the simple repeats it’s a breeze!
Button Band:
Using at least 30” circular 4mm needles, pick up stitches all the way around the the front edge of the cardigan starting at the bottom right side with the RS facing you. Pick up stitches in every row of the ribbing. Pick up stitches evenly along the front edges skipping every 5th row and pick up stitches evenly around the back neckline, making sure to have the same number of stitches picked up on the left and right sides. Approx. (327(327, 327, 327, 327, 379, 379, 379, 379)
Using locking stitch markers, mark where the button holes will be along the right edge of the cardigan. Each button hole will be 3 sts tall.
XS(S, M, L, XL)-ONLY
Place a stitch marker on the cord after the 7th, 10th, 26th, 29th, 45th, 48th, 64th, 67th, 83rd and 86th sts.
2X(3X, 4X, 5X)-ONLY
Place a stitch marker on the cord after the 7th, 10th, 26th, 29th, 45th, 48th, 64th, 67th, 83rd, 86th, 102nd, and 105th sts.
Starting at the bottom right side of the cardigan and with the WS facing you, co 13 sts using the Italian cast on method. This will be the starting stitches of the double knit button band.
Row 1: *k1, sl1wyif, repeat from * until 1 st remains, k last st and 1st picked up st on cardigan together tbl, turn. (13)
Row 2: *sl1wyif, k1, repeat from * until 1 st remains, sl1wyif, turn. (13)
Row 3: *k1, sl1wyif, repeat from * until one st remains, k last st and next picked up st on cardigan together tbl, turn. (13)
Repeat Rows 2 & 3 until you have reached the 1st st marker. Remove marker and work another Row 2 repeat.
Button Hole:
You will now be creating a button hole by working just the sts on the right side and then just the stitches on the left side.
Right Side:
Row 1: *k1, sl1wyif, repeat from * 3 times, k1, turn. (7)
Row 2: *sl1wyif, k1, repeat from * until 1 st remains, sl1wyif, turn. (7)
Row 3: *k1, sl1wyif, repeat from * 3 times, k1, turn. (7)
Row 4: *sl1wyif, k1, repeat from * until 1 st remains, sl1wyif, turn. (7)
Row 5: *k1, sl1wyif, repeat from * 3 times, k1, turn. (7)
Cut yarn, leaving a tail for seaming.
Left Side:
With new yarn and RS facing you, start the 1st row of the left side of the button hole.
Row 1: sl1wyif, *k1, sl1wyif, repeat from * until 1 st remains, k last st and next picked up st on cardigan together tbl, turn. (6)
Row 2: *sl1wyif, k1, repeat from *, turn. (6)
Row 3: sl1wyif, *k1, sl1wyif, repeat from * until 1 st remains, k last st and next picked up st on cardigan together tbl, turn. (6)
Row 4: *sl1wyif, k1, repeat from *, turn. (6)
Row 5: sl1wyif, *k1, sl1wyif, repeat from * until 1 st remains, k last st and next picked up st on cardigan together tbl, turn. (6)
Remove next st marker and then work a Button Band Row 2 repeat across all 13 sts to rejoin.
Continue to repeat Rows 2 and 3 up the right side of the cardigan, repeating the instructions for above for each button hole. Once all button holes have been created, continue with repeats of Rows 2 and 3 until you have reached the bottom left hand side of the cardigan making sure to end on a Row 2 repeat. Finish with a tubular BO.
Sew buttons to left side of button band in line with each button hole. To get buttons lined up correctly it can be helpful to pin the right side of band on top of the left and then place stitch markers or pins on the left side of the band where the center of the button hole is.
Weave in all ends and block.

Congrats on finishing your Freya Cardigan. I hope you love it! Don’t forget to share your finished Freya photos on social media and make sure to tag me @meghanmakesdo and use #freyaandfarrenmal
Our last giveaway is a chance to win one of two $50 gift cards to Lion Brand Yarn! All you have to do to enter is share a photo of your Farren or Freya on Instagram. I’ll be picking winners July 20th. Good luck!